Irrespective of the type of website you have, forms are very important. They are an efficient and simple method of building an email subscriber list, enabling customers to contact you, and collecting feedback from users.
When it comes to creating forms on your site, the first thing is to choose the form builder plugin. In this post, we will look at the best tips on how to use one of the top form builder plugins for WordPress, Gravity Forms.
Overview of Gravity Forms
With dozens of options available on the marketing, you must first establish what you need your forms to do for you before making a choice. Gravity Forms plugin is one of the top choices you can find in the market. It is a third-party, easy-to-use form field with a huge library.
It is also compatible with third-party add-ons and in itself, it has numerous features to help you develop custom forms for just any purpose. Creating forms in WordPress is often a tasking project, especially if you want to start from scratch and create a customized form.
However, when you choose pre-built forms plugins, you can cut the task by more than half. Gravity Forms come with a host of pre-built features and fields and all you have to do most times is to drag and drop to create your forms.
If you want to create and customize your form, this plugin makes it easier and easy. With this, you can build a form that meets your need and offers a great user experience for your site visitors.
What are the Best Tips and Ways to use the Gravity Forms Plugin?
You can do a lot with the Gravity Forms plugin. Beyond simply collecting contact details of your site visitors, you can glean more insights from the magnitude of data you can gather from using this form plugin. In this section, we will look at the best ways to maximize your use of the Gravity Forms to get the best out of it. Let us get right into the details!
• Use Conditional Logic to Build Advanced Contact Forms
Gravity Forms plugin allows you to create a standard contact form with fields such as the name, message, and email address. In addition, it also comes with other advanced pre-built fields that let you request more information from your customers.
You will also find features in the basic version that lets you create a dynamic form. One of such features is the Conditional Logic feature. You can use this to set customized parameters that ensure specific fields and details are displayed when certain prerequisites have been fulfilled.
For instance, you may request that users provide their preferred contact method and then display different fields according to their selection. So, if they choose a phone number, for example, you can have a primary phone number and alternative phone number.

With this, you can collect more information and streamline the form to include relevant fields for each user. With the Conditional Logic feature, you can hide or show fields, confirmations, notifications, and feeds, among others.
• Add Coupons to Order Forms
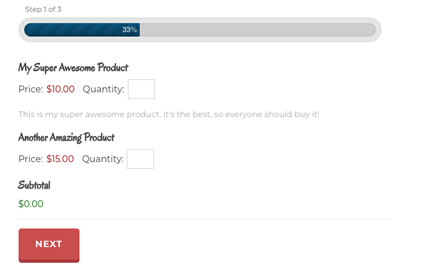
You can also use the Gravity Forms plugin to get order details from your customers. The pre-built fields for order forms include Product, Shipping, Quantity, Total, and any other information you want to collect.

You can easily generate order forms with a few clicks and include coupons add-on in the order form. With this, you can offer your customers discounts on their orders. This tool offers you absolute control over the usage limits of coupons, which means that you do not have to worry about over-discounting your customers.
• Build Mailing List with Basic Subscription Forms
Gravity Forms also works great for building your mailing list. It allows you to include fields to gather insights into the type of information that your subscribers would be most interested in getting through emails. This guarantees that you only send relevant content to users per time. Additionally, you can ask them about how often they would like to get emails from you.

This information is important as it prevents you from pestering and bombarding your users with emails, which will make them unsubscribe from your mailing list. Gravity Forms also comes with a pre-built option that allows users to enable email confirmation with a CAPTCHA feature that is ready to use.
• Grow Membership through User Registrations
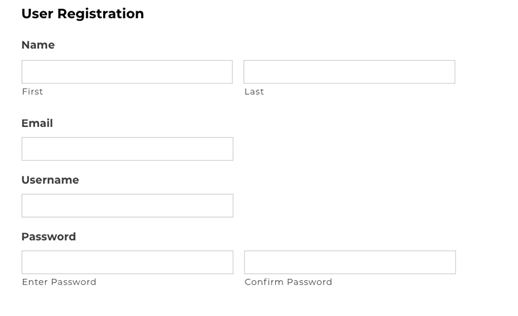
The form plugin also has a user registration add-on pre-built into it. It comes with username and password fields, which makes adding registration forms to your site very easy and seamless. You may also include the CAPTCHA feature to prevent bot accounts.

To also ensure that users do not enter fake registration, you can use an email confirmation email. If your registration option will have payment integrated, Gravity Forms makes it easy with unique add-ons that integrate PayPal to your site easily.
• Collect Feedback through Surveys
If you are interested in getting feedback from your users about their experience while using your site, then Gravity Forms is a good choice for your contact forms. You can use a survey add-on to request information and insights from your audience and customers. You can ask about their experience while using your site or after using your service.

The survey add-on can show response options in different ways, such as checkboxes, ratings, rankings, or drop-down menus, among others. You can then select the display option that best makes sense for the questions. After response submissions, you can go ahead to filter and aggregate the responses to understand the results and take necessary actions.
Conclusion
These are the five best tips that will help you optimize your use of the Gravity Forms plugin. As mentioned earlier, the form plugin is more than just collecting basic information. You can do much more with it to build your client insights and profile.
The more you use the tool, the more you develop some fantastic features. If you are not convinced about going for the premium version, you can start with the free version to create your forms. You are sure going to love it and will likely upgrade to the premium version.
How do I keep Gravity Forms displayed after submission?
This requires that you enable the "automatic reload" option. To do this, go to “Form Settings” and scroll to the down part of the page. Next, check the “Automatically reload the form” box and the specific duration until reload. Next, click on the “Save Settings” to confirm the changes.
How can I create forms for user-submitted posts?
First, install the Gravity Forms plugin to your site if you are yet to install it. Second, install the Advanced Post Creation Add-on. Next, create a new form and add fields to the form. Create a feed for your Advanced Post Creation Add-on and then add the form to your desired page.
Does the Gravity Forms plugin work with only WordPress?
Gravity Forms plugin is designed for WordPress but it can integrate with other services and advanced features, such as PayPal, HubSpot, Authorize.Net, Mailchimp, Stripe, DropBOX, Zapier, and Campaign Monitor, among others.
How do I embed a payment gateway in my Gravity Form?
Install the Gravity Forms plugin and install the relevant add-on. Next, create a new Gravity Form and build the form fields. Next, create a feed for the form and embed the form on the page you want.

![Best Tips to Use Gravity Forms in WordPress [2021]](https://fixed.net/assets/uploads/images/blog/tips-to-use-gravity-forms.jpg)


