
Contact Form 7 is unarguably one of the most popular plugins in WordPress. It is used for the creation and management of forms. Over five million WordPress site owners have installed this plugin to keep in touch with their site visitors.
One of the unique attributes of Contact Form 7 is its simplicity and it is one of the major reasons why many web owners have stuck to it, even with the introduction of more savvy and more comprehensive contact form plugins. It is easy to set up and customize without any prior experience.
In this post, we will look at the simple steps to follow to install Contact Form 7 on your WordPress website.
Why Use contact form 7
With dozens of contact form plugins for WordPress that are available in the market, why is Contact form 7 popular? Why is it the most preferred by many WordPress website owners? The answer is pretty simple. Contact form 7 is simple to use and very effective.
Apart from its simplicity and impressive functionality, it also has many features that rank it high among its peers. Let us briefly look at some of these features.
• Easy to Customize
No one wants a boring-looking form on their webpage. Everyone wants something attractive and flexible to customize. Contact form 7 offers you the freedom to customize your form just as you like.
• Spam Protection
Spam messages are the bane of website owners. You constantly have to guard your site against spam messages because they can frustrate you if you allow them. With Contact Form 7, you do not have to do so much. The plugin takes care of spam and frees up your webspace.
• Supports CAPTCHA
This ensures that automated messages from bots are kept away from your website. With this plugin, you can have a website that can breathe easily without being loaded with spam messages.
• It is Free
This is one of the biggest features of Contact form 7. It is free to install and use, which makes it an instant choice for many new website owners.
Simple Steps to Install Contact Form 7
Now that we have looked at the unique features of Contact form 7, let us explore the simple steps to install the plugin and get you started with using it already. Follow the steps below to install and activate the Contact Form 7 plugin on your WordPress website:
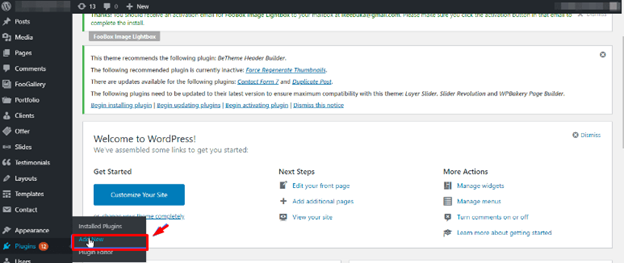
Step one: Install and activate Contact Form 7 on your site. The first thing to do is to install the plugin. Navigate to “Plugins” from your dashboard and click on “Add New”.
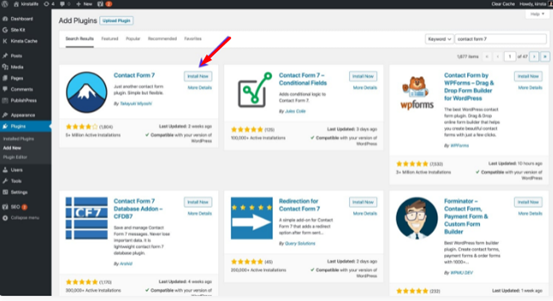
Step Two: Browse through the list to locate “Contact form 7”. You can use the search feature to make it faster. Click on the “Install Now” button to install it when you have found it.
Step Three: After the installation process, a pop-up window will appear. Click on the “Activate” button from the window to activate the plugin. With these two simple steps, your Contact form 7 is activated and ready for your use.
How to Create Your Form
Now that your Contact form 7 has been installed and activated, it is time to create your first form and start connecting with your site visitors. Follow the steps below to create your form:
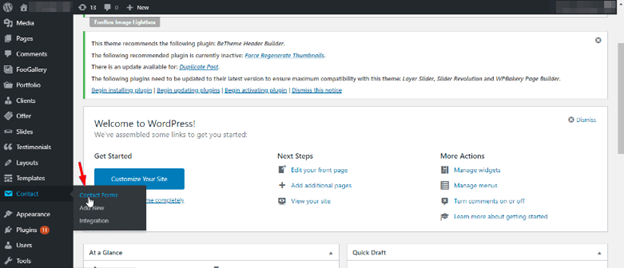
Step 1: Go to “Contact” from your WordPress dashboard and click on “Contact Forms”. You will see a default contact form named “Contact Form 1”. If you are not ready to customize your form, you can use the default option.
It will do the same job as a customized form but the only difference is that it may not look exactly like what you would have loved. To use the generic form, copy the generated shortcode and paste it on the page where you want the form to appear. However, if you want to create a customized form, click on “Add New” from the “Contact” menu.
Step 2: To create your customized form, enter the name/title of the form in the space provided in the title field and click on “Save”.
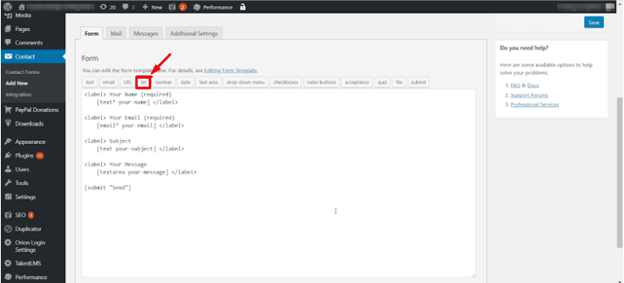
Step 3: Add the relevant HTML for the contact form in the “Form” section. You may use the different preset buttons to generate the shortcodes for general form tags.
Preset form tags that you will find in Contact Form 7 include Email, Text, Number, Tel., URL, Drop-down Menu, Text Area, Date, Radio Buttons, Checkboxes, File, Quiz, Acceptance, and Submit. Let us look at how to insert some of these.
How to Insert Tags
To add a telephone number field, for instance, place your cursor in the location where you want the field to appear. Click on the “Tel.” button.
This will launch a pop-up window and you can customize the field from here. If you want to make the addition a required field, click on the “Required” box.
With this, it means that the visitor must fill the field before they can submit the form. In the “Name” field, create a name for the newly created field. You will use this name to identify the field. If you are an experienced user, you can include styling in the field with CSS codes.
You can set a Class attribute or ID attribute, or just about anything. To do this, refer to the field in your stylesheet with the Class or ID attribute. When you are done, click on the “Insert tag” button.
How to Set Up Your Form
Once you have created your form and added all the fields, the next thing is to make it functional. To do this, follow the steps below:
Step 1: click on the “Mail” tab. You will set where and how the messages from your contact form are sent from this place.
Step 2: Input the email address you want all messages from the contact form to be sent to in the “To” field. Note that the “From” field is the source of the email and that is where you will get the details of the message sender from your WordPress website through the contact form.
To retrieve the email subject, insert the subject tag into the “Subject” field. If you want, you can leave the “Message Body” and “Additional Headers” sections the way they are, or you may add other tags or text if you want. This completes the setting up of your form and it is ready to be used.
You may also want to have your form display a completion message when a user finishes an action on your page. This is recommended if you want a good user experience. For instance, you may want to thank them for contacting you after they have successfully submitted a form.
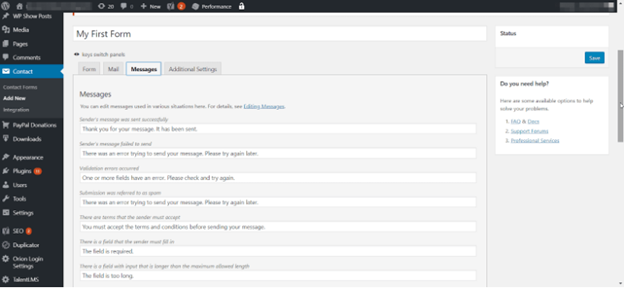
You may also decide to include error messages when a user makes mistakes. All these can be done in the “Messages” section. You will see the default text but you can change them however you want. Once you are done making the changes, click the “Save” button and your form is ready for use.
Conclusion
This post has looked at how you can install Contact Form 7 on your WordPress website and the different essential segments of the forms that are important for you as a beginner. With this, you can begin to receive messages from your website visitors.