With the help of HTTP security headers, you can add additional security to your WP website. They can stop suspicious activity from compromising your website.
Today, we will show you how to add HTTP security headers in WP.
HTTP Security Headers
They are an extra security measure which helps your server in preventing common security threats before they reach your website.
Every time a user goes to your site, your web server sends an HTTP header response to their browser. This advices browsers on cache control, error codes, etc.
In normal cases the header response issues a status callback – HTTP 200. After that your site loads in the user’s browser. If, however, there are issues with your website, then your server might send a different HTTP header.
HTTP security headers are used to prevent sites from threats like cross-site scripting, click-jacking, brute force attacks and much more.
HSTS - HTTP Strict Transport Security
HSTS header advices browsers that your site uses HTTP’s and it shouldn’t be loaded using a protocol like HTTP which is insecure.
If your site was moved from HTTP to HTTPs, then it will allow you to stop browsers from loading site on HTTP.
X-XSS Protection
It allows you to block cross-site scripting from loading on your website.
X-Frame-Options
This type prevents cross-domain iframes or click-jacking.
X-Content-Type-Options
X-Content-Type-Options block content mime-type sniffing.
How to add HTTP Security Headers in WordPress?
HTTP security headers are most useful when set at the web server level. This way you can trigger them during a typical HTTP request, providing more benefit.
When using a DNS-level website app firewall like Cloudflare or Sucuri, HTTP security headers work even better.
How to add HTTP using Sucuri?
Sucuri is the most famous and used security plugin. If you are using Sucuri’s site firewall service too, you can set HTTP security headers without the need of any code.
After signing up for a Sucuri account, install and activate the free plugin. Now, go to Sucuri Security – Firewall (WAF) page and enter the Firewall API key.
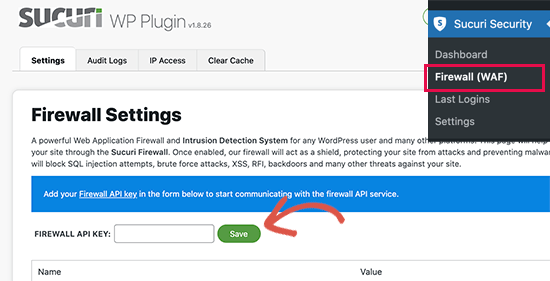
Save your changes. Go to your Sucuri account dashboard, click on Settings and switch to the Security tab.
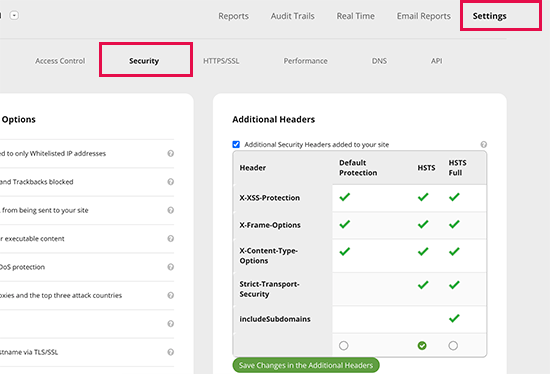
You have 3 sets of rules to choose from. HSTS is the default protection and then you have HSTS Full.
To apply all changes, click on Save changes in the additional headers.
Adding HTTP using Cloudlfare
With Cloudflare you get a CDN service and a basic free website firewall. It does not have advanced security features included in the free plan, which means you need to upgrade the plan.
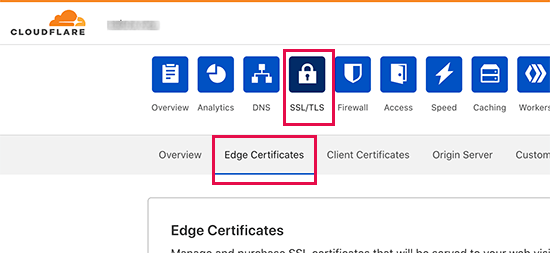
Once you activate Cloudflare, go to the SSL/TLS page from the Cloudflare account dashboard, and switch to the Edge Certificates tab.
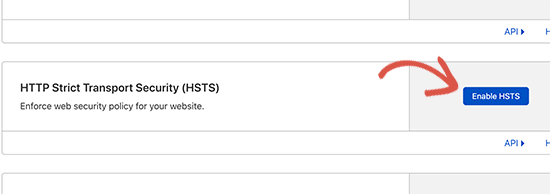
Next, go to the HTTP Strict Transport Security tab and click on Enable HSTS.
You will now see a popup with instructions. Click on the Next button to see how to add HTTP security headers.
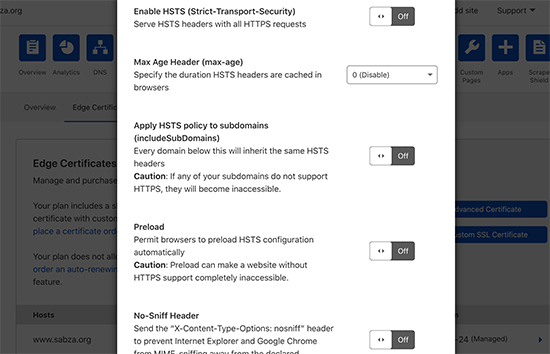
Now, enable HSTS, no-sniff header, apply HSTS to subdomains, and preload HSTS. Note, that even though you get basic security with this method, it does not let you add X-Frame Options, also Cloudflare does not have a user interface to do it.
Adding HTTP using .htaccess
With this method you can set the HTTP security headers in WP at the server level.
In this case you need to edit the .htaccess file on your site. Connect to the website using an FTP client or the file manager app in the hosting control panel. Locate the .htaccess file in the root folder of your site and edit it.
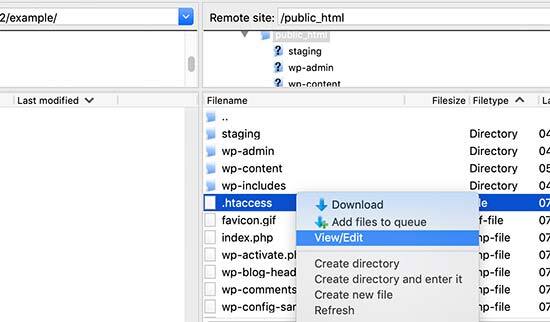
The file will be opened in a plain text editor. Add the code at the bottom of the file so that you can add HTTPS security headers to your site.
Simply add the following sample code:
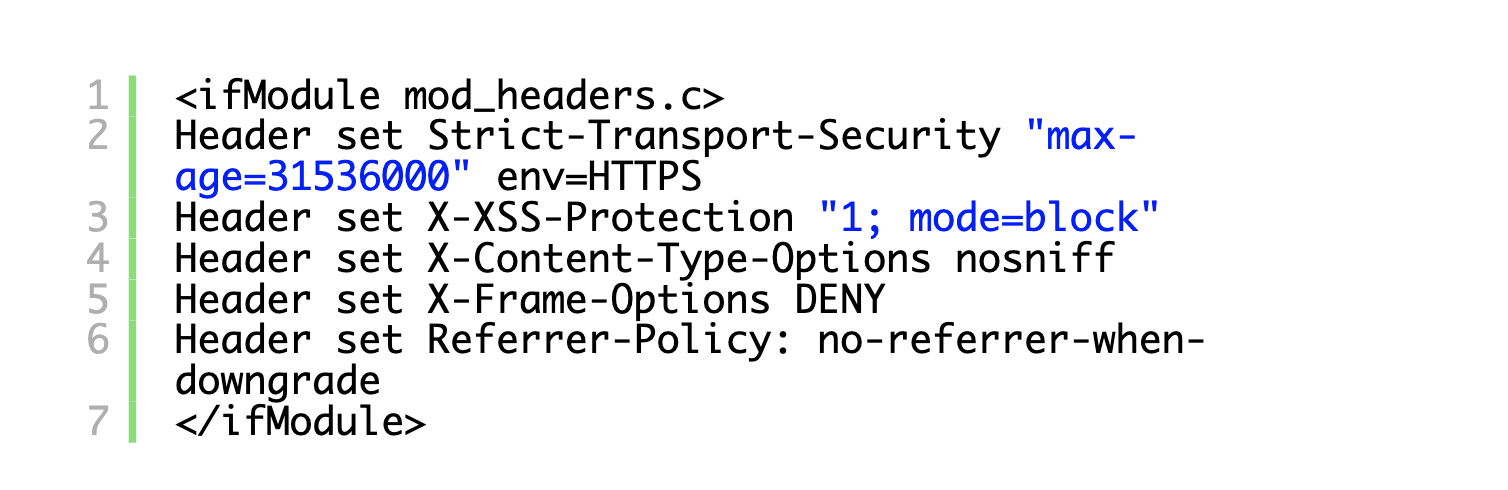
Note: Wrong conflicts or headers in the .htaccess file can trigger 500 internal server error on most webhosts.
Adding HTTP using a plugin
Although it’s the most effective way, it’s also the easiest one to use in order to add HTTP security headers to your website.
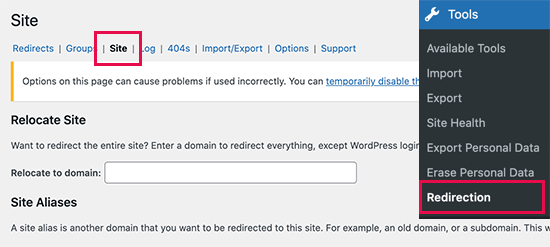
Install and activate the Redirection plugin. You will see the setup wizard. Simply follow the guidelines. Now, go to Tools – Redirection and click on the Site tab.
Go to the bottom of the page and click on Add Header. You will see a drop-down menu, select Add Security Presets.
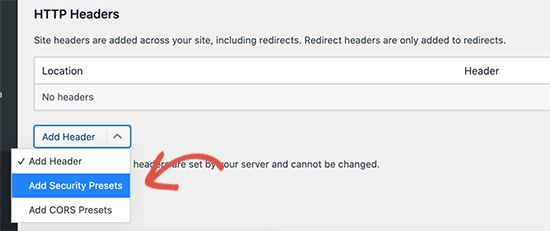
A preset list will open up of HTTP security headers.
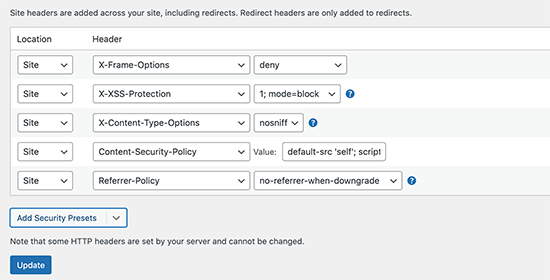
You can make changes if needed. Once you are finished, Update the changes.
Test the HTTP Security Headers
Now that the HTTP Security headers have been added to your site, you can test the configuration using the Security Headers tool. Enter the link to your website and click on Scan.
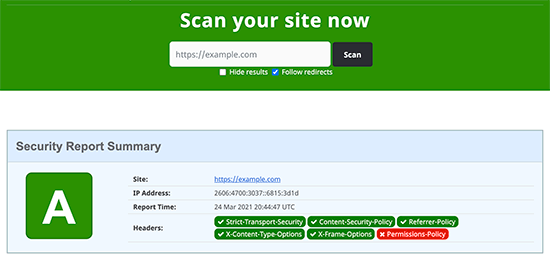
You will now see a detailed report. The tool will show your grade label and which HTTP security headers are sent by your site and which are not included.
We hope today’s article was useful in helping you learn how to add HTTP security headers to your WordPress website.