Adding or editing pages on WordPress is easy. This post shows you how to create and edit pages on WordPress. Relax, all you need are a few clicks and you are done. Let’s get started.
Step-by-step Guide to Create a Page in WordPress
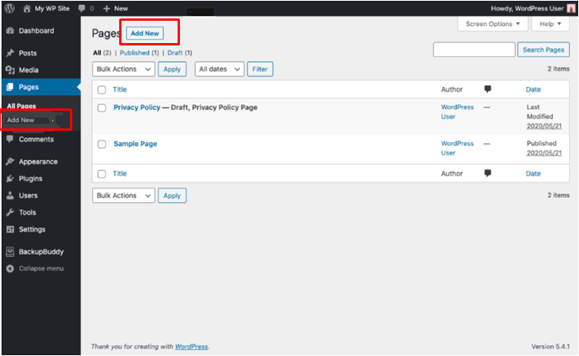
Step 1: Add a New Page
• Locate the Pages menu from your WordPress Dashboard menu and click the “Add New” button.
• A popup window with the WordPress Block Editor will come up. You will see different blocks representing each paragraph, video, or image. Each block has its set of controls to change things like alignment, width, and color.
When you select a block, the set of controls will show up for your use. The popup window will take you through all you can expect in the WordPress Block Editor.
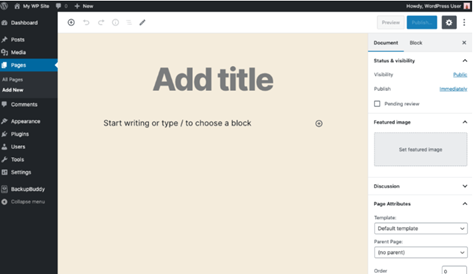
Step 2: Add Page Title
• Your new page is ready to be customized. To get started, you have to add the title of the page. Your page title should be descriptive enough to provide the information contained on the page.
Step 3: Choose a Block or Write the Content from Scratch
• When you are done adding the title, the next step is to add your content. This can be anything you want, from headings, lists, tables, to images, videos, text, and more. To view the block for your page, simply click the plus sign (+) at the top of the page.
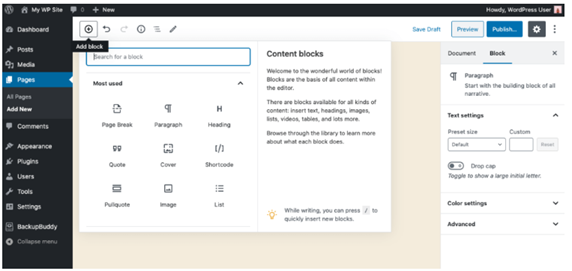
• The Blocks are the foundation of content in the WordPress page editor. The different types that are available for you to use include Paragraph, Image, Headings, List, Gallery, Quote, Cover, File, Audio, and Video. Each can be used to add elements to your page.
Step 4: Use the Document Settings
• Next, customize your page using Document settings. This feature is located on the right-hand side of the WordPress page editor. Here, you can use the Status and Visibility feature, which has information on how your page can be viewed.
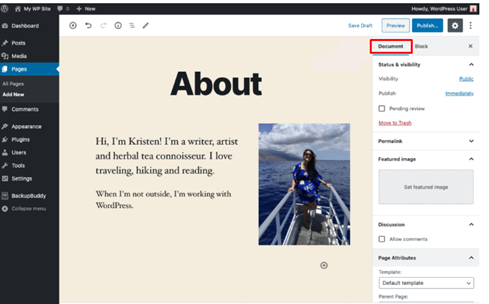
You can choose from three options in the Visibility section. These options include Public (your site is visible to everyone), Private (visible to only editors and site admins), and Password Protected (visible to only users with a unique password.
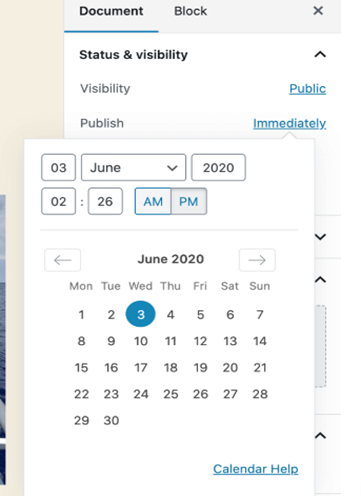
Step 5: Schedule when to Publish your WordPress Page
• You can set the Publish settings based on when you want your page to be published. You can choose “Immediately” or specify a future date.
What You Can Add to Your New Page
• Choose a Featured Image
Your theme will determine how you use the featured image on your page. You can use a gallery-style listing for your home page, for instance. Simply upload an image that explains your new page in the featured image section.
Suffice to mention that featured images can also be used for social media pages like Instagram and Facebook as the preview image of your page if you want to share a link to the page on such platforms.
• Add Discussion Comment
If you want to enable comments on your newly created page, you can enable it under the Discussion menu. If not, you should turn off the setting for this.
• Permalink
This field allows you to customize the last part of your new page’s URL. It is a great idea to select a slug that compliments the title of your page instead of using strings of characters or numbers. It is recommended that you choose good permalinks from your WordPress settings.
• Page Attributes
This section applies the parent page and template to the newly created page. You can order the pages in your Parent section into page hierarchies. For instance, you can place the new page as a subsidiary under an existing page or use it as a parent page and add other pages underneath it.
You can use the Template section to apply a template of choice to your new page. The Order box lets you arrange your page numerically for easy access.
Step 6: Preview or Save your Page as a Draft
Now that you are done with creating the page, preview or save it as a draft. Click the Preview button to preview. This lets you see your new page in your browser so you can see how it will look when it is published.

Step 7: Publish your New WordPress Page
This is the final step in creating a new page. When you are done with adding content, proofreading your page, and sizing the images, the next step is to publish. Simply click the “Publish” button and your new page will go live. You will get a confirmation that the page is live with the page address. You can save the URL to your new page by copying the link.
How to Edit a WordPress Site
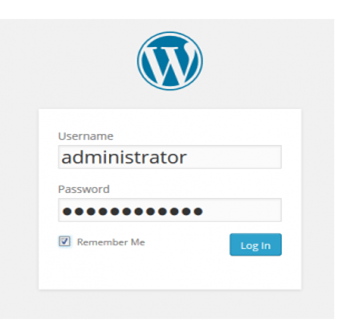
Now that we’ve looked at how to create a new WordPress page, let us check out the steps to edit an existing page. Step 1: Log in to your WordPress Admin Area and fill out your username and password.
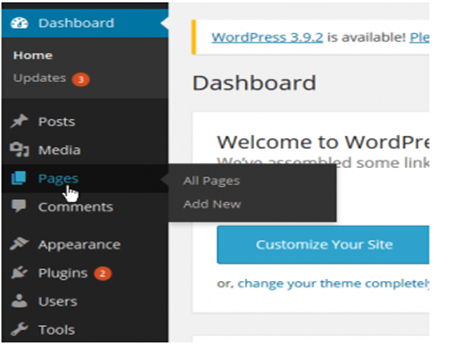
Step 2: From the admin dashboard, click the “Pages” menu to reveal the list of pages existing on your site.
Step 3: Hover your mouse over the Page Title in the list of pages to reveal the editing links. From here, click on “Edit: to modify your page content. It should be noted that WordPress has two methods of editing WordPress content – Visual and Text.
• Visual Mode Tab: this is the way your published content will display. It includes formatting buttons for bold and italic, among others.
• Text View Tab: this shows the HTML code that controls media resources, styles, and layout. It is an advanced editing mode that can be confusing if you are not conversant with HTML.
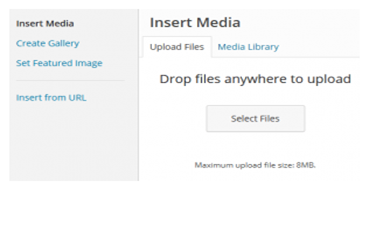
Step 4: Add Image or Media. If you want to add an image to the edited content, click on “Add Media” at the top of the formatting controls to reveal the “Insert Media” dialogue box. Click “Select Files” to open a file browser dialogue from your computer. You can also drag and drop multiple files from your computer at the same time.
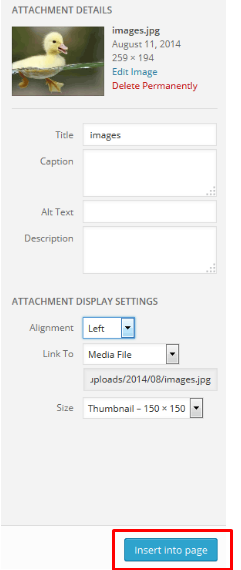
Step 5: Use the Image Settings to set caption, alt text, and description. It is not compulsory to fill out these fields as they are optional. You can also adjust the “Attachment Display Settings” fields to make the image fit well into your page. When you are done, click “Insert into Page”.
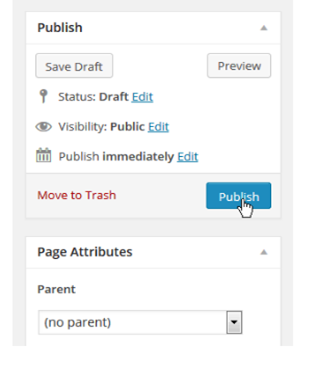
Step 6: Save the changes you have made. Next, click the “Publish” button to make the edits go live on your website.
Conclusion
There you have a step-by-step guide on how to create and edit a page on a WordPress website. You can be creative with your website and the great part is that you can edit your pages as often as you want or add more pages whenever you want.
What is the difference between posts and pages in WordPress?
Posts are timely content that is often updated while pages are used mainly for static content. A website can have a combination of posts and pages.
How many pages can my WordPress website have?
There is no limit to the volume of pages that a WordPress site can handle. Some sites have over 40,000 pages. So, have as many as you want.