Introduction
The present time is constantly changing and has made us adapt to a faster pace of living. We need information at the touch of our fingertips; we need to know what is going on around us.
Recent studies have shown that approximately 49% of marketers dedicate their time to repetitive tasks like emailing, monitoring social media, and creating reports.
This is why we need automation. It allows us to keep up with the ever-changing world and helps businesses feel more connected to their clients.
To learn more about improving your WooCommerce store's results through automation, I recommend that you read this post to the end.
Uncanny Automator – In brief
The Uncanny Automator is a plugin for WordPress users to make automation easy. With this tool, users can easier manage their websites since they can easily add tasks they need to do. For instance, the plugin allows users to schedule when posts from various blogs are displayed on Twitter and Facebook.
The Uncanny Automator has different settings to adjust for the majority of users. The plugin comes with various pre-installed actions and filters for better and more accurate performance.
If you want to increase the number of actions and filters that come with this plugin, you can use the ReQueue post action. If you have a Twitter account for your blog, this action will enable automatic re-posts.
In addition to the pre-installed actions, users can add their custom actions for this plugin. If you have a task that requires two or more steps to complete, this is where you can make it happen using the Uncanny Automator.
How does it work?
The Uncanny Automator is an advanced infinite loop machine. It allows for creating recipes that use other recipes to create something new while constantly checking if a condition is met.
When the recipe is enabled, it will look for a condition to be met before processing an action. If the condition is met, it will process an action. If the condition is not met, it will wait until the next cycle to check if it's now true.
Some of the terminologies you may encounter while configuring this plugin include:
Condition: This section is where you can name what the Uncanny Automator should be looking for before processing an action.
Action: This allows you to list what the Uncanny Automator should do if it does find a condition to be met.
Triggers: These conditions can activate this recipe and send it through a particular loop.
You can have several triggers for one action. When the last trigger is used, the action will activate. Also, you can have an entire list of triggers for an action to fire off. Upon hitting the 'apply' button, the first trigger will activate and run the action, regardless of whether or not you used any other triggers.
There are several ways to do the same thing regarding actions. For instance, by choosing an action such as "Use Item on Target", you will need to pick a specific item from your hero inventory. It will then check for that item in the target's (the person you used the action on) inventory. If it does not find an item (or if there are no items at all in their inventory), then nothing will happen.
However, if it finds the item you searched for in their inventory, then the program will use that specific item on them.
Now, let's see how you can automate workflows in your WooCommerce store with the Uncanny Automator.
How to Automate Workflows in WooCommerce Using Uncanny Automator
1. Install Uncanny Automator
To start with, you'll need to install the free version or premium version of the Uncanny Automator extension. Head over to your WordPress dashboard click Plugins > Add New. In the keyword search box, enter 'Uncanny Automator'. Click the 'Install Now' button, then activate the plugin.
Additionally, you can access more of the plugin's features, such as third-party integrations, by creating an Uncanny Automator account by visiting their website.
Next, go to Automator > License Activation and enter your license key (this information is available on the Uncanny Automator website under your account). At this point, you'll have activated your license, and you're now ready to start creating automated workflows in your WooCommerce store (they are referred to as recipes in Uncanny Automator).
2. Create a new recipe
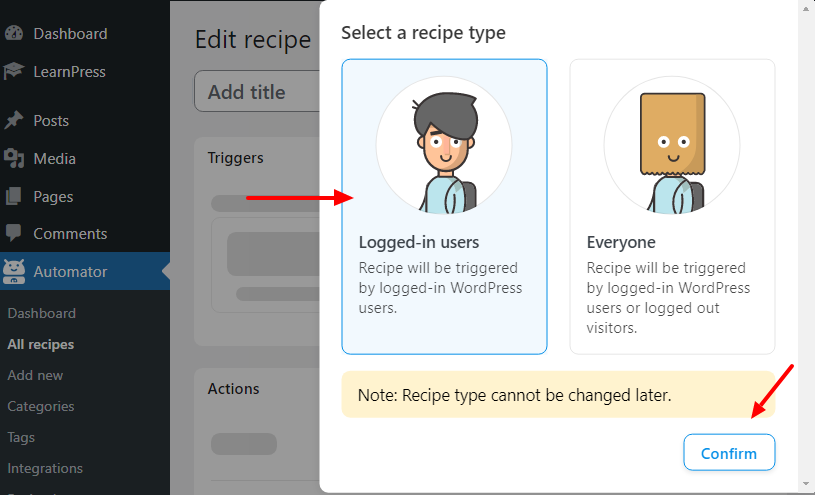
To create your first recipe, go to Automator > Add New. Here, you'll need to choose the type of recipe you want to create. You can either create a Logged-in recipe or an everyone recipe.
Logged-in recipes can be triggered by logged-in users only, while logged-in WordPress users and other visitors can trigger an anonymous/everyone recipe.
We'll use the logged-in option as our recipe type for this case.
3. Configure your triggers
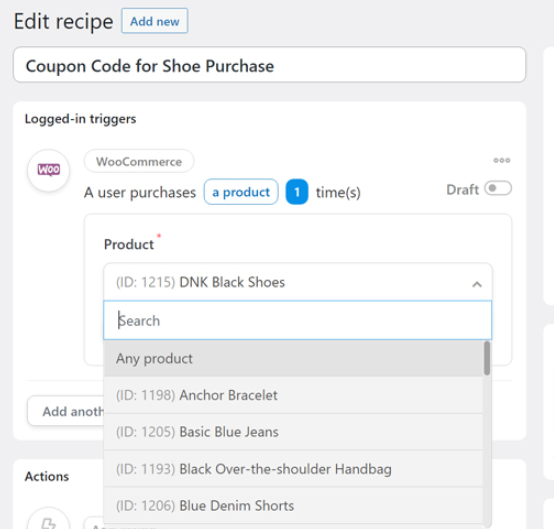
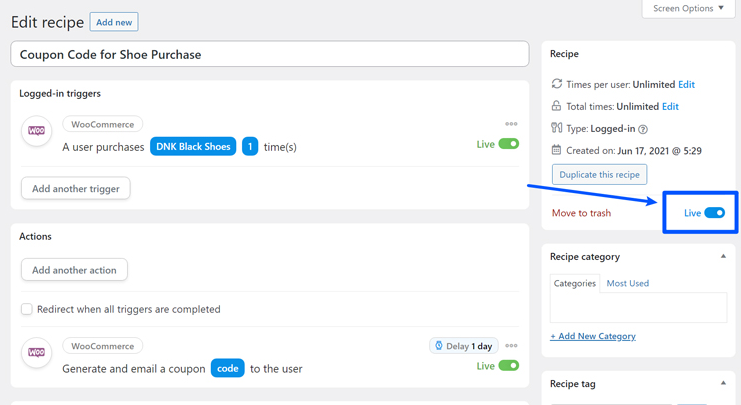
At this point, you need to add triggers. A trigger is a condition that can activate a recipe. But first, you need to pick an integration that will enable you to activate the trigger. Select WooCommerce as your integration. A list of triggers supported by WooCommerce will appear. To proceed, select 'A user purchases a product' as your trigger.

Next, pick the product you want to trigger and add the number of times a shopper can purchase the product. Alternatively, you may select the 'Any product' option that triggers the action anytime a customer wants to make a purchase.
4. Set an action
Now, it's time to set up the action you want to automate once your trigger happens. You will again pick WooCommerce as your integration.
As for the action, you can pick WooCommerce to send a coupon code to a customer once they purchase a product. Configure the coupon code's settings for a static coupon code or an auto-generated coupon.
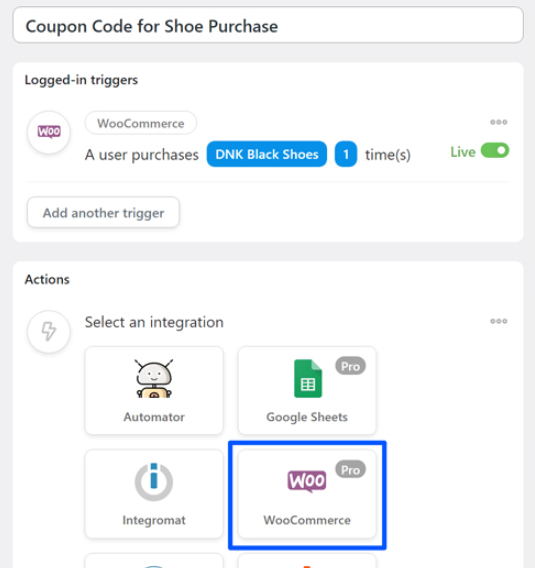
Other actions you could set include setting up a discount, adding expiration dates, sending customized emails to shoppers, setting restrictions, usage limits, or even daily spend amounts.
5. Activate your recipe
Once you're satisfied with your WooCommerce automation set-up, toggle the 'Live' button to activate your task.
Conclusion
Uncanny Automator is a suitable option for automating tasks across WordPress sites. Using this plugin, you can schedule posts, send emails, check RSS feeds for new content and much more. These tasks can help you boost your marketing and increase conversions.
In addition, you can create custom triggers that will fire whenever your pre-defined condition is met. For example, when the product price crosses over a certain threshold.
The plugin is compatible with major eCommerce plugins, including WooCommerce, Easy Digital Downloads and WP e-Commerce.
Using this plugin lets you rest assured more time for running your business and less time worrying about day-to-day tasks.
So, after reading this post, would you consider using Uncanny Automator to automate your tasks on WooCommerce?
Share your thoughts in the comments section below.
See you soon!
How does Uncanny Automator work?
You install the plugin on your website. Import the plugin's actions, triggers, conditions and filters. You can then add these actions to any workflow you create.
What happens if I delete a trigger or action?
Uncanny Automator creates a backup of your site's wp-content/plugins directory. If you delete an action or trigger via the plugin, go to the plugin's directory and copy the action or trigger from the backup folder. You'll then be able to import that into Uncanny Automator again.
What happens when a plugin associated with a recipe is removed?
Uncanny Automator will show an error if it can't find a plugin. You may need to re-import the recipe(s) that use the plugin.
I'm getting Uncanny Automator errors in my site's logs. What should I do?
Copy the message and create a new thread on WordPress.org for support or visit the Uncanny Automator profile for support on automatic workflows for WooCommerce.
Does the Uncanny Automator comply with GDPR?
Yes. All actions are on individual pages, so you can see exactly what information is being accessed and permission the site's users to do so.


