In some cases, you may wish to show customized content from certain locations, dates or other conditions. This option is not available in WordPress, however, there is some type of drag-and-drop tools which you can use.
Today, we will show you how to show users personalized content with content personalization, dynamic text replacement, and more.
Why do you need personalized content?
Normally, upon publishing content on your website, it’s available to everyone. But what if you wish to show different versions of this content to specific users?
For example, you might want to offer free shipping for customers from a specified location, or a different landing page.
One of the methods for doing this is by creating a membership site with restricted access to the content depending on the user.
However, not all site admins would like to require the use of login in order to offer personalization.
This is where certain tools can help.
You can use dynamic text replacement for some of your landing pages, smart conditions to add content personalization in your blogs, or product personalization for your e-commerce store.
Some of these conditions can include certain user interactions, their time zone, location, pages which they have visited, traffic source, etc.
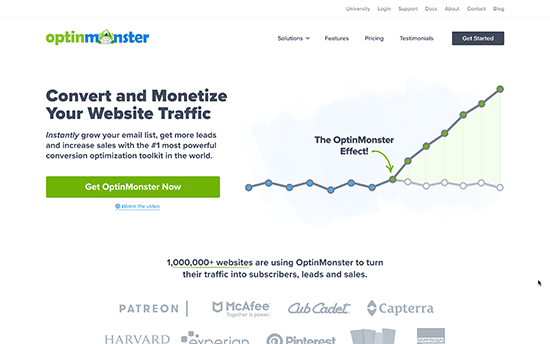
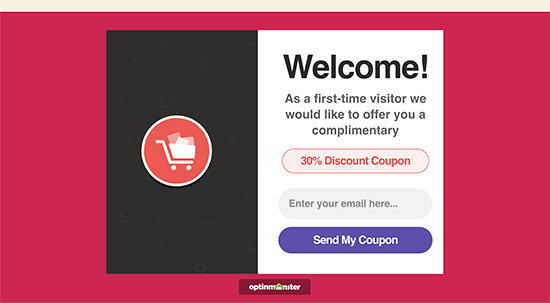
Personalizing content with OptinMonster
The OptinMonster plugin is one of the best optimization tools on the market. It comes by default with a number of powerful targeting tools which can help you show personalize campaigns to different users based on previously set up display rules.
This method is appropriate for all users as they provide you with the ability to design your own content and it also comes with some more powerful targeting tools. It works without any issues with your existing integrations and third-party apps.
The first thing you need to do is create an OptinMonster account and sign up. In order to access all targeting features, you would need to upgrade to a Pro or Growth plan.
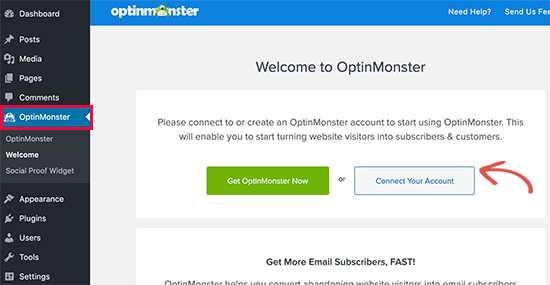
Now, you have to installed the plugin on your website. After activating it, you will need to click on the OptinMonster menu in the WordPress dashboard.
Next, click on the Connect your account button in order to connect your website with your OptinMonster account.
This will lead to the OptinMonster website where you would need to choose the campaign template and type.
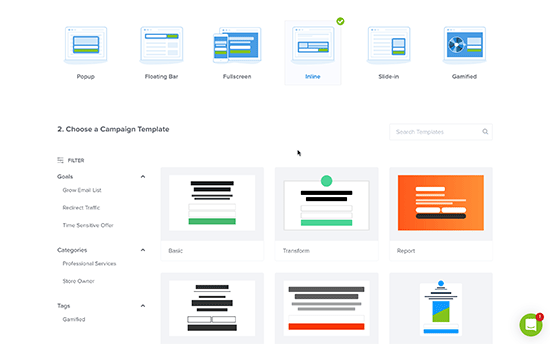
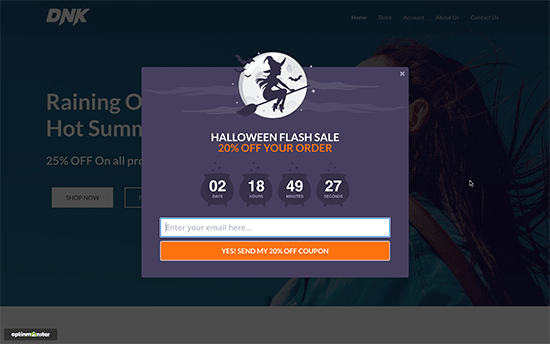
The plugin provides different campaign types which you can use to showcase a number of different content type or messages for users. This includes floating bar, lightbox popups, inline widget, fullscreen, sliding, as well as gamified campaigns.
For example, if you wish to show dynamic content which is inside a page or post, you need to choose the Inline campaign type.
Each campaign gives you the option for dozens of templates which you can choose from. All you need to do is click to select and use the chosen template.
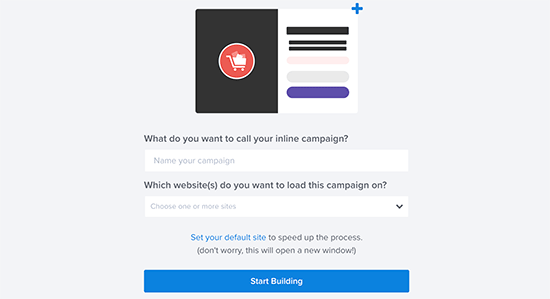
Now, enter a name for this campaign and choose the website where the ad will run.
Go to the plugin’s campaign builder interface. This is a drag-and-drop tool where you can make changes to the design of the campaign and check them out with the live preview.
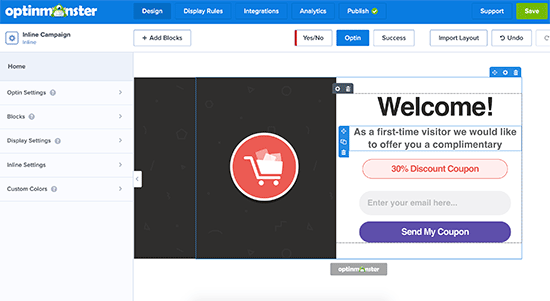
Just click on the element provided in the preview in order to make changes or add any new element from the left panel. The plugin also provides the option to connect with the best marketing services so that you can show an email signup form.
This software was designed initially with the idea to help you get more email subscribers, but now it has turned into a full featured conversion optimization suite.
By using the campaign builder, you can create campaigns where you can insert all type of content such as free shipping offers, discount codes, smart product recommendations, etc.
Once the design of your current campaign is finished, click on the save button located at the top in order to store all of your changes.
You can also make changes to your design any time you wish so that it matches your display rules.
How to set up display rules for your campaign?
This is where you will need to set up the display rules which will decide when your campaign will show up.
Inside the plugin’s builder interface go to Display rules tab.
With this option you can create smart rule sets, where you can also choose from a number of targeting options.
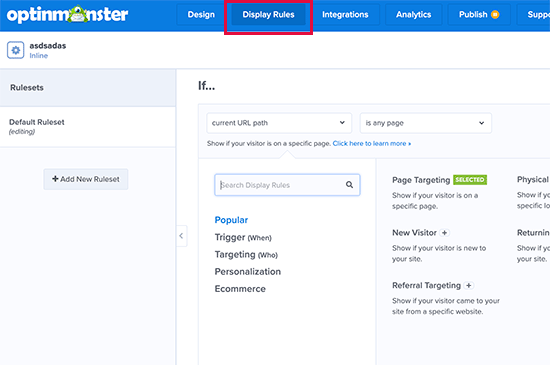
First, choose the conditions to match. There are lots of options to choose from, so let’s take a brief look at all of them.
1. Time based triggers Said triggers will allow you to set display rules which are based on date or time. You can show your campaign content at specific time, date or day of the week.
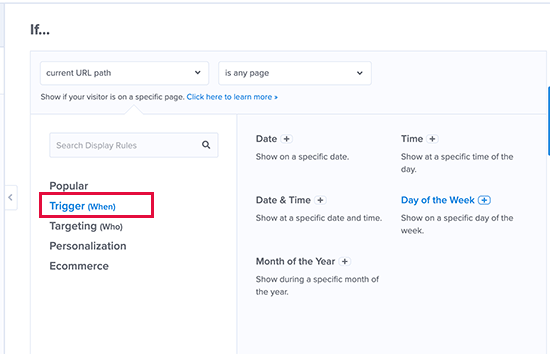
With these triggers you can show custom messages which are designed for specific times and dates. For example, you can show a sale coupon on certain holidays or display a message for a special event.
2. Targeting users with matching specific criteria
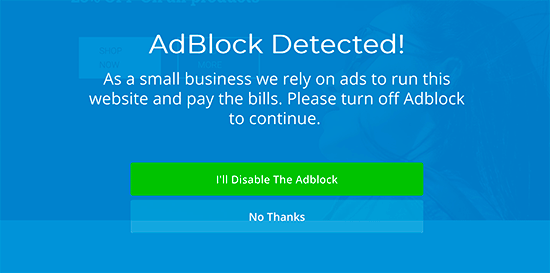
With the targeting section you can set up display rules which are based on smart recognition technology. For example, you can show certain campaigns to customers which are coming from a specific referral, website, landing page, or location. They can also be targeted based on blocker, cookies, and JavaScript variables.
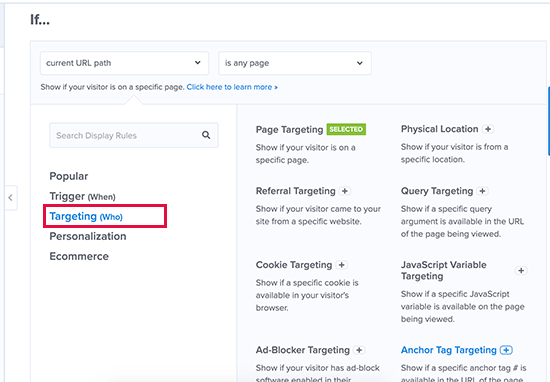
You can also ask users to give their support by disabling the adblock software. This way you can show a message only for those users with the personalized content.
Another great example is by giving special offers to visitors which are coming from a certain URL. For example, you can offer them an exclusive discount when they’re coming from an affiliate partner website.

3. Personalisation targeting
OptinMonster helps you to set personalized display rules which are based on user behavior. You can show custom campaigns to returning visitors, new users, device targeting, users who have converted, not converted, visited a certain page, and more.
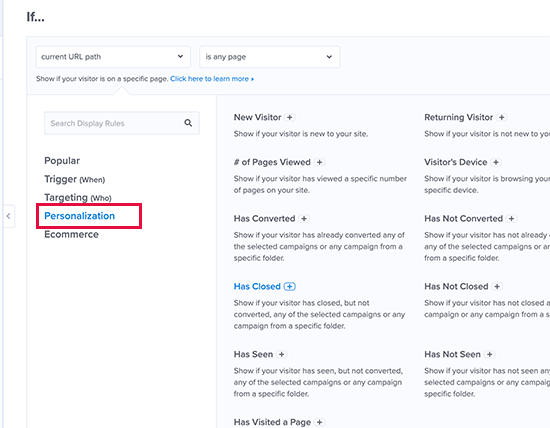
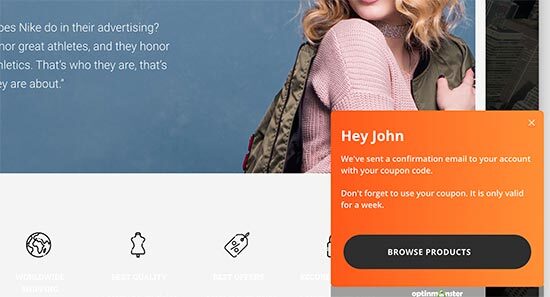
OptinMonster can be set for smart tags feature where it can display user’s location, name, and more so that they can be shown personalized content. This will allow you to tailor the content for specific users.
4. Display rules for e-commerce
These triggers are created specifically to boost conversions on e-commerce sites. You can show content to users which is based on their shopping behavior. The plugin supports BigCommerce, WooCommerce, and Shopify platforms.
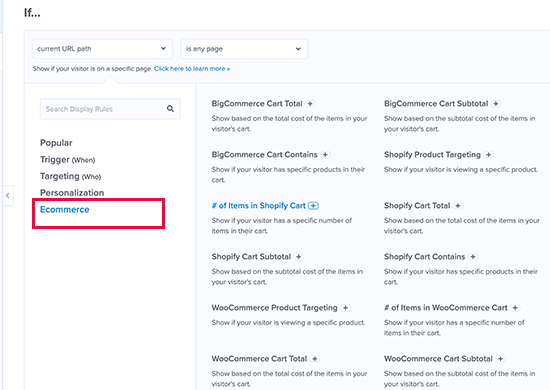
With e-commerce targeting you can show content based on the products users are viewing, the number of products in the cart as well as the total cart amount.
Once you choose a condition, you will be asked to select what to look for. For example, you will need to set up the location, after which you will be asked to select the locations that need to be matched.
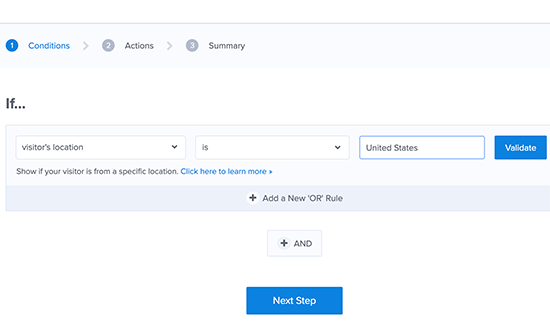
Upon setting up your condition, you can validate it so that you are sure the setup is done correctly. Click on the next step button.
Now, you will be asked to choose the campaign view. Depending on your campaign type, you can choose from Option view which is the main campaign, Yes/No view, or success views.
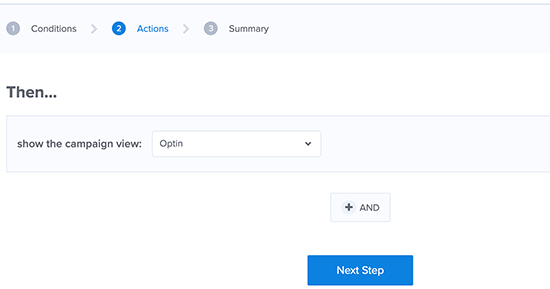
Continue by clicking on the Next step button.
You will now see a summary of your display rule set. You can continue with your design changes or simply click on the save button to store the current changes.
Publishing your content and adding it to your website
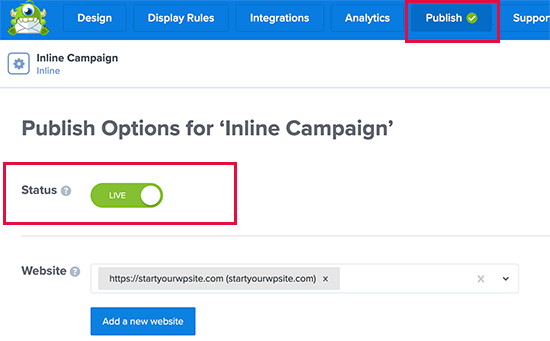
OptinMonster makes it extremely easy to display campaigns on your site. All you need to do is switch to the publish tab inside the builder and change the status button to Live.
If you go back to your WordPress dashboard and check the OptinMonster – Campaign page, you will be able to see the new campaign listed there.
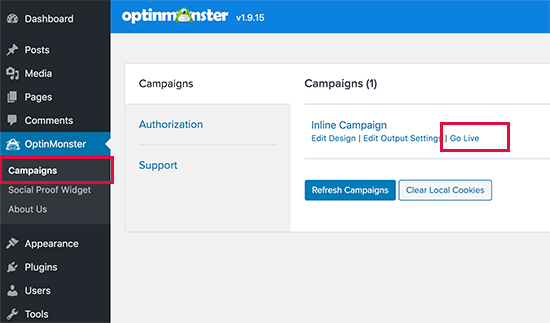
In order to display the campaign, simply click on Go live.
With OptinMonster display rules you have the power to show different content to users in WordPress without the need of making any changes to your code and template.
It will give you the option to leverage additional digital audio estate on your website in order to increase your conversions and sales. You can easily test the changes and improve your campaigns for better results.
This is all thanks to the A/B testing technology.
Show different content to users with the help of a plugin
You can use this method if you’re looking to change the full contents of a page or post in WordPress or show the same content to users in different variations.
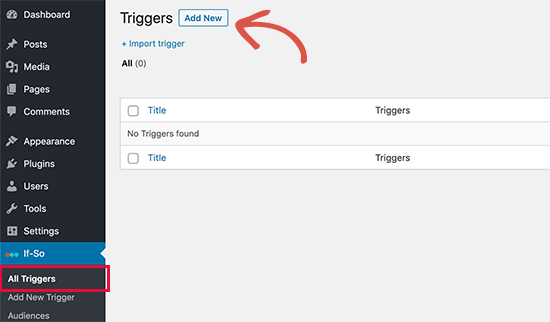
You would need to install and activate the If-So Dynamic Content plugin.
After activating it, go to If-so – All triggers page and click on the Add new button.
This will show the page where you can create a trigger and add new content. You will also be able to see a box where you can select the condition.
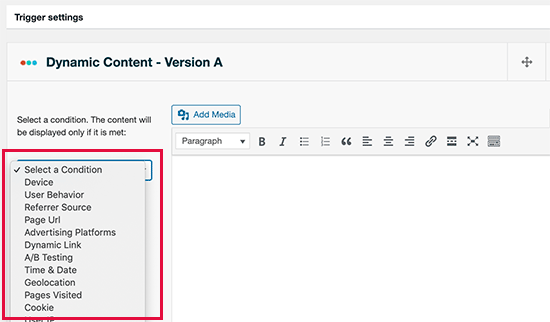
The plug-in will provide a number of conditions which are based on date, time, IP address, location, and more.
Upon choosing the trigger, you can add the content which you wish to show to your users when that condition is matched.
You can also add another version in another set of rules to display different content.
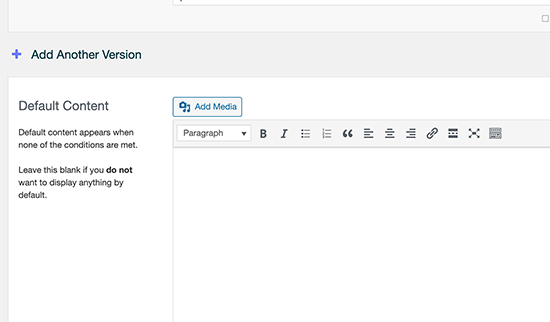
Last but not least, you will see the default content area. This is the exact content that you wish to show to your users who do not qualify for the conditions which you have set above.
Once this is done, don’t forget to publish your trigger and copy the shortcode which is shown on the screen.
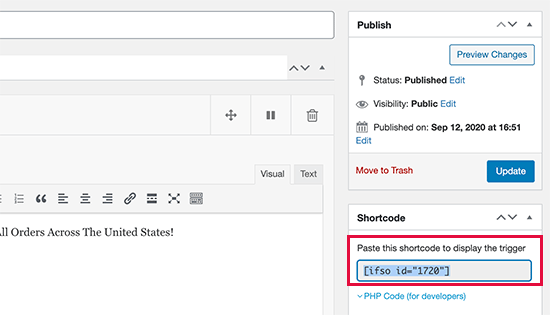
You can now edit the page or post as well as at the shortcode in your content where you want the trigger to be displayed.
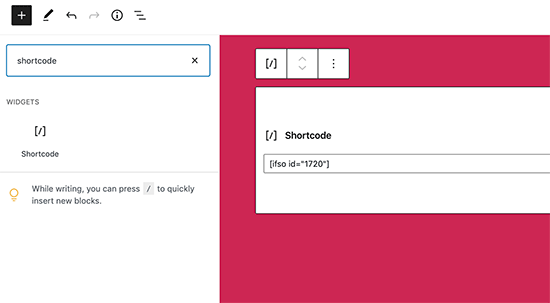
Now all that’s left is to save and publish your page or post.
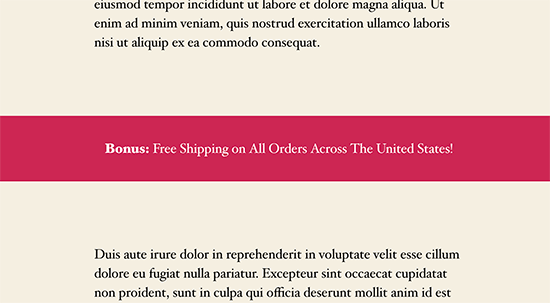
Go ahead and check your website to see the trigger in action. If the conditions are matched, you can see the message you set for the same conditions. If that’s not the case, the default message you have set up will be shown.
We hope this article was useful in teaching you how to easily show different content to different users in your WordPress website. Share with us your experience on this topic. Drop a comment below!