Introduction
The e-commerce sector has greatly revolutionized the online market space. Gone are days when we had to visit shops physically to purchase what we need. Today, you can place an order straight from your mobile device and have it delivered to your doorstep.
As technology evolves, players in the e-commerce industry have been forced to adjust how they approach the online marketplace to conform to the new trends. One major technology that has transformed the e-commerce industry is the advent of WooCommerce.
The open-source WordPress plugin makes it easier for entrepreneurs to set up their online stores. Aside from being easy to install, the WordPress WooCommerce plugin makes it easy for you to customize and add e-commerce functionality to your website.
With just a few clicks, you can easily convert your website into a fully functional e-commerce website. In this article, we give you important tips on how you can set up a WooCommerce shipping strategy for your store.
Before diving into how to set up a WooCommerce shipping strategy for your store, let’s have a look at what WooCommerce shipping entails?
Wooshipping
Wooshipping is an advanced WordPress plugin for companies using a WordPress platform and shipping with DHL. The Woo shipping plugin is custom developed to easily integrate on WordPress websites and to make it easy to ship through DHL.
Some of the features that come with the plugin include:
• Supports shipping in countries that DHL offers services.
• Enables entrepreneurs to shift to multiple locations around the world.
• Facilitates paperless trading.
• Users can easily generate shipping labels quickly.
• You can reship to the same customers through data submitted previously during shipping.
• You can easily generate an invoice to share with customers.
• You can easily get DHL service options for yourself and your customers.
Now that you understand what woo shipping entails, here is what WooCommerce is all about.
What is WooCommerce
If you are a WordPress expert you must be familiar with the word ‘’WooCommerce’’. The free WordPress plugin enables you to transform your WordPress website into an e-commerce store. The plugin is open-source making it easy for anyone to customize it to anything.
What's more? WooCommerce is a free tool powered by open-source WordPress software. The plugin features a powerful customizable dashboard and admin section. The technology enables you to sell products and services from your website.
If you sell physical goods, shipping should be one of your topmost considerations if you want to succeed. In addition to paying less for products, customers expect to receive ordered products quickly.
Therefore, you should start by understanding shipping methods, fulfillment and how to choose the right shipping strategy.
So, how do you set up a WooCommerce shipping strategy for your store? Here is how!
Step 1. Back up and update the Store.
If your store is live, you must first back it up before making changes. This saves you from losing any important data should anything happen.
To avoid inconveniencing your customers during the setup process, you can test an array of shipping options before implementing them through a staging site. To back up your data, you can use credible platforms like Jetpack. The platform features two plans, once-daily snapshots and automatic daily backups.
Alternatively, you can manually back up your website and store it on your stores dashboard. Once you have backed up your website, you can then proceed to update the theme, WooCommerce, WordPress, and all the existing plugins. This is ideal in ensuring full compatibility with any new extensions that you may add to the process.
Step 2. Configure WooCommerce Settings.
In the case where you offer either a flat rate or free shipping, you may not need additional extensions. This is because WooCommerce has inbuilt features that you can use to customize and set up whichever mode of payment you need.
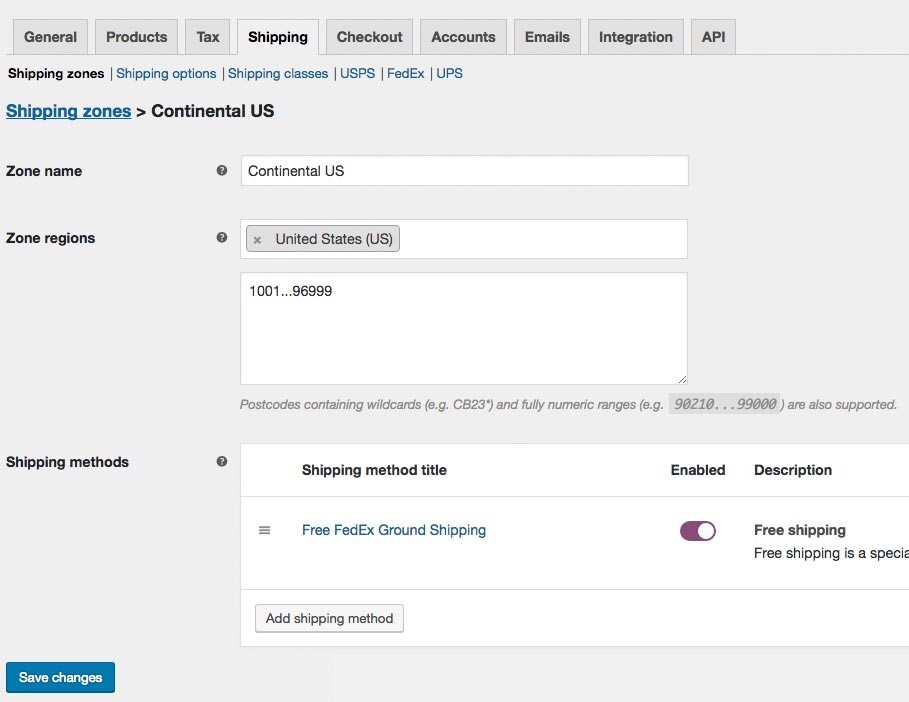
To configure, simply go to WooCommerce>Settings>Shipping on your dashboard that contains an array of shipping zones. In this case shipping zones are geographical areas that you can ship to based on regions, countries, zip codes, and states. As such, you can leverage the features to set up various rates based on client locations.
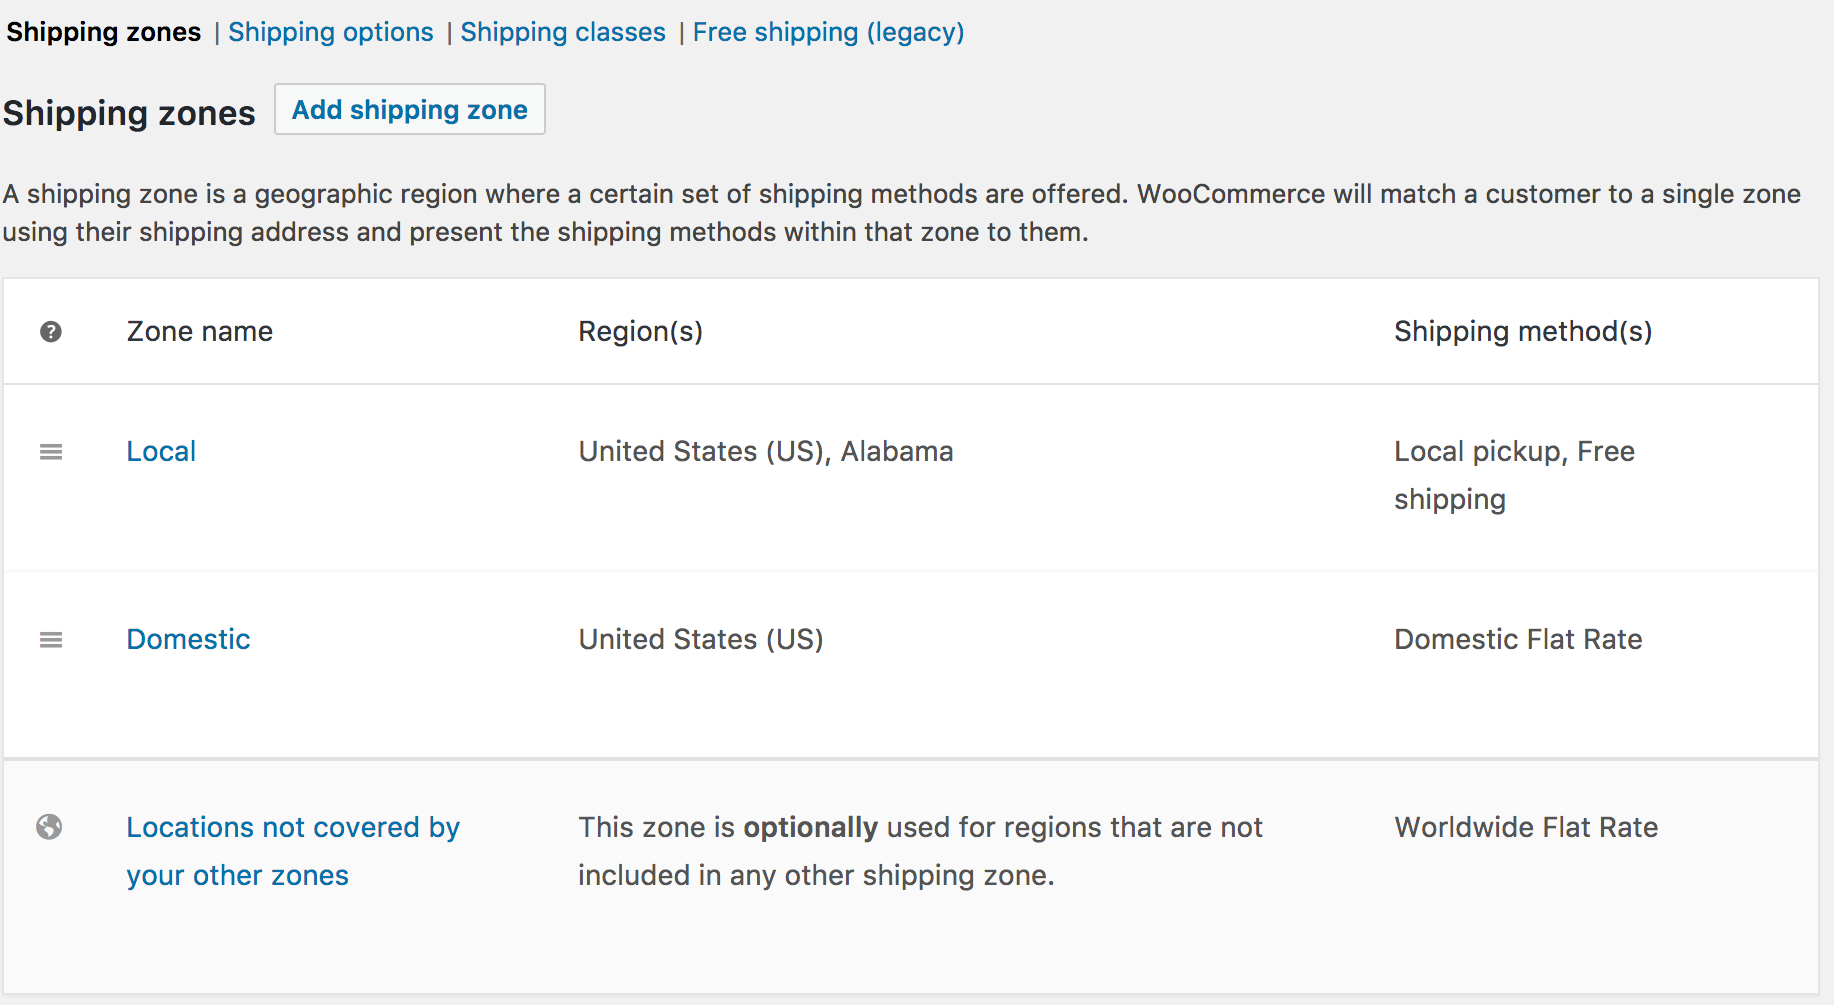
To assign shipping methods to zones, you simply click on Add shipping method. Some of the options you can select include free shipping, flat rate, and local pick up. In this case you can choose the pricing that you need for each.
On the other hand, you can as well determine shipping rates based on classes i.e groups of similar products, etc. For example, you can charge a flat rate for smaller products and offer free shipping on larger orders. Depending on how you want to capture your audience, you can always come up with different pricing models that suit the needs of your target market.
If you run a restaurant business, you can charge customers for shipping packaged meals and offer free local pickups for meal kits. To set up, simply click on the local shipping classes button and add your preferred classes. You can then edit your products to assign them to various classes.
Step 3. Install and activate shipping extensions.
To use live rates, table rates, or a wide range of shipping options, you will have to add a shipping extension to access more options. Apart from enabling you to add more shipping options, extensions are ideal in adding functionality like tracking numbers, printing labels, and syncing the warehouse.
To add an extension, you can download an extension from the WooCommerce marketplace.
After downloading an extension, navigate to plugin,>Add New in your WordPress dashboard and select upload plugin. To enable the extension on your store, select the extension zip file on your store and click Activate.
Step 4. Adjust shipping settings to Suit your needs.
Instructions on how to install every extension vary since each comes with different settings. To access instructions on how to install every extension, simply navigate to its page in the WooCommerce marketplace and click the documentation button. This will enable you to access a specific extension that suits your needs.
Step 5. Test the shipping setup.
Before allowing customers to access your shipping setup, run a test to understand whether it's working effectively. Here is a checklist on how to conduct a test trial.
• Test a combination of products along with the size of every cart.
• If you choose to use live rates to display your prices, ensure the prices match the carrier rates.
• Ensures return and shipping policies are easily accessible by clients on your website.
• Ensure offers and discount offered to customers for various zones can be seen by customers.
• Ensure calculations and shipping are accurately done to avoid confusion. For instance, are rates on your cart and checkout calculated correctly?
• Scrutinize the functionality of your shipping systemize confirm whether the shipping information is integrated correctly.
Step 6. Ship your Products.
WooCommerce typically comes with all the tools to enable you to ship your products to any destination. All you need is to set up the shipping zones that you need to target. The WooCommerce shipping zones not only help users to set up shipping methods for their stores but also display them to make it easy for customers to access whenever they want to buy a product. In that regard, you can easily configure your target shipping zones thanks to the WooCommerce plugin.
Other features that come with the plugin include restricting your shipping location and adding multiple shipping zones. This means you can reach out to any type of audience as per your business objectives.
Conclusion
If you are struggling to set up a WooCommerce shipping strategy for your online store, the tips in this article will not only help you target the right prospects but also improve the functionality of your WordPress website.
Why is the WooCommerce plugin important?
Generally, the WooCommerce plugin enables you to build an e-commerce website using WordPress. In other words, it transforms an ordinary WordPress website into a fully functional e-commerce store.
Do I need to hire an expert to help me add the WooCommerce plugin to my WordPress site?
No, adding the WooCommerce plugin on your WordPress site is easy. It can take you less than 2hrs if you understand how to go about it. It takes a few clicks to convert your ordinary WordPress website to an e-commerce store.
Why do I need a shipping method for my site?
A shipping method enables you to set pricing and target locations at which you’d like to get customers. Additionally, a shipping method helps customers to pay for products that they need.
Which is the most suitable shipping method?
DHL is the most established courier platform that you can use to deliver your product to a designated location. All you need is to ensure that the locations set up on your website area DHL operating zones. That will ensure your products reach out to your clients in perfect condition.
Why should I use DHL as a shipping method for my products?
DHL covers many countries around the globe. This not only helps in expanding your market segment but makes it easier for clients to access your products from various parts of the world.