The most important stage in an online shopping journey is the completion of a purchase. No matter how long a user spends browsing through your online store, if it does not translate to sale, then it is not relevant.
It is crucial to make the checkout process as seamless as possible for your customers. So, how do you create an easy-to-use checkout page on your WooCommerce store? In this post, we will look at how to set up a customized WooCommerce checkout page with Divi.
Why do you need a Customized WooCommerce Checkout Page?
No customer has to deal with a cumbersome checkout process. The truth is that your customers would not hang around if your checkout page and process is stressful. If you currently experience abandoned carts on your eCommerce site, it may be a good idea to overhaul your checkout page.
You need to give your customers a “wow” effect from the start of their shopping experience to the final stage. If you choose the traditional WooCommerce checkout page, you would not achieve this effect.
You need to create a unique, seamless, and easy-to-use checkout process to deliver a smooth shopping experience for your customers. Some of the advantages of creating a customized checkout page are as follow:
• Reduction in Cart Abandonment
Missed sales opportunities are often caused by cart abandonment. It is a situation where customers already place items in their cart but somewhere along the line, they leave the site without the purchase completion. A complicated checkout page often results in cart abandonment.
If your customer has to go through a long process or feels the process is not secure, they are likely to lose interest in completing the transaction. With a customized checkout page, there is a high chance that your customers will find the process easier and more secure.
• Fast and Easy Transactions
Your sales funnel should be as short and faster to complete as possible. When you set up and customize your WooCommerce checkout page, you easily remove the unnecessary burden and focus on only important details in the transaction process.
Having a checkout process with multiple pages to fill out, customers will likely get tired and leave your site. However, when the whole process is streamlined, you can aid your customers in completing the purchase journey faster and easier.
How to set up a Custom WooCommerce Checkout Page
Your WooCommerce page comes with a default checkout page. You can edit this with a third-party plugin or shortcode. If you are a new user, you may find it difficult to edit your checkout page using these options. This is where using a plugin like the Divi Builder comes in.
Divi Builder has a Divi Shop Module that lets you build a stunning online store with a customized checkout page. In this section, we will look at the step-by-step guide to set up your custom WooCommerce checkout page.
Before then, it is crucial to understand the importance of SSL certificates, data protection, and security on your site. You need an SSL certificate for an extra layer of security to encrypt data stored on your platform.
An SSL certificate shows your customers that your site is safe to provide credit card details. Now that we have cleared this part out, let us delve into the details of creating a custom WooCommerce checkout page.
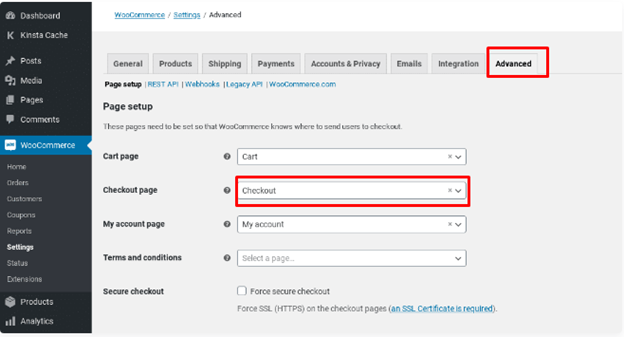
Step One: Set up your checkout page in the WooCommerce plugin settings before using the Divi Builder plugin. To do this, go to your WooCommerce dashboard and click on “Settings”.
Next, click on the “Advanced” tab and locate the Checkout Page. Select the “Checkout” option from the drop-down menu and scroll to the end of the page to click on the “Save” button to save the changes.
Step Two: With the checkout page already set, the next step is to install the Divi Shop Builder plugin. So, navigate to the Elegant Theme official website to purchase the Divi Shop Builder plugin. Click on the download link from your “My Account Page” to download.
After the download, install and activate the plugin. the plugin will show up in the Divi menu after completing the installation. Before you continue, ensure that you authenticate the plugin for your purchase.
To do this, go to “My Account Page” on the Elegant Theme website to copy the license key. When you have authenticated the plugin, you can begin to use it. The Divi Shop Builder works in the Divi Builder plugin, which makes building your WooCommerce store a very seamless task.
Step Three: The next step is to create your custom WooCommerce checkout page. To do this, click to open the Checkout Page and enable the purchased Divi Builder. Next, open the Divi Builder plugin and start to add modules.
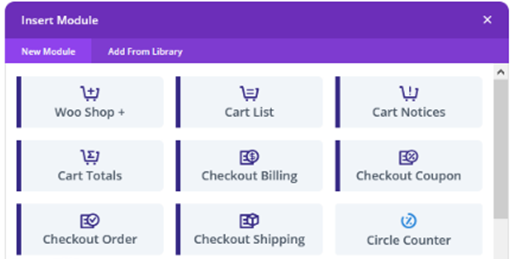
You will find five new Modules (Checkout Billing, Checkout Coupon, Checkout Order, Checkout Shipping, and Cart/Checkout Notices) added to the Divi Builder. These modules will help you to set up your custom checkout page on your WooCommerce store. Here is how these modules work.
Checkout Billing: This enables to customize all form entry fields where customers can enter their billing details. You can edit the field labels as appropriate.
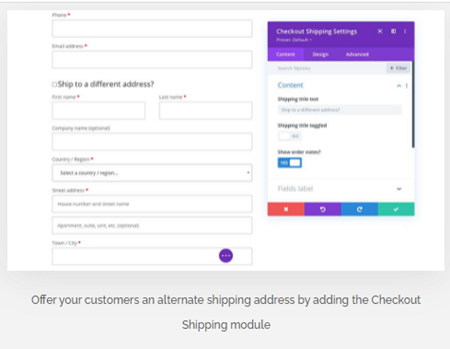
Checkout Shipping: This allows your customers to specify a secondary address. Like the Checkout billing, you can also edit the form fields as appropriate.
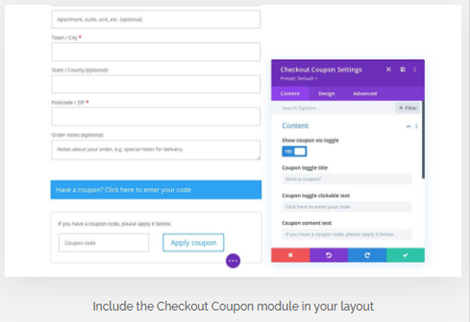
Checkout Coupon: This enables your customers to enter a unique promo code that they have been assigned to claim a special discount. You should place the Checkout Coupon module separate from other modules to make them function. If you have a space constraint, reduce the padding between the rows and sections to create more space.
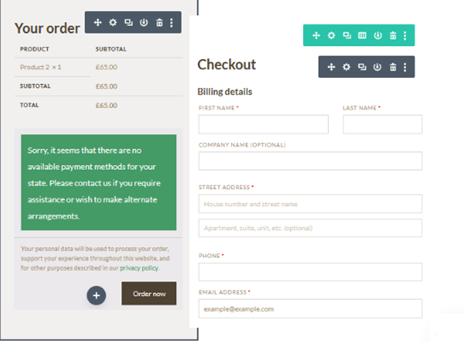
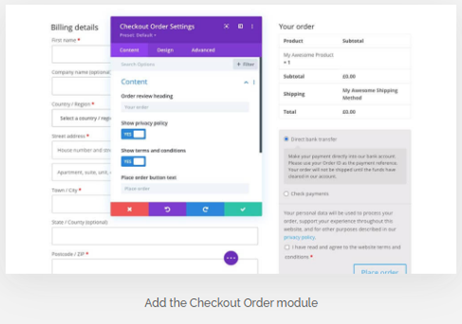
Checkout Order: This is where your customer establishes and confirms the order before proceeding to the payment option. You can also edit this part as appropriate using the drag & drop feature.
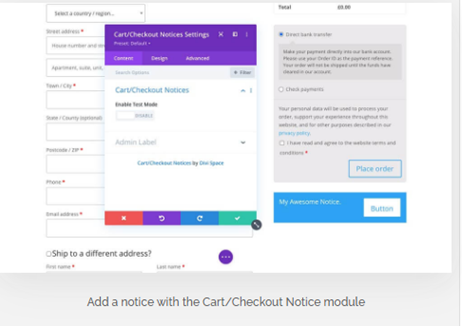
Checkout Notice: If you want to add a note to other checkout pages, you can use this module. You can be as elaborate or simple in your design as you want.
When using the Checkout modules, you must ensure that they are not in the same sections as other form modules. If you place them together, they would not function. You should place the Contact Form Module, Opt-in Form Module, Comment Module, and Login Module in separate sections when building the Checkout page to make them function appropriately.
Like other modules within the Divi Theme, you can custom style your checkout modules with the Divi Builder. To do this, follow the steps below:
• Click to open the Checkout modules
• Click on the “Design” tab
• Use the different elements to style your page in a way that matches your design and brand identity
• You can also add more customization through the Advanced tab. From the Advanced tab, you can set scroll effects, transitions, positioning, and visibility settings for a device. You can also add custom IDs and classes for advanced CSS scripting.
Conclusion
Divi takes the stress off setting up a WooCommerce checkout page. It lets you edit your current checkout page and also create a customized Cart page. The divi plugin comes with numerous features to make your store as inviting to customers as you can imagine. It also makes shopping and the checkout process very seamless.
Can I use Divi with WooCommerce?
Yes, you can. Divi is designed to be compatible with WooCommerce. When you have enabled WooCommerce in your Divi Page Builder, you will see a new “Product” and WooCommerce” section added to your WordPress dashboard. From here, you can edit your eCommerce setting, create a custom WooCommerce product page, and publish new products.
Is Divi Theme good for my eCommerce site?
Yes, Divi is versatile and perfect for eCommerce websites. It easily integrates with WooCommerce and other eCommerce sites. It helps to build seamless shop page layouts and product pages with interesting styling tools and features.
Is Divi Builder a plugin?
Yes, the Divi Builder is a stand-alone plugin and is also integrated into the Divi Theme. It is a drag-and-drop page builder that is compatible with any WordPress theme.
How do I customize my WooCommerce Checkout page with Divi?
You first need to set up your Checkout page within the WooCommerce plugin settings by navigating to WooCommerce and the Settings. Next, click on the “Advanced” tab and select the Checkout option from the drop-down menu. Drag and drop the elements to customize your Checkout page.