Customising a WordPress site is a pretty straight forward process, but it also hides some risks. Usually, people who are not very familiar with the way WordPress themes work, start customising the site’s main theme directly instead of creating a child theme.
What is a child theme?
Long story short, child theme is a backup placeholder of your main theme. It works simultaneously and exactly the same way as your main theme, and you can make all the customisations and modifications there instead of doing them directly to the core of your main theme.
Why not edit the theme directly?
There are certain risks when customising your theme directly. If you make changes to the code in a third-party theme, the next time you make an update your changes will be lost. Not only will your website change back to the way it was initially, but all your work will be gone. There are three main ways to customize your site:
How to Customize WordPress?
Editing the theme directly
If your site is using a custom WordPress theme, developed especially for you, you can safely edit it without the risk of losing all changes next time you update the theme.
If you or the developer working on your website make any future changes, you will be editing the customized version, not the original one before the changes.
This of course, doesn’t mean there aren’t any risks. If you lack experience in coding, the safer way may still be to create a child theme.
If you do decide to edit the theme directly, make sure to back up the original theme and don’t edit on the live site. You can just use a staging or development site instead. Also, use a version control to keep track of all changes made so far.
If you are working with e third party theme, never edit it directly, but instead create a child theme, or use a plugin.
Install a Plugin
Your second option when customizing a WordPress is to use a code or install a plugin.
If you are more interested in more functional related changes, then probably a plugin is the best way to do it.
There is no need for plugins to be too complex. If all you need is to add extra code to the functions.php file, you can create a simple plugin to add a few lines of code to your website. A good example for this is to register a custom post type.
Adding a custom post type is a functional change to your website, not a design one. If you decide to switch themes in the future, you would not want to lose all the posts types and posts you have created. Instead, install or create a plugin.
In some cases, you can find an already existing plugin which meets your needs, but sometimes you would need to code the plugin yourself.
If you are wondering whether you should customize the theme or create a plugin, ask yourself the following: If I wanted to make any future changes to the design of my website and install a new theme, would I want the changes to remain? If the answer is yes, then the change you want is functional and not related to the design, which means it should be done with a plugin.
Child themes
Your third available option when customizing a WordPress theme, is creating a child theme.
Some of the cases in which you would use a child theme are:
- You are interested in making changes concerning functionality, not design
- The site is running a third-party theme or a theme you wish to use again in in its current design.
- It’s wise not to edit your current theme in case problems arise.
- Your website is running a theme which is designed to be a parent theme. There are themes with a lot of customization options available.
Therefore, child themes are a safe and effective method to customize your website.
What is a WordPress child theme?
A child theme is basically a theme which works with another theme, referred to as a parent theme.
It contains some specific guidelines which tell WordPress which is the child, and which is the parent theme. WordPress then takes the code from the parent theme and will overwrite it with a code from the child theme.
Why you should use a Child Theme
As the child theme takes the characteristics from a parent or a master theme, the code can be customized without meddling with the original’s functionality. This way all changes will be saved after an update.
Another good reason to use a child theme is that you have a fail-safe option in case you ever mess up the changes you’ve made. Also, you can easily track all changes as the files are separated from the parent theme.
How does the Child Theme work?
As mentioned above, the child theme is stored separately from the parent theme, with its own functions.php and style.css files. Others can be added if necessary, but those two files are the minimum required for the child theme to function properly.
With the help of a relevant .php and .css files. You can modify basically everything from layout parameters, styling, to actual coding and scripts used by the child theme even if said attributes aren’t present in its parent theme.
When a user visits your site, WordPress loads the sub-theme first, then with some parts from the master theme, fills out the missing styles and functions.
Creating a Child Theme
For this example, we’ll be using Twenty Seventeen as the base theme.
- Go to your hPanel and click on File Manager
- Now navigate towards public_html – wp-content – theme
- Create a New Folder by clicking on the upper menu icon
- Enter the name of your child theme and click Create. We recommend using the parent theme’s name and a -child suffix.
- Once you are inside the folder, create a style.css file. Add the following code to populate its content:
/* Theme Name: Twenty Seventeen Child Theme URL: http://yourdomain.comDescription: Twenty Seventeen Child Theme Author: Your NameAuthor URL: http://yourdomain.comTemplate: twentyseventeen Version: 1.0.0 Text Domain: twentyseventeen-child
6. Change the values accordingly. The Template is the most important field because it specifies for WordPress which is the parent theme that the child theme is based on. Click Save and Close.
7. Create a functions.php file in the folder, after which copy and paste the code bellow to the blank file:
<!--?phpadd_action( 'wp_enqueue_scripts', 'enqueue_parent_styles' );function enqueue_parent_styles() {wp_enqueue_style( 'parent-style', get_template_directory_uri().'/style.css' );}?-->8. Now go to your website and access Appearance – Theme. Activate the child theme – you will notice it looks the same as the parent theme.
Customizing a Child Theme
A basic understanding of CSS rules is needed if you wish to personalize your child theme. Also, you need to know how to inspect elements in order to locate their CSS code and the class they are assigned to.
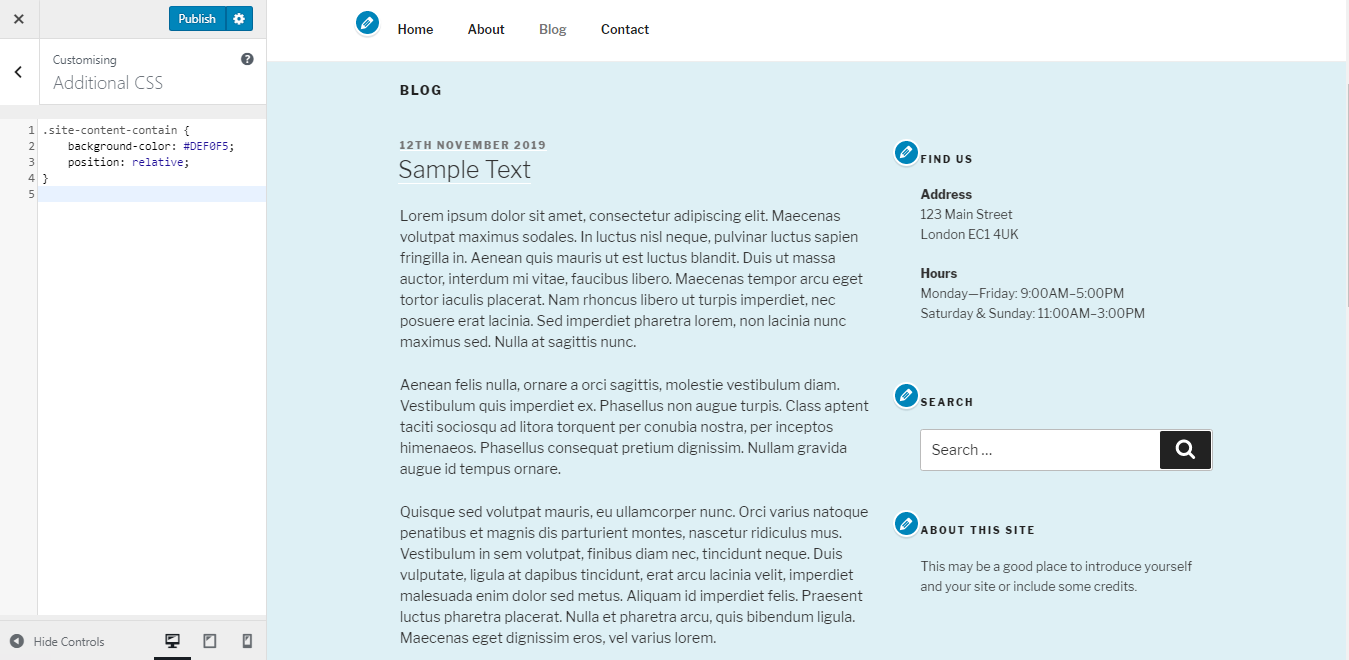
Click on Customize – Additional CSS from the now active child theme.
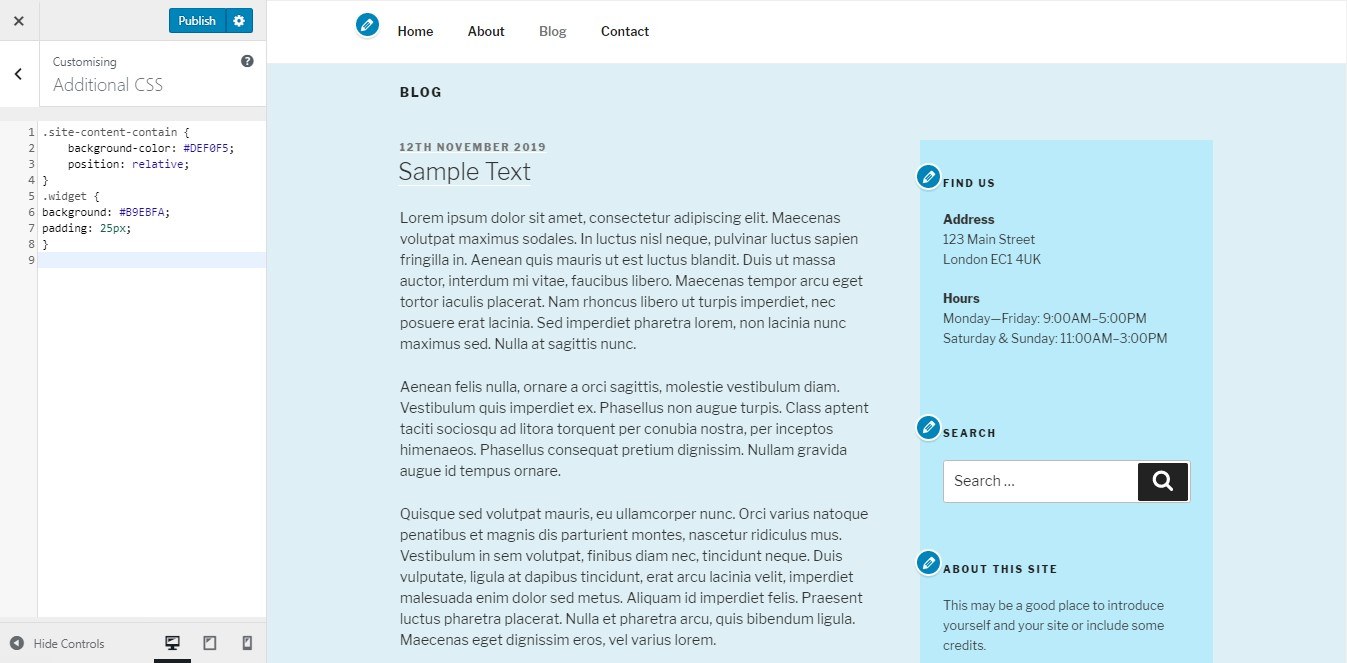
Change background color
When changing the background color of your WordPress child theme, insert the following:
.site-content-contain {background-color: #DEF0F5;position: relative;}The value which is next to the background-color: corresponds with the hex code of your chosen color. For example, when changing from white to blue, you will have the following result:
Changing Sidebar Color
Achieve this with the following CSS code:
.widget {background: #B9EBFA;padding: 25px;You should get this result:
Changing Color, Size and Font Types
Insert the following code if you wish to make changes to the font size, color and font type:
p {color: teal;}p {font-family: Georgia;font-size: 18px;}The P is for Paragraph. The rule changed the way the fonts look based in the specified value.
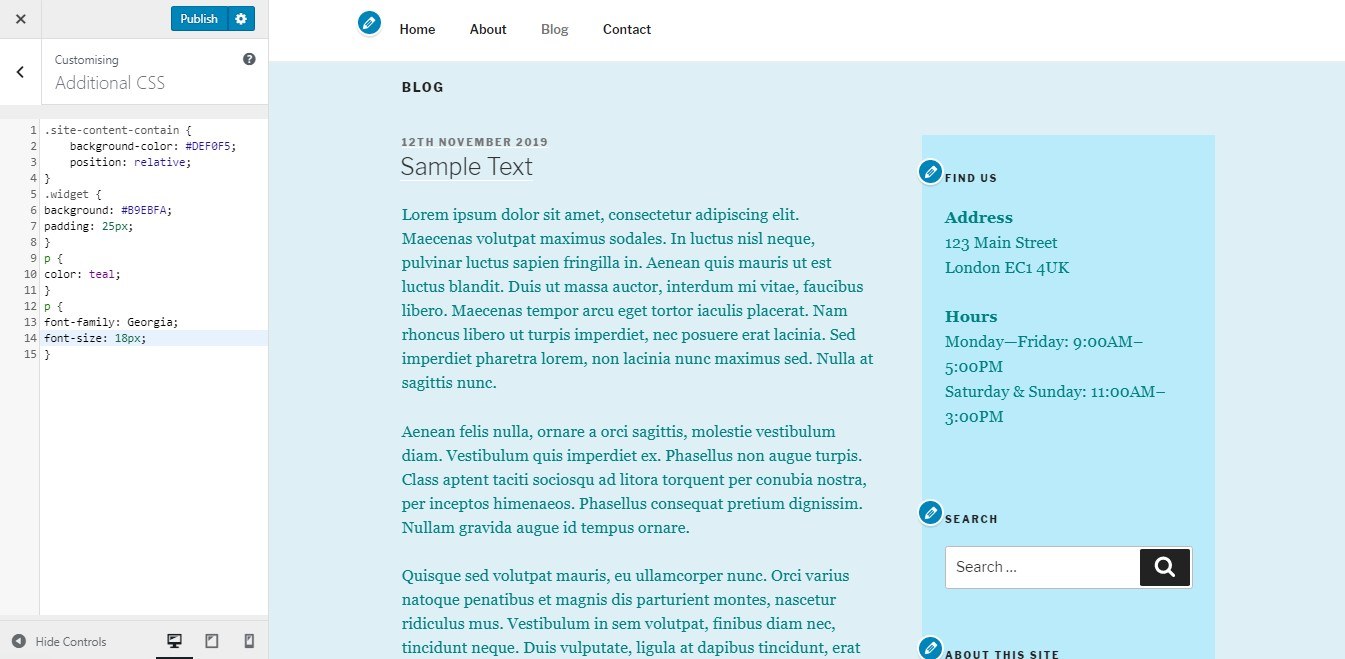
If you want to make changes to other text related parts, such as header or title, first inspect the element as to see their CSS parameters first. In our case we will change the title’s font color.
1. Right-click on the text and choose Inspect. Find the CSS style link and open it.
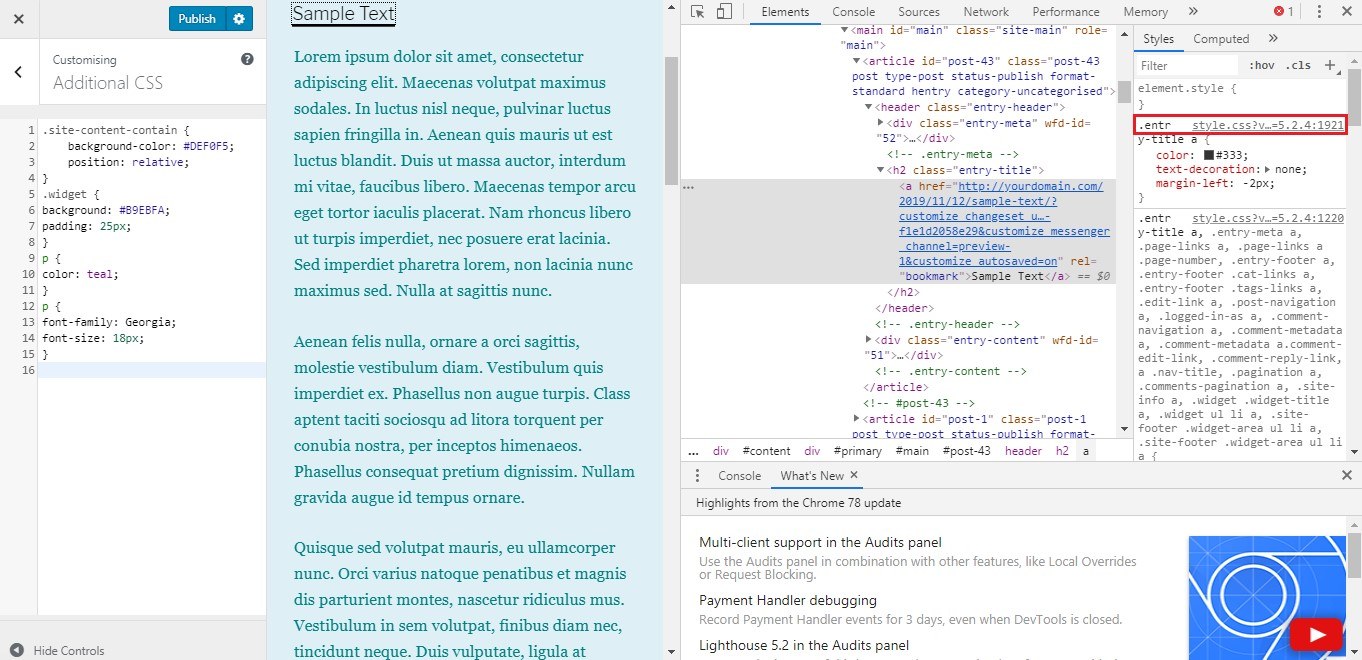
2. With the help of CTRL+F locate the exact part you are looking for, after which copy the code to the Additional CSS tab. Change the needed values.
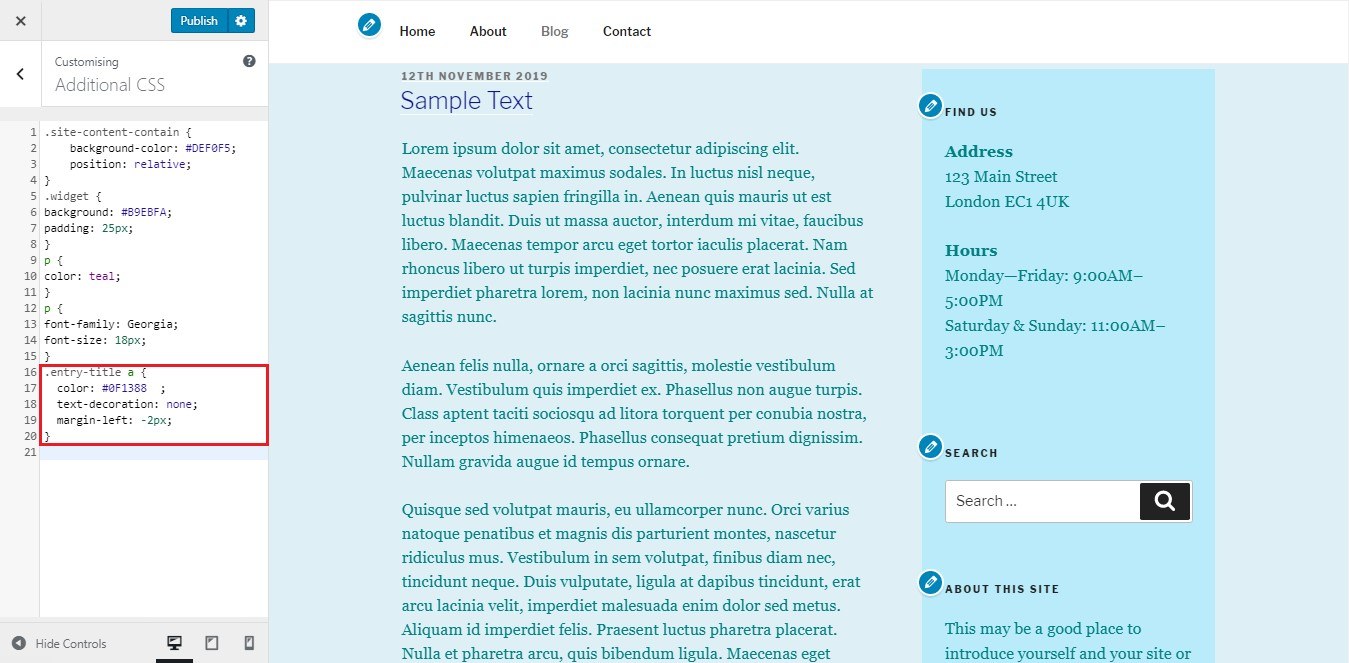
Same can be done with any other element you want to make changes to.
Changing Layout of Posts and Pages
Templates files give you the option to create your own layouts by revoking the default ones.
The new template must be with the same file name and in the exact folder which corresponds with the original.
The main template files are in the theme’s main folder. For example, the template for a single post is single.php, while the template for pages is page.php.
In the case of the Twenty Seventeen theme, the templates are split into template-parts, which are referenced in the primary template with the function get_template_part (). If you wish to edit page.php, start by finding the template parts to check if there are parts that need to be edited. In our case, we have line 28 which reads:
get_template_part( 'template-parts/page/content', 'page' );.
Template-parts/pages/ is the folder path. On the other hand, “content” refers to the character before the hyphen, while “page” is after the hyphen.
They form the path wp-content/themes/twentyseventeen/template-parts/page/content-page.php.
If you follow this structure, when changing the layout of content-page.php, simply copy it in your child theme folder and paste it here: wp-content/themes/twentyseventeen-child/template-parts/page/content-page.php.
Adding or Removing Features
One of the advantages of using a child theme is the ability to have a separate functions.php file, which very much like plugins, is used to add or remove some features while using PHP code.
The following code lines will remove the right-click features in your theme:
function your_function() {?><script>jQuery(document).ready(function(){jQuery(document).bind("contextmenu",function(e){return false;});});</script><!--?php}add_action('wp_footer', 'your_function');Conclusion
Child themes for WordPress sites offer a way to create a new project from scratch based on an already existing parent theme without breaking its core function. With the help of some simple coding and directory management, you can make any changes you want to the child theme, which gives you tons of options for your design.
Don’t hesitate to drop a comment bellow and give us your thought!

