Introduction
If you’re looking for a way to improve your WooCommerce store, integrating Salesforce CRM is a great option.
Salesforce is a popular CRM software that can help you manage your WooCommerce store, including customer data, tracking sales and leads, and more.
With over 3.3 million active WooCommerce users, more data continues to be generated, giving a need for it to be managed and sorted out.
To integrate WooCommerce with Salesforce, you can either use the built-in integration that comes with WooCommerce, use a CRM plugin such as the WooCommerce Salesforce Integration plugin, or even use a Salesforce API to integrate WooCommerce with Salesforce CRM.
These options will enable you to sync your customer, order, and product data between the two platforms.
For more information on how you can take advantage of this powerful tool, keep reading.
What is Salesforce CRM?
Salesforce is a customer relationship management (CRM) software that helps businesses manage and keep track of their customers’ data and interactions. It’s used by various companies, from small businesses to Fortune 500 companies.
Often described as Salesforce Customer 360, Salesforce’s latest release gives businesses the ability to have a complete view of their customers. This includes data from various sources, such as social media and marketing platforms. It also allows businesses to create more personalized customer experiences.
Salesforce ranks among the best CRM software in the market due to its robust features, scalability, and flexibility. It’s also easy to use and can be customized to fit the needs of any business. Additionally, Salesforce offers a wide range of add-on applications to enhance its functionality further.
With over 150000 businesses already using Salesforce with WooCommerce, this is a clear indication that this integration is popular and powerful.
Reasons Why You Should Use Salesforce CRM with WooCommerce
Salesforce and WooCommerce are two of the most popular platforms used in business today. When these two platforms are integrated, businesses can enjoy many benefits. Let’s explore four primary reasons that make this integration the best for your business.
- Lead Generation
Salesforce is an excellent tool for lead generation. When integrated with WooCommerce, businesses can see all their leads on a single interface. This makes it easy to follow up with potential customers and convert them into buyers. Furthermore, customer data collected from various databases can be analyzed to understand customer behavior and tailor marketing messages accordingly.
- Automate Daily Tasks and Processes
Salesforce CRM allows businesses to automate their daily tasks and processes, saving time and improving efficiency. For example, orders placed on WooCommerce can be automatically processed and entered into Salesforce. This eliminates the need to manually enter data into both systems, making it fast and reducing errors.
- Analytics
Salesforce offers analytical tools to help businesses keep track of all their data. This data can include order information, customer contact information, and more. Having all of this data in one place makes it easy for businesses to track their progress and make necessary adjustments.
- Team Management
The integration helps you manage your teams better through custom interfaces. Consequently, you can effortlessly assign sales reps and managers roles and monitor them at ease. Besides, businesses can assign leads and tasks to specific team members, and they can track the progress of each task. This can significantly contribute to creating effective team goals and strategies for your business.
How to Set Up WooCommerce Salesforce Integration
Since you now have some background information about Salesforce, you’ll want to integrate it with WooCommerce to exploit its powerful features. In this section, we’ll show you exactly how to do that in a few simple steps.
Step 1: Download and installation
First, you’ll need to install the Salesforce Integration for WooCommerce plugin. This will allow you to connect your Salesforce and WooCommerce accounts and sync data between the two platforms.
First, you’ll need to download the plugin’s .zip file from your WooCommerce account. Next, log in to your WordPress dashboard and head to Plugins > Add New. Click on the ‘Upload’ button and upload the file you just downloaded. Finally, install and then activate the plugin.
Step 2: Connecting and configuration
Now, you need to set up the plugin’s connection with your Salesforce account for authorization. On your WordPress admin dashboard, go to MakeWebBetter > Salesforce Woo. Hit the ‘Connect Your Account’ button to proceed. There are two ways in which you can set up this connection.
- Direct login and authorize
If you don’t wish to log in with custom apps, this might be the perfect method for you. Start by disabling the option to use a custom app. Next, select the environment and click on the ‘Login and Authorize’ button to proceed.
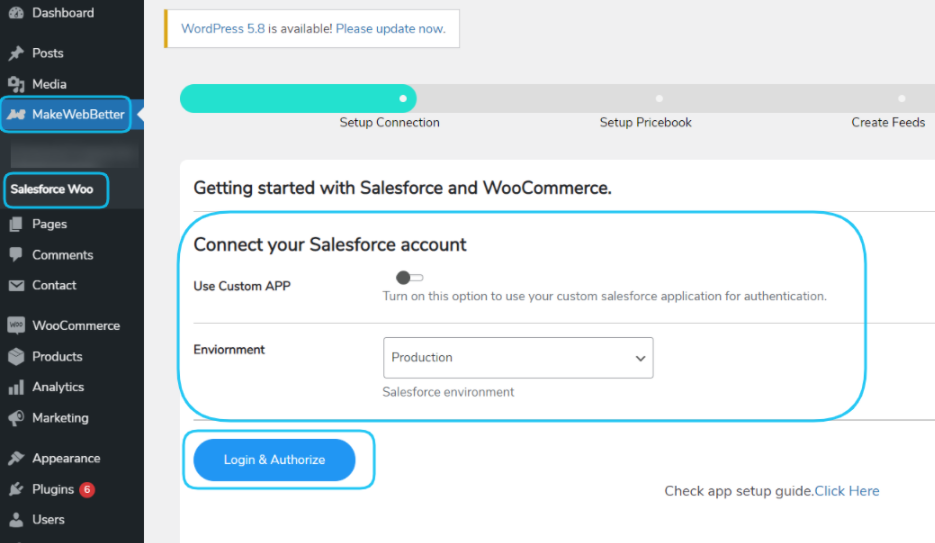
Upon completing this step, log in with your Salesforce account. You’ll then be redirected to the plugin’s setup page to proceed with the setup.
- Use of a custom app
Here, you’ll first need to toggle on the option to connect your Salesforce account using a custom app. Then enter the Consumer Key, Consumer Secret, Environment, and Callback URL details in the field provided and hit the ‘Authorize’ once you’ve entered all these details. Grant permissions in the following steps to finalize your connection authorization request.
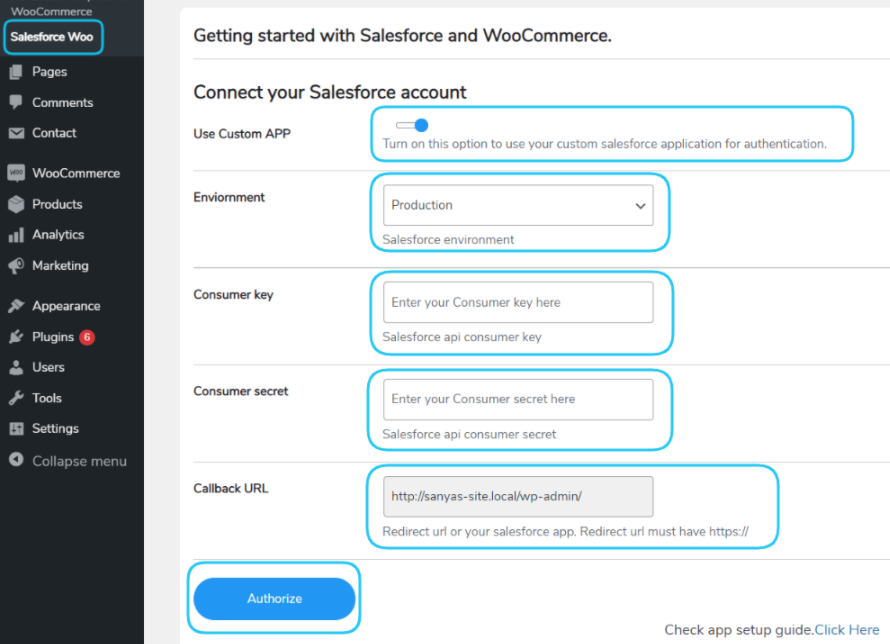
Log in to your Salesforce account and navigate Settings > Setup > Setup Home to get these details. Next, search for the keyword ‘App Manager’ on the search menu search box. On the next screen, click the ‘New Connected App’ button. A basic information form will appear where you should fill in some information.
Enable the OAuth checkbox settings on the same screen and add your callback URL.
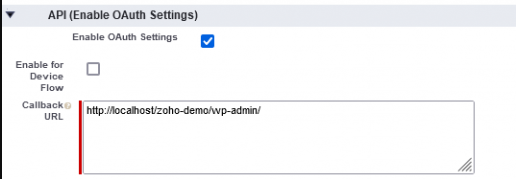
Next, pick the OAuth scopes from the list of available scopes. Remember to save your changes and click the ‘Continue’ button on the next screen that appears.
In a few minutes, you’ll get a Consumer Key and Consumer Secret ID that you’ll now add to the plugin’s integration authorization form.

Step 3: Setup the Pricebook
After authorizing the WooCommerce-Salesforce connection, you’ll be directed to the ‘Setup Pricebook’ page. You may choose to create a new pricebook or click the ‘Refresh Pricebooks’ and select an existing pricebook from the drop-down menu.

Step 4: Create feeds
Feeds are essential to keep your WooCommerce and Salesforce data in sync. When you create or update products, customers, orders, or other data in WooCommerce, the changes are automatically reflected in Salesforce. This way, you always have up-to-date information in both systems.
You’ll only need to click the ‘Create Feeds’ button here.
Step 5: Sync data
At this point, you can now synchronize your WooCommerce data with Salesforce CRM. You can do this through Bulk Data Sync or One-Click Data Sync. On deciding the method you want to use, hit the ‘Start Sync’ button to start syncing your data.
Upon completion, you’ll receive a notification showing that your data sync is successful.
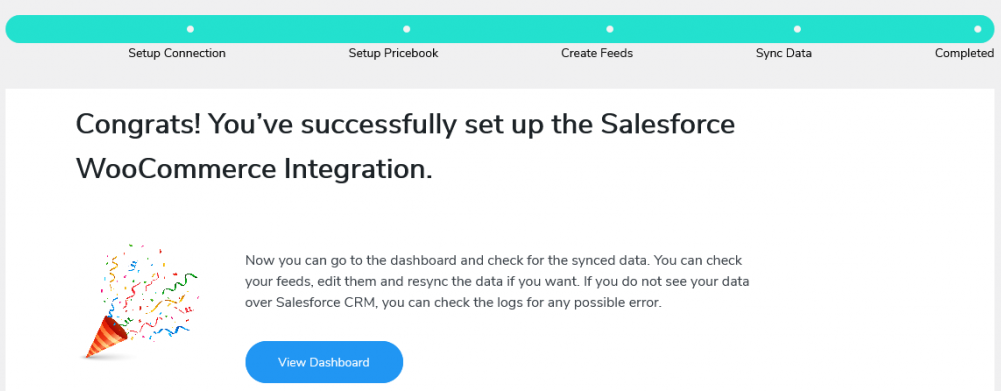
You can now view and manage your WooCommerce data from within Salesforce CRM. Follow this link for tips on using HubSpot for WooCommerce CRM as an alternative.
In a Nutshell
Salesforce CRM is essential for managing customer data and interactions. By integrating WooCommerce with Salesforce, store owners can better understand customer interactions and purchase behavior.
The Salesforce Integration for WooCommerce plugin makes this process easy and efficient. With the plugin, store owners can view customer data in Salesforce and WooCommerce, create and update customer records in both systems, and sync orders and customer data automatically. To integrate WooCommerce with Salesforce, you only need to install the plugin, configure the connection’s settings, set up the pricebooks, create feeds and finally sync your WooCommerce data.
If you are looking to improve your customer management process, integrating WooCommerce with Salesforce is the solution you need.
What is the difference between Bulk sync and One-click Sync?
The Bulk Sync will sync all your customers and orders from WooCommerce to Salesforce. On the flip side, the One-click Sync will only sync newly created customers and orders from WooCommerce to Salesforce.
How to use Salesforce API to integrate WooCommerce with Salesforce CRM?
To use Salesforce API to integrate WooCommerce with Salesforce CRM, you need to first create a custom object in Salesforce that mirrors the structure of your WooCommerce products. After that, you need to map the custom fields in Salesforce to the corresponding WooCommerce product fields. Finally, you need to create a custom connector using the Salesforce API and configure it to send data to and from WooCommerce.
How to map WooCommerce fields to Salesforce fields?
The easiest way to map WooCommerce fields to Salesforce fields is by using the Salesforce Field Mapping tool. This tool lets you map fields quickly and easily by dragging and dropping WooCommerce fields onto the corresponding Salesforce fields.

