Introduction
The one-page checkout is the newest and most cutting-edge approach to speeding up your store’s checkout process. One-page checkouts are popular with eCommerce platforms such as WooCommerce and Shopify.
The one-page checkout originally began as a WooCommerce plugin developed by WebDevStudios (WDS) before being bought by Automattic - the company behind WordPress.com and WooCommerce.
There are various ways to set up the one-page checkout in WooCommerce. For instance, you could create a new page template or even use a plugin.
In this article, we’re going to walk you through the steps necessary to set up a one-page checkout in WooCommerce using the WooCommerce One Page Checkout extension.
Now, let’s dive into it!
What Is One-Page Checkout and How Does It Work?
One-page checkout enables online shoppers to check out the shopping cart in a single step. This eliminates the need to provide billing and ship-to address information, letting users purchase items without re-entering their details.
Importantly, this one-page checkout does not mean users cannot add or remove items from their shopping carts. However, they do not have to provide information unnecessary for purchase.
In one-page checkout, users start by adding items to their carts. Once they are ready to purchase, they’ll receive a prompt to log in or create an account. Upon login, they are already at the checkout page. Here, they only have to provide their shipping address and select a payment option. Upon making payment, users receive a purchase receipt and order confirmation email.
One-page checkout is suited for mobile applications where users don’t like to provide too much personal information before purchasing. You can check our guide on enabling guest checkout on WooCommerce for more details.
Besides, it’s also perfect for eCommerce sites with many products since it does not require users to provide billing or shipping information for items they want to purchase.
Reasons Why a One-Page Checkout Converts Better Than the Regular Process
Today, we live in a fast-paced society where time is money, and nobody has the patience to wait. One-page checkouts are becoming more and more popular. If you’re a store owner and you’re yet to make the change, below are some of the primary reasons why you should consider updating your checkout process.
Reduces cart abandonment
If you have ever visited a retail store, chances are you have navigated your way through a checkout aisle. While the purpose of the checkout is to complete transactions, it also serves as a sort of treasure trove, including products you might need, forgotten items, and other products for impulse buys.
One thing that will surprise every retail expert is that shopping carts are typically abandoned at the checkout aisle. Previous studies have shown that when an online store has more than one page in the checkout process, chances are higher for shoppers to get distracted by other products.
You can ensure that customers go through the entire process in one sitting by adding a one-page checkout to your WooCommerce store. This will help reduce cart abandonment by a considerable percentage.
Recommended: How to Recover Abandoned Carts in Your WooCommerce Store
Speeds up the purchase process
People are more likely to visit your checkout page if it’s easily accessible. With a single-page checkout, the customer is not distracted by other products. This means that they focus on the checkout page and purchase your product or service at a much faster rate than if there were other clickable pages on the page.
Eliminates distractions
On a single-page checkout, there is only one thing that’s going on at any given time. If you’re advertising an offer on your checkout page, the customer is not distracted by other promotions slipping through under their eyes.
Better display of add-on products and offers
If you’re selling multiple products, one-page checkout allows shoppers to check out all products in one sitting. There’s no need for the customer to go back to the product page and navigate the checkout process again. In addition to this, shoppers can easily access special promo codes on the one-page checkout page, making it a more effective marketing tool.
Provides a mobile-optimized checkout
Mobile sales are on the rise. According to statistics, mobile sales have already overtaken desktop sales in some countries.
One-page checkout is fully responsive and provides a better experience to mobile shoppers. This ensures that the customer doesn’t abandon the purchase midway because of poor usability on their phone.
How to Setup a One Page Checkout in WooCommerce
The WooCommerce One Page Checkout Plugin is one of the best methods of adding a one-page checkout in WooCommerce. This extension lets you display checkout forms and product selection on a single page. Consequently, customers can add, remove products, or even make payments on a single page. A one-page checkout offers many features, including templates and powerful integrations. In addition, it also supports shortcodes. Let’s see how we can use the WooCommerce One Page Checkout extension to set up a one-page checkout in WooCommerce.
Step 1: Download and installation
First, visit your WooCommerce account and purchase the WooCommerce One Page Checkout by clicking on the ‘Buy Now’ button. Next, download the plugin’s files in the form of a .zip file to your computer. To proceed, head over to your WordPress dashboard, click on Plugins > Add New and upload the .zip file you downloaded. Install and activate the plugin.
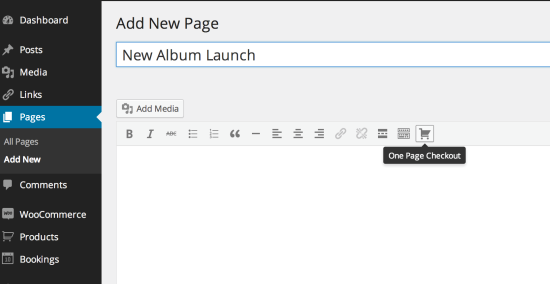
Step 2: Customize product settings
Go to Pages > Add New and click on the One Page Checkout icon. Remember to ensure that the editor is in visual mode. Click on the ‘Products' field and insert the name of the product you want to add, choose the products you want to be displayed, and choose a template of the product selection fields. Next, click on Create Shortcode to proceed.
Let's see how you can add the one-page checkout shortcode manually.
Enter [woocommerce_one_page-checkout] in the page or post you want your one-page checkout added.
Enter the product product_ids= "" attribute and add the product IDs you need to display at the checkout page.
Add the template= ““attribute and also add the slug of the template that you need to display at checkout
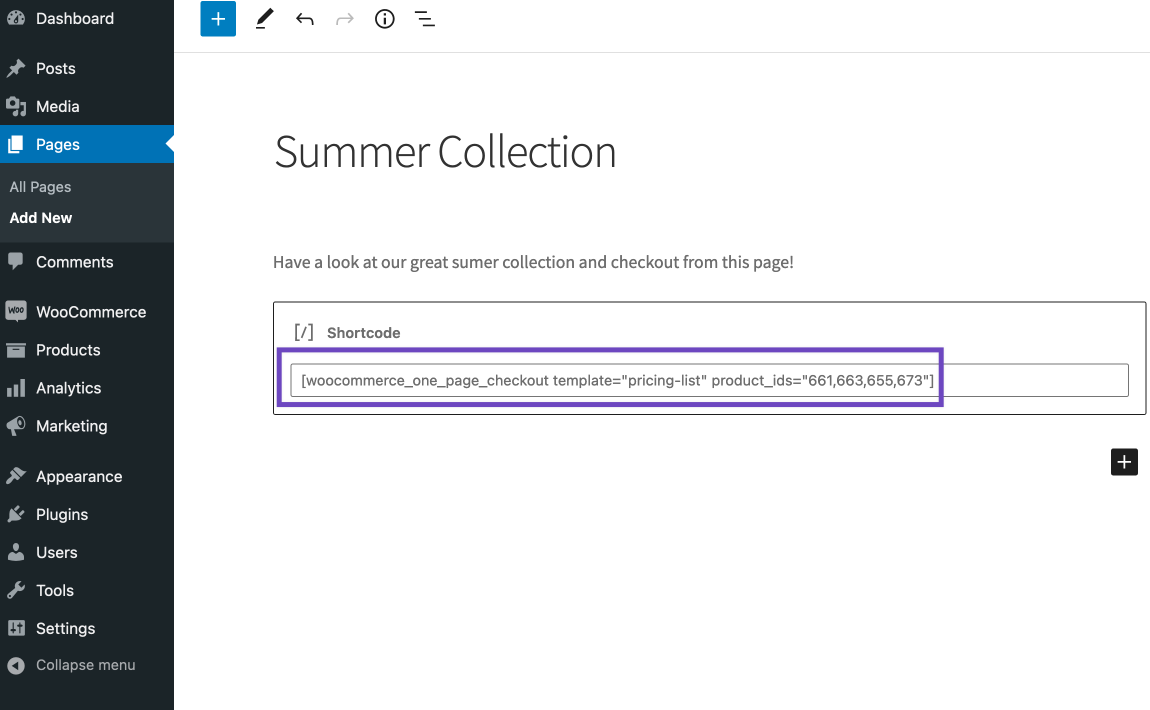
Below are some standard templates and their slugs.
Product List: product-list
Product Table: product-table
Single Product: product-single
Pricing Table: pricing-table
You can use an example such as: [woocommerce_one_page_checkout template="pricing-table"]
Besides, you can also insert a custom template and, once done, save your page/post. To create the custom template, use the slug of the template as the ‘template’ attribute’s value if it's located in your theme’s/WooCommerce/Checkout template directory.
You can also use the template’s full path as the ‘template’ attribute’s value if it's located elsewhere in your themes/WooCommerce template directory.
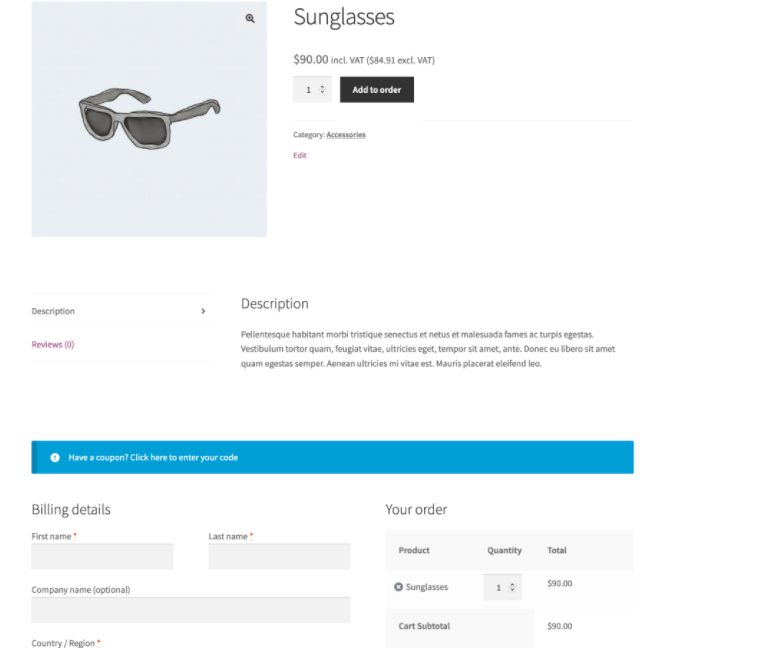
Here’s is a sample of your checkout page after adding one-page checkout.
In Conclusion
The checkout process shouldn't be a deterrent for your customers. Instead, it should highlight the benefits of purchasing from your site and give them a pleasant shopping experience. A one-page checkout helps you achieve just that.
With the WooCommerce One Page Checkout plugin, you can easily set up a one-page checkout for your store. The plugin helps you customize different checkout options, allowing customers to see all the details of a product without going anywhere else.
Making it easier for customers to checkout will help you reduce bounce rates, which will lead to increased sales.
By now, it should be easy for you to add one-page checkout to your WooCommerce store. For more information on improving your WooCommerce store's checkout process, consider reading our detailed guide on improving WooCommerce checkout.
Need help to integrate one-page checkout in your online store? Reach out to our experts for the best support and services.
Does One Page Checkout replace WooCommerce’s checkout page?
No. One Page Checkout is not a replacement for the WooCommerce checkout page. Instead, it acts as an additional gateway to your shop. Users can go through the ‘classic’ checkout page if they wish to or use this page to add items to their cart. They can also enter their shipping details and/or purchase multiple products without having to navigate back and forth through the standard WooCommerce checkout flow.
Do I still need WooCommerce’s cart and checkout pages?
Yes, the WooCommerce checkout pages are still required for anyone that wishes to use them. You can use one-page checkout as an additional checkout option – but it’s only available after the cart page and checkout are complete.
Why aren’t my products displayed on the One Page Checkout page?
If the catalog visibility of your products is hidden, your products will not be visible on the page. You can use WooCommerce Catalog Visibility Options to set various access levels for each product category that you sell.
Is One Page Checkout compatible with my theme?
All themes that are WooCommerce 3.0+ compatible should work without a problem. If you’re using a theme with its own styling over WooCommerce, there may be problems to resolve (which is beyond the scope of what we can do with WP101).