With the help of Google Analytics and some additional tracking links in your email newsletter, you can measure the effectiveness of each email you send to your subscribers.
In this article, we will explain step by step how to set up your newsletter tracking using Google Analytics.
Why do you need to track your email newsletter traffic?
When sending out email newsletters, you have most likely included at least one link to your website. The email marketing platform you are using should be able to tell you exactly how many people clicked in your email. However, most of these services are not able to follow the customers’ behavior afterward.
That’s why you need Google Analytics.
Let’s say you run an online store and you wish to know which emails were successful in driving most of the sales.
It’s actually quite easy to set up email newsletter tracking with Google Analytics and check out how many sales that email has generated for you.
How to create trackable URL’s for your Newsletter campaigns
If you wish to get a detailed report from Analytics, then you have to add special tracking settings for each link in your newsletter.
For example, you can’t use a standard link such as:
https://www.example.com
But instead the URL would look like this:
https://www.example.com?utm_source=newsletter&utm_medium=email&utm_campaign=jan_sale
Everything added after the question mark, is called a UTM code.
Despite it looking a bit complicated, it’s actually quite simple to create.
There are two ways to create trackable URLs for your newsletter campaigns.
1. Creating trackable URLs using MonsterInsights
MonsterInsights is without a doubt the best Google Analytics plugin available for WordPress. With its help you can easily install Analytics in WordPress and receive stylishly designed reports within the WP dashboard.
To access the URL builder, you can use the free version of this plugin. We do, however, recommend using the upgraded version as to unlock the eCommerce tracking features.
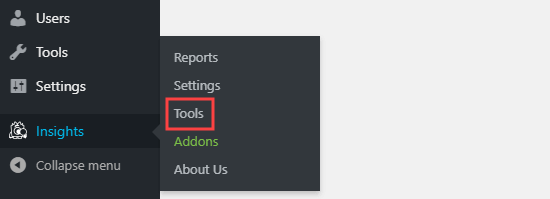
After installing and activating MonsterInsights, go to Insights – Tools from your dashboard.
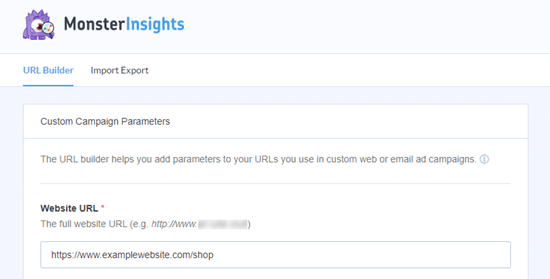
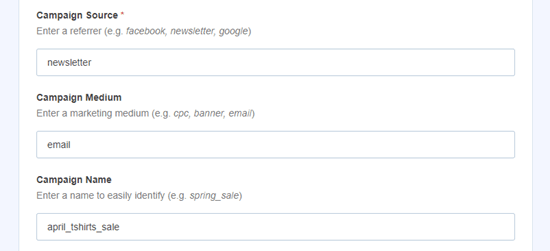
The URL builder tool will show up. You need to then enter the URL you wish to add in your email. This could be your site’s home page, for example.
Google Analytics will detect your email newsletter as a “campaign” – this is just the term used for advertising.
Then add the source, name of campaign and medium, so that Analytics can track the data.
Source: Title for the email Medium: Set this to “email” Name: Type in whatever makes sense to you like may_sale.
When using more than one word, make sure to add underscores between words, no hyphens or spaces.
At the bottom of the page, a special URL should be visible, along with the tracking details:
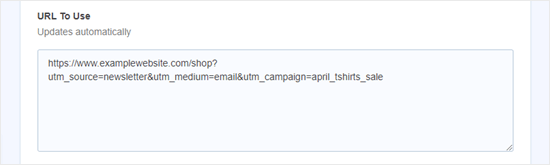
With this URL you can now track click in your Google Analytics account.
2. Create trackable URLs manually in Google Analytics
MonsterInsights’s URL builder is very handy and saves times, but if you prefer to manually create your URLs, here’s how it’s done:
We’ll be using the following link for this example:
https://www.example.com/shop
Next, create the UTM code.
Add a “?” at the end of the URL:
https://www.example.com/shop?
Then follows the utm_source:
https://www.example.com/shop?utm_source=newsletter
Next step is adding the ampersand symbol (&) as well as the utm_medium:
https://www.example.com/shop?utm_source=newsletter&utm_medium=email
Finally, add another (&) and the utm_campaign:
https://www.example.com/shop?utm_source=newsletter&utm_medium=email&utm_campaign=jan_sale
For the campaign name you can use any word or phrase you wish. If you are using multiple words, make sure to separate the words with an underscore.
How to use trackable URLs in the Newsletter?
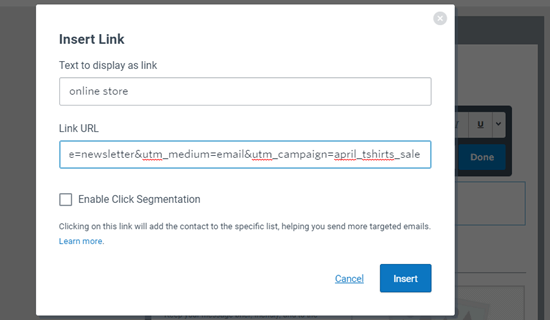
Now that you have the trackable URL, it’s time to use it in your emails.
Wherever you need to use the standard URL, simply copy and paste the trackable URL.
You can even use trackable URLs for your standard emails, especially if you do a lot of email outreach. Such URLs can be used even for ads, social media, etc.
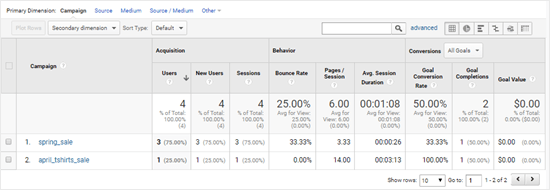
Viewing your newsletter report in Google Analytics
Once you log into your Analytics account, go to Acquisition – Campaigns – All Campaigns.
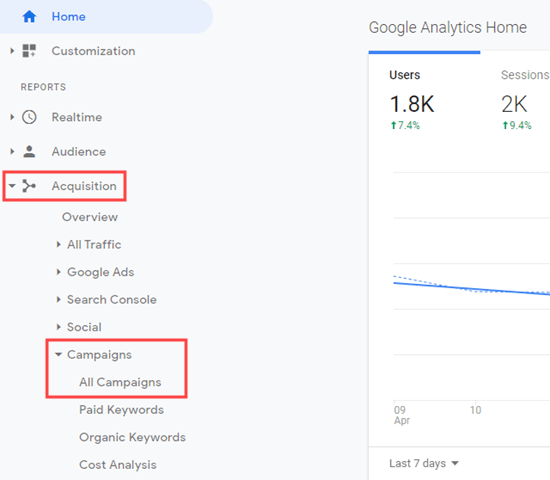
Then you should be able to see the data for all the campaigns you’ve created.
If you have sent the email today, make sure to change to date for the report to Current day, as by default Analytics will show you the data for the last 7 days.
Tracking conversions
What’s most important is what users will do after they go to your website.
If you have an eCommerce business, it’s important to know which emails successfully led to a sale. If users used an online form by filling it out, then track the form.
MonsterInsights is your easiest way as it will do the setup for you.
How to switch on eCommerce tracking in Google Analytics
First thing you need to do, is switch on eCommerce tracking in Google Analytics.
This can be done by logging into Google Analytics.
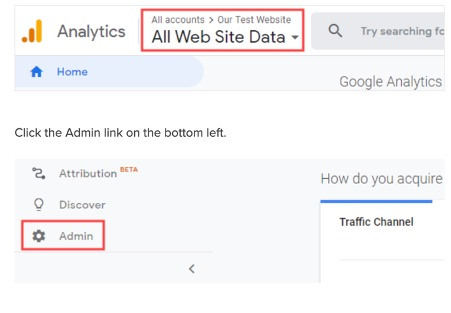
From the View column, go to Ecommerce Settings.
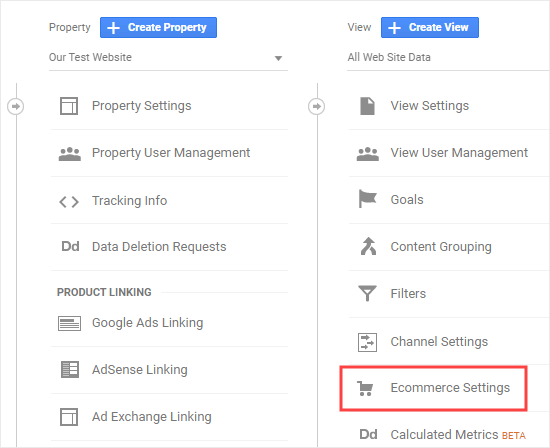
Check Enable Ecommerce. It would be great if also enable Enhanced Ecommerce, which will help in tracking additional data.
Click Save.
MonsterInsights - Switching to eCommerce tracking
You would need to upgrade to the pro version of the plugin in order to use the eCommerce features. They work well with WooCommerce, MemberPress, Easy Digital Downloads and Lifter LMS.
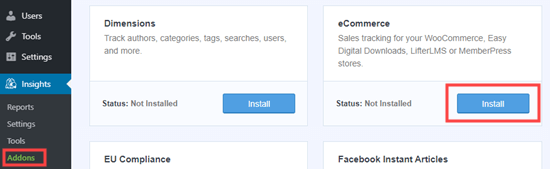
Activate MonsterInsights and go to Insights – Settings, then click on Verify.
Enter your license key for MonsterInsights, then go to Insights – Addons, find the eCommerce one and click on Install.
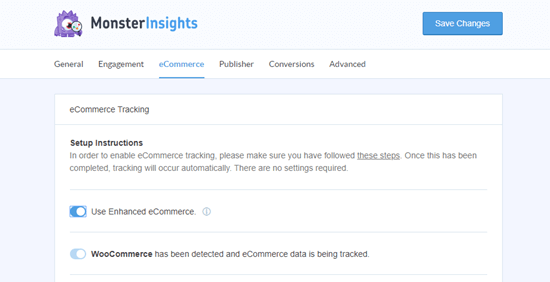
Then, go to Insights – Settings and click on eCommerce. The eCommerce plugin should have been automatically detected.
If you switch to Use Enhance eCommerce, you will be able to view the MonsterInsights eCommerce report too.
MonsterInsights will handle everyting for you after that. Analytica will be able to track eCommerce transactions made on your site.
If you open your Google Analytics, you will see the details in eCommerce transactions.
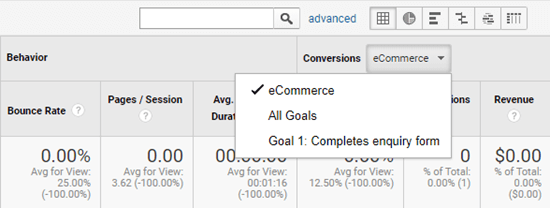
Click on Acquisition – Campaigns, then click on All Campaigns. Select E-commerce from the Conversions dropdown menu.
Conclusion
If are using just a simple order form, then you can track the campaigns which led customers to submit it. If you have a Click to call button, simply track that.
We hope this article was useful, don’t hesitate to drop a comment bellow and tell us what you think.