Introduction
The checkout process is among the most crucial steps for a WooCommerce store. A lengthy checkout process can force potential customers to abandon their carts. For this reason, it’s always vital to keep in mind the kind of checkout that will be efficient for your business.
With guest checkout, shoppers can purchase from your WooCommerce store without necessarily creating an account. The process is as simple as entering their names, shipping, and billing address, and in a few minutes, one has their order complete.
Furthermore, it will save your customers plenty of time and provide them with a wonderful shopping experience.
By the end of this blog, you’ll know precisely what guest checkout entails, why it’s essential for your business, and how you can enable guest checkout to your WooCommerce website.
Let’s begin.
Top 5 Benefits of Enabling Guest Checkout
Do you want to increase the conversion rates for your business? Yes. Right? Well, there are many ways in which your WooCommerce store can benefit when you enable guest checkout. Here are a few ways guest checkout can help grow your WooCommerce store.
1. It reduces purchase time
With guest checkout, shoppers can save time since they no longer have to log in to their accounts when purchasing a new product. Moreover, faster checkout encourages fast time buyers to complete their order due to the hassle-free process. This means more conversions in less time.
2. Leads to increased conversion rates
A lengthy purchasing process is a turnoff for many customers. Guest checkout eliminates the long process of account opening and registration. This makes it easier for new users to buy products from your store without any difficulties. Due to the absence of roadblocks, cart abandonment will decline as more customers are likely to complete the purchase process.
3. Increases customer confidence
You can be assured of more trust from your customers with guest checkout. Often, customers think twice before providing their personal details such as credit card information and their address details. However, since you’re not forcing customers to add their details, their trust level in your business is likely to increase.
4. Better customer satisfaction
Your customers will be more satisfied with your business when they don’t experience any challenges. After you have enabled guest checkout, the difficulties of getting stuck during checkout are eliminated. This creates satisfaction as a shopper can complete the purchase process in just a short time.
5. Reduces cart abandonment
A store with guest checkout will likely have fewer carts abandoned than one without. Research shows that 14% of customers are likely to abandon their cart at checkout if they find out that there is no guest checkout. For this reason, you should consider enabling guest checkout to your WooCommerce store. Doing this will eliminate checkout barriers, and no customer will leave your site having not completed purchasing what they wanted.
In a nutshell, guest checkout simplifies the checkout process for customers, making it easier for them to purchase their required products.
Recommended reading: How to Improve WooCommerce Checkout
How to Enable WooCommerce Guest Checkout Manually
If you don’t want to overload your WooCommerce store with additional extensions and plugins, you can still enable WooCommerce guest checkout manually. This section will show you how you can do that step-by-step. Let’s get started!
Step 1: Locate the Accounts & Privacy section
Firstly, log in to your WordPress site and navigate to WooCommerce > Settings on the left-hand sidebar of the WordPress dashboard.
Once you’ve accessed WooCommerce settings, click on the “Accounts & Privacy” tab.
Step 2: Tick the checkbox
Here, you’ll see a ‘Guest checkout’ option with a checkbox beside it. Ensure to tick the checkbox to enable guest checkout. This will allow customers to place orders without an account (see the screenshot below).
Step 3: Allow users to use their existing accounts (optional)
Below the option that we just selected is the ‘Allow customers to log in to an existing account during checkout’ option. Tick this option as well to allow existing users to check-in using their current accounts.
Step 4: Create an account while checking out (optional)
This step enables your customers to register for an account with your platform while checking out. To activate this, tick the option written ‘Allow customers to create an account during checkout’.
Step 5: Generating a username from the customer’s email address (optional)
Additionally, you can tick the “When creating an account, automatically generate a username from the customer’s email address” option to enable the automatic creation of a username using the email address provided by your customers.
Step 6: Automatically generate a password from the customer’s email address (optional)
This works similarly to the “When creating an account, automatically generate an account password” option when enabled.
Step 7: Save your changes
Finally, remember to save your changes once you have finished customizing your settings. Once a customer registers at the checkout page, a Username and a Password will be sent to their email.
How to Enable WooCommerce Guest Checkout Using a Plugin
By using a plugin, you can access additional features to make your guest checkout appear more appealing. But wait! If we can enable guest checkout with a single click of a button, what’s the need to install a plugin for the same job?
To answer this question, let’s first understand how it works. In this case, we’ll be using the Flux Checkout for WooCommerce plugin.
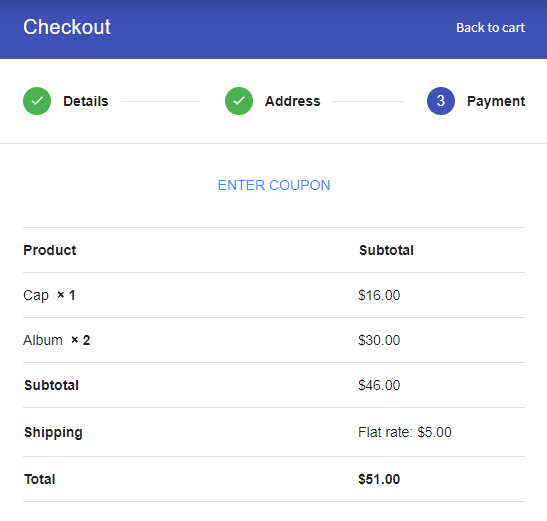
So, when a customer visits your store, adds items to their cart, and is ready to make their payment, they’ll be presented with a slick app checkout like the one below.

Your customers can add their details and make their payments in just a few simple steps. However, auto-filling the customer’s address and adding a few prompts to guide the customer on what to do next would make this process a little bit faster.
Flux Checkout works well with your existing theme and can be customized to suit your requirements. Besides, you can;
Edit the checkout header text
Change the font to suit your theme
Adjust primary colors and accent colors
Decide whether to use flux on desktop, mobile or both
With that said, let’s look at the procedure for enabling guest checkout using Flux Checkout for WooCommerce.
Step 1: Install Flux Checkout for WooCommerce
Firstly, you’ll need to purchase this plugin from the Iconic store.
Once you have purchased the plugin, it’s time to start the installation. On your WordPress dashboard, go to WooCommerce > Plugins > Add new.
Here, click on the “Choose File” button. Next, upload the Zip file you downloaded after purchasing the plugin and then activate the plugin.
Step 2: Enable guest checkout
Navigate to WooCommerce > Settings from your WP dashboard and click on the “Accounts & Privacy” tab.
At the topmost of this screen, you’ll see a ‘Guest checkout’ option with an option beside it written ‘Allow customers to place orders without an account’. Tick the checkbox to enable guest checkout. Once done, click on ‘Save Changes’ at the bottom of the screen, and guest checkout will be activated.
Step 3: Adjust Flux Checkout settings
To customize Flux Checkout settings, go to WooCommerce > Flux Checkout. Here, you’ll find a dashboard with three tabs: General Settings, Header Settings, Checkout Style.
In the ‘General Settings’ tab, you can enable or disable checkout for desktop users or display it to mobile users only. In addition, you can tick the option for address auto-completion to enable/disable address autocompletion within the checkout.
In the ‘Header Settings’ section, you can change the header type from text to image, change the font text and size to match your store, and add a custom color or gradient to the header background. Lastly, you can modify the color of the ‘Back to Cart’ button.
In the ‘Checkout Style’ tab, you can customize the appearance of the checkout page by picking a color theme from a palette of hues, color picker, or by inputting your hex code.
Step 4: Check the results
Once done, click on ‘Save Changes’ and view the applied changes at your checkout. Now your WooCommerce guest checkout page is ready to go live. Below is a sample of a WooCommerce guest checkout page after customization.
Conclusion
In this post, you have learned how to enable guest checkout for WooCommerce to achieve a more intuitive and user-friendly checkout.
Whether using a plugin or having the job done manually, your customers can now enjoy a simplified shopping process courtesy of guest checkout.
With the Flex Checkout plugin, you can elevate the design of your checkout page for a more appealing look.
And finally, once the guest checkout option is available, you can expect lower cart abandonment, less purchase time for your customers, and increased conversions.
So, what are you waiting for? Enable guest checkout for your store today.
Feel free to engage our support team for any form of help related to WooCommerce or WordPress.
Meanwhile, check out our blog on How to set up a WooCommerce Checkout Page with Divi for more ideas about customizing your checkout page.
I can’t allow guests to check out without an account. What could be the problem?
In some instances, a WooCommerce user will have a WooCommerce Subscriptions plugin or third-party plugin that will conflict with the original settings ‘Allow guest checkout in WooCommerce without an account’. In this case, it’s advisable to reach the WooCommerce Subscriptions support.
Why can’t I find the checkout tab in my WooCommerce settings?
At times, you’ll create a checkout page for WooCommerce but fail to locate the checkout tab for that page in your WooCommerce settings. A missing checkout shortcode could probably be the cause of this issue. So, recheck your checkout page settings to ensure all code is accurately included.
Is adding the guest checkout option to my online store good?
It depends on how you like it. Adding guest checkout to WooCommerce will save customers the struggle of lengthy account creation procedures, making it easier to make purchases. However, on the flip side, a guest checkout may end up creating more problems for your store than it could have solved.
What is flexible checkout fields for WooCommerce?
Flexible Checkout Fields for WooCommerce is an excellent plugin for customizing checkout fields for your WooCommerce checkout page. With the plugin, you can make changes to your WooCommerce checkout page to your liking for an intuitive and simplified checkout process.