Using a site builder to create your website is the easiest option. All you need is the basic knowledge of computer operation and the internet. Of course, you also need to choose a site builder to use. Site builders make it seamless to set up a website in an instance.
You do not need any knowledge of web language to launch your full-featured site and you can complete everything within minutes. So, if you are ready to create your first website, let us walk you through the simple process using a site builder.
Steps to Create a Website with Weebly Site Builder
Let’s start with a clarification. There are dozens of site builders on the market. However, not all of them will deliver an efficient website just as you want. Of course, many are fantastic and one of such is the Weebly site builder. Weebly powers over fifty million sites across the world.
It is easy to use and set up with no special knowledge. The basic things you need are a Weebly account to get started and an affordable domain name. Let us look at the simple steps to create your website with this site builder.
Step 1: Sign up for a Weebly Account
Visit the official website of Weebly to register and create an account. You can build your website for free on this platform. Follow the steps below to complete this process:
• Click on the “Create your Website” button at the center of the page or the top right corner of the site. After clicking the button, fill out your name, email address, and a unique password.

• Next, click the “Sign up” button and you will be redirected to where you have to choose between a personal website and a business website. If you want to build a business website, you will be redirected to Square Online.

Square Online acquired Weebly in 2018, making both platforms sister builders. The former is a general site builder, while the latter focuses on eCommerce. For this post, we will focus on creating a site with Weebly.
• Next, select “Try Weebly Websites” and this will take you to the template library on the site builder platform.
Suffice to mention that this platform has different plans with four paid packages and one free one. You have the freedom to choose any that meets your online needs. If you are just getting started, you can choose the free package to create, edit, and publish your site. You can later upgrade your site to a paid package.
Step 2: Choose a Theme
You will find over 50 themes on Weebly and they are all free. These themes cover different categories, including Blog, Personal, Portfolio, and Business. Browse through the library to choose your preferred theme based on the type of website you want to build.

You can also explore the industry-specific templates to narrow down your choices. You can also change the templates whenever you want. You can preview the themes one after the other to see how they will look on the screen by clicking the thumbnail.
Once you have found the theme you like, click the “Start Editing” button at the top right corner of the page.
If you want to change the theme to something else, simply click the “Themes” in the top toolbar and it will redirect you to the library.
Step 3: Choose a Domain
The first thing is to determine whether you want a custom or free domain. You need to have a name for your website before starting the editing. Weebly will prompt you automatically to type out your domain name. Weebly offers free sub-domain names, which come with weebly.com.

Although this is not professional, it is free, making it a good choice if you do not have a budget for a domain name. However, if you want something more professional, attractive, and sticky, you should opt for a custom domain. You can make it as unique as you want.
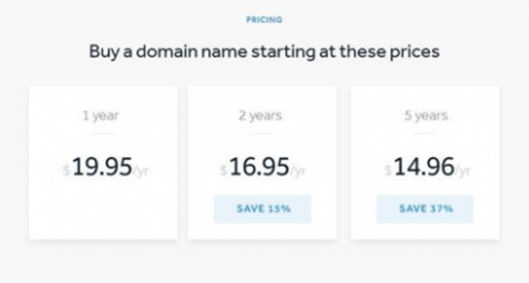
The cost of domains varies from platform to platform. Weebly offers yearly, bi-yearly, and five-year packages with a starting cost of $19.95. You can explore other domain name providers if you are looking for something more affordable.

After getting your domain name, click the “connect or transfer now” at the lower part of the popup and then type out your URL. Next, click on “Search”. When choosing a domain name, make sure it is short, catchy, memorable, has a popular keyword, and focuses on your area of business.
Step 4: Design your Website
This is the exciting part! It is time to customize your website. Once you put in your domain name, you will automatically be redirected to the Weebly website editor. From here, you can customize your site and be as creative as you can.

You can interact with the different features and see how they work to add a form to your site. Here are some of these features.
• Edit Text Boxes
Simply click and edit the content on the site. You can also drag and drop media seamlessly without using any code. To edit the text, click on the box and type away.
• Edit the Background
It is also easy to change and customize the theme on your site by editing the background. To do this, click on the background image and choose the “Edit Background” button. This lets you change the image, use page alignment, and scrolling effect.
• Add New Elements
You can add a lot of fun items here with the “Element Menu” on the left side. All you have to do is drag and drop the selected media icon on any part of the page. You can add buttons, videos, popup text, and more.
If you want to add an image, simply drag the image icon to where you want the image to stay and click “Upload Image”. You can use the search button to explore free images from Weebly or upload them from your computer.
• Add New Pages
To add new pages, go to the “Pages” tab and click the plus icon at the left sidebar. Select the type of page you want from the drop-down menu and name it. The page automatically loads with pre-filled content and images that you can edit. After editing, click on the “Done” button to save the settings of your new page.
• Change the Color Scheme
Navigate to the Theme section on your dashboard to change the color theme on your page. You can add custom colors to your site from the variety of options available.
You can explore all features on the site to customize your site and make it as you want it. Simply drag and drop to complete most of the customization.
Step 5: Publish your Website
Now that you are done with customizing your site, it is time to publish it. It is super simple to publish your site. Simply click the “Publish” button and you will see a popup message informing you that your site is published. That’s it! You have successfully published your website using Weebly site builder.
Conclusion
Weebly makes it possible to edit content even after it has been published. You can update old details, add new sections to your pages, or write new blogs. To ensure that your site does well in search engine ranking results, master the art of using search engine optimization. You will find numerous resources to help you get the hang of this.
Is it better to build a website from scratch or use a site builder?
If you want to maximize time, using a site builder is the best option. It saves you the stress of fumbling with the design code. With a site builder, your website can be ready in a matter of minutes.
Is Weebly better than Wix?
Both site builders are great but Wix has more features and capability. Weebly is a nice option if you want to build a simple but stylish and efficient website.


