Introduction
You’re probably wondering why customer tracking is vital for your WooCommerce store. Well, you have a lot going on in the back-end of your website, and it can be hard to keep track of all the different pieces.
It’s even harder when you don’t know who is visiting your site or what they are looking at. With Google Analytics, you can see how customers interact with your products and then make changes that will help increase conversion rates. You’ll also get detailed information about what people are searching for, making it easier to create content that matches their needs! Meanwhile, what’s the point of tracking customers if you can’t see any data?
In this article, I will show you how to enable customer tracking on your WooCommerce store to assist you in having a better idea of what is happening with your online business.
What Is Google Analytics eCommerce Tracking?
Over the years, Google Analytics has become an invaluable tool for understanding website behavior. Many website owners use some analytics program on their websites. This way, they can understand how people use their website, and what pages they view the most. It also allows them to track conversions and see how many sales their website generates.
Google Analytics is a great analytics program that is free to use. It is a little bit tricky, though, when it comes to eCommerce tracking. Google Analytics uses a unique tag to track sales information. This pixel will track the user’s mouse movement and clicks on the site so that website owners can see the pages people are viewing, and the total number of views each page receives.
What are the benefits of Customer Tracking to Your WooCommerce Store?
Customer Tracking lets you measure and improve your WooCommerce store with customer-related data. Want to know how many products were viewed by a single person, or how many times a person viewed the checkout page? Here are several ways you can benefit from Google’s advanced analytic features.
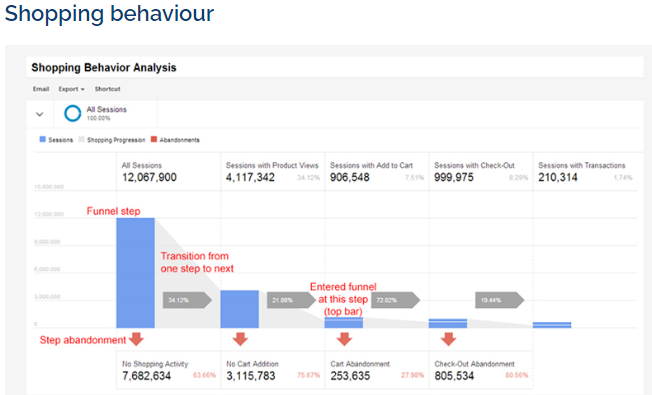
1. Shopping Behavior
By tracking your customers’ shopping behavior, you can get an idea of what products they’re interested in and what sorts of products they tend to buy together. This information can help you make better product suggestions and create more effective marketing campaigns.
2. Checkout Behavior
Tracking your customers’ checkout behavior can help you identify potential problems with your checkout process. For example, if many customers abandon their carts without checking out, you may want to consider adding social login features to eliminate this challenge.
3. Product List Performance
Tracking product list performance can help you determine which products tend to sell better than others and how successful certain promotional strategies are for specific products. This information can help you create more targeted promotional campaigns that yield higher returns on investment (ROI).
4. Sales Performance
By tracking different sales metrics like average order value (AOV) and total revenue, you can understand how your overall sales are trending over time. This allows you to decide when it’s best to launch new marketing campaigns or include product promotions to maximize ROI.
5. Key Performance Indicators
There are a variety of KPIs that can assist in tracking the performance of your WooCommerce store, including total site traffic, average daily orders per month, total revenue, etc. You’ll want to think about which KPIs are most important for your particular business when determining how to set up tracking.
6. Marketing Reports
An excellent way to track the performance of your marketing campaigns is by using Google Analytics. That way, you can get an idea about which channels are driving the most traffic to your store and then focus on what’s working best.
7. Sales Conversion Rate
Tracking your sales conversion rate (that is, how many customers purchase something after browsing or adding it to their cart) can help you find areas for improvement in your checkout process. For instance, if only 2% of customers purchase your products after adding them to their carts, there may be problems with the design or layout that could prevent potential customers from continuing through the checkout flow.
How to Enable Google Analytics WooCommerce Customer Tracking
Use of the MonsterInsights Plugin
Step 1: Install the MonsterInsights Pro plugin.
First, you need to install the MonsterInsights plugin. You can do this by going to Plugins > Add New in your WordPress dashboard and searching for ‘MonsterInsights’. Then, click on the ‘Install’ button and follow the prompts to install the plugin.
Step 2: Connect MonsterInsights to your WooCommerce store.
Once the plugin is installed, you need to connect it to your WooCommerce store. To do this, go to Insights > Settings in your WordPress dashboard and click on the ‘Connect MonsterInsights’ button.
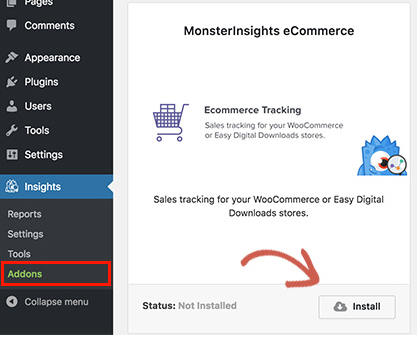
Step 3: Install the eCommerce Addon.
Next, visit the WooCommerce » Insights » Addons » eCommerce and install the eCommerce Addon. To activate the addon, you need to enter your MonsterInsights license key. You can find this on the Insights » page, under the General tab.
Step 4: Enable Enhanced eCommerce Tracking in Google Analytics.
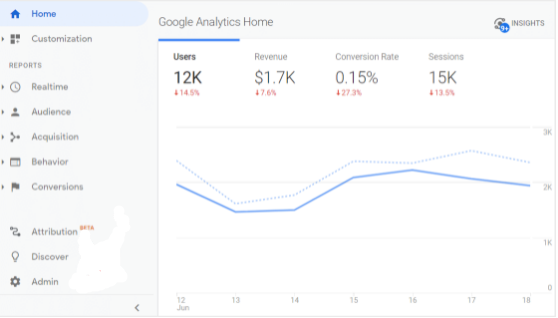
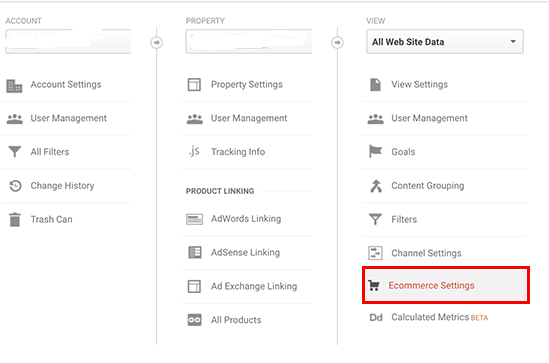
The next step is to enable Enhanced eCommerce tracking in Google Analytics. To do this, you need to open your Google Analytics account and switch to admin mode by clicking on the ‘Admin’ tab on the bottom left pane.
Then, select Property Settings on the left pane and click Ecommerce Settings.
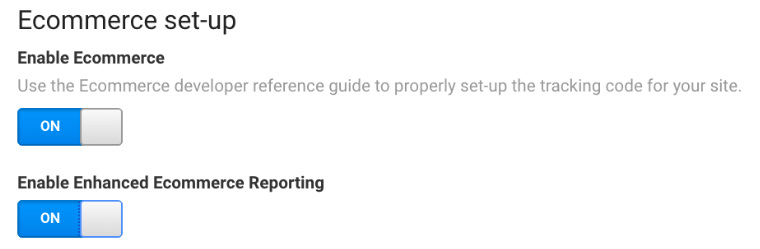
Under the Ecommerce settings, turn on the Enable Ecommerce and Enable Related products sliders.
Step 5: Enable Enhanced eCommerce in MonsterInsights.
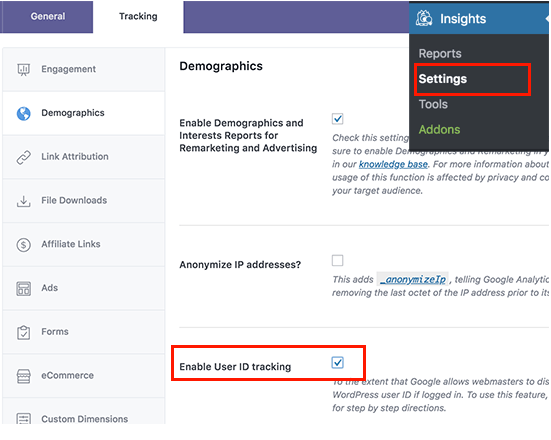
At this point, you’ll need to navigate into the Monsterinsights plugin from your WordPress dashboard. Click on the Insights » Settings page and select ’Tracking’ on the top panel. Navigate to the ‘Demographics’ tab and Enable User ID tracking by checking the box beside. In addition, don’t forget to save the changes.
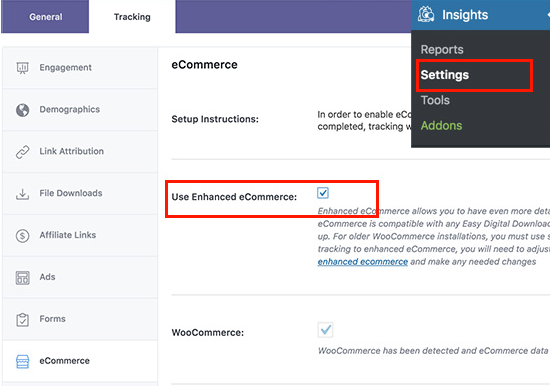
Next, click on the ‘eCommerce‘ tab at the bottom left corner and check the box beside ‘Enhanced eCommerce’ to turn on tracking activities within WooCommerce.
Checking Your WooCommerce Conversion Tracking
Once you have completed all the steps, your Google Analytics view should show data from WooCommerce. To view your data, go to Conversions » eCommerce » Overview. You should then see purchases and other relevant WooCommerce info.
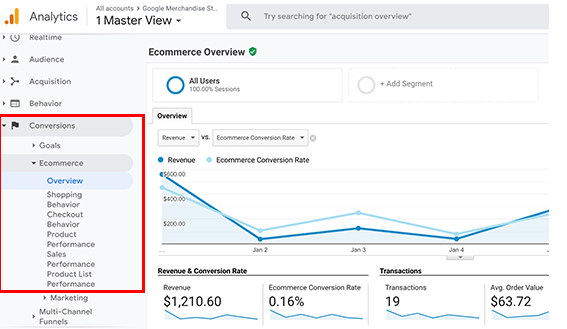
For more detailed data, you can drill down into each of the Enhanced eCommerce reports. For example, the Product Performance report will show you info on product performance, such as clicks, impressions, and conversion rates. The Shopping Behavior report will show you data on shopping behavior, such as pageviews and average session duration.
You can monitor your WooCommerce data by going to Behavior » Events and clicking on the eCommerce tab. This will show how many transactions you have, goals, revenue, and other eCommerce data.
In a Nutshell
Setting up WooCommerce conversion tracking using Google Analytics enables you to track how well your online store performs. You can see information on the products your customers are purchasing most, where customers are coming from, and how much revenue your online store is generating.
Besides, MonsterInsights helps make the process easier by providing an easy-to-use plugin for Google Analytics. With the analytics in hand, you can make data-driven decisions to help improve your store’s performance.
All in all, if you’re looking to improve your online sales, then you should consider integrating an eCommerce tracking solution with your WooCommerce store.
Hopefully, this article has helped you understand how to add WooCommerce Google Analytics eCommerce conversion tracking. Do let us know in the comment section if you would like us to cover a specific topic or you have any ideas or suggestions.
What is the MonsterInsights plugin?
The MonsterInsights plugin is a tool that allows you to connect your WordPress site with Google Analytics. This plugin creates a new section in your WordPress dashboard to monitor website stats, such as pageviews and traffic sources.
How do I connect MonsterInsights to my WooCommerce store?
To connect MonsterInsights to your WooCommerce store, go to Insights > Settings in your WordPress dashboard and click on the Connect MonsterInsights button. Then, you will need to enter your Google Analytics ID (UA number). You can find this on the Insights > Settings page, under the General tab.
How do I install the eCommerce Addon?
To install the eCommerce Addon, visit the Insights » Addons page and click on the Install button. Then, you will need to enter your MonsterInsights license key. You can find this on the Insights » Settings page, under the General tab.
How do I enable Enhanced eCommerce tracking in Google Analytics?
To enable Enhanced eCommerce tracking in Google Analytics, you need to open your Google Analytics account and navigate to Property Settings. On the left pane, click on Ecommerce Settings. Then, check Enable enhanced eCommerce tracking.
How do I view my Enhanced Ecommerce data in Google Analytics?
To view your enhanced eCommerce data, go to Behavior » Events and click on the eCommerce tab.