Wordpress Debug Mode
WordPress includes an inbuilt debug mode which can help you to highlight issues with plugins, themes and code. In this article we show you how to enable it and see the errors that WordPress is giving.
Before You Start
At Fixed.net we can debug and fix WordPress issues for a one-time fee. We are available 24/7 and can start instantly. Why not trust the experts and use fixed.net?
Nobody likes to have issues with their website. Sooner or later, however, you will encounter a problem which would need some troubleshooting skills. One clever trick is enabling WordPress debug mode, which might be quite confusing for those of you who do not have development experience.
Fortunately, this process is quite straightforward. It can help you to identify specific errors and resolve them, thanks to the detailed log which shows up when there is a problem. If you prefer to avoid any coding, you can simply use a plugin.
Today we will show you what debug mode is and how you can enable it.
What is WordPress debug mode?
Making changes to your website can disrupt the core PHP of your website. For example, when installing a new theme or plugin, and adding custom code, it might come into conflict with other tools. Such problems are not immediately apparent, which is where debug mode comes in.
When you enable debug mode in WordPress, this will display a log of PHP errors and warnings, even if that’s not your current problem. If you are a developer who wishes to create high-quality products, using this feature can be essential for having a clean code.
The debug mode is also very useful for users who are not web professionals. Let’s say that you have installed some new tools, but now your website does not work. By using the instructions below, you will be able to see what is causing the issue, and contact the relevant support channel.
The debug mode is not always useful for all situations. However, by enabling it you can speed up the troubleshooting process and identify the cause of the problem a lot faster than if you disable all of your extensions one by one.
How to enable debug mode?
Now that you have a pretty clear understanding of what debug mode is, let’s take a look at two popular ways to enable it in WordPress. It doesn’t matter which method you choose, just make sure you always disable the feature again after you’ve completed your troubleshooting.
When using the debug mode, you will see displayed PHP error codes on the front and back ends of your website, which will make them visible to visitors. Hackers will be able to use this information and take advantage of it. It might also cause concerns in users that your website is not safe.
Aside from that, debug mode is a very popular and helpful tool, and knowing how to use it can be a important skill.
Method 1: Using a plugin
For all users out there, who do not wish to mess with the PHP code themselves, this is the perfect solution. A plugin such as WP Debugging will do that for you.
Why not let Fixed.net fix your WordPress problems for you. We charge a fixed fee and can start immediately.

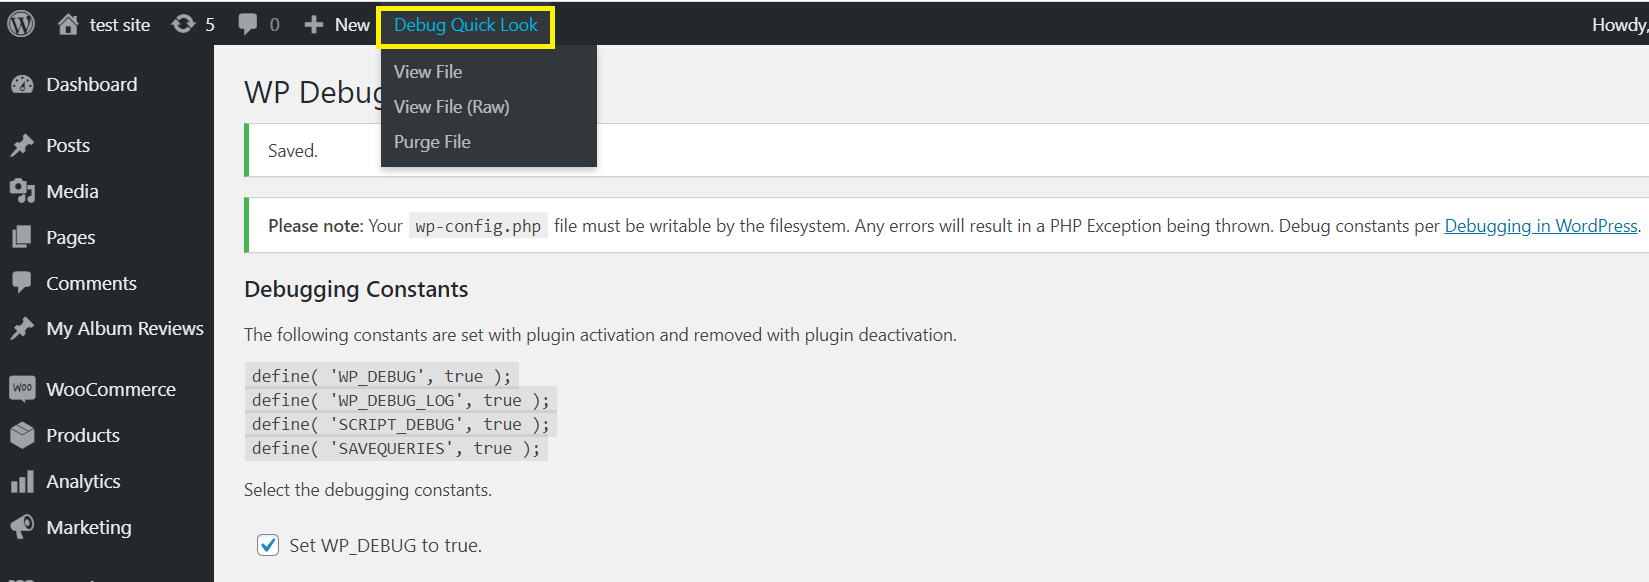
All you need to do is install and activate the plugin. As soon as you do this, it will start working. The plug-in will set the following values to “true” in the wp – config.php file without you having to intervene.
define('WP_DEBUG', true);
define('WP_DEBUG_LOG',true);
define('SCRIPT_DEBUG', true);
define('SAVEQUERIES', true);
All warnings and errors will be saved in a log, which can be accessed by using the debug QuickLook link located in your admin toolbar.

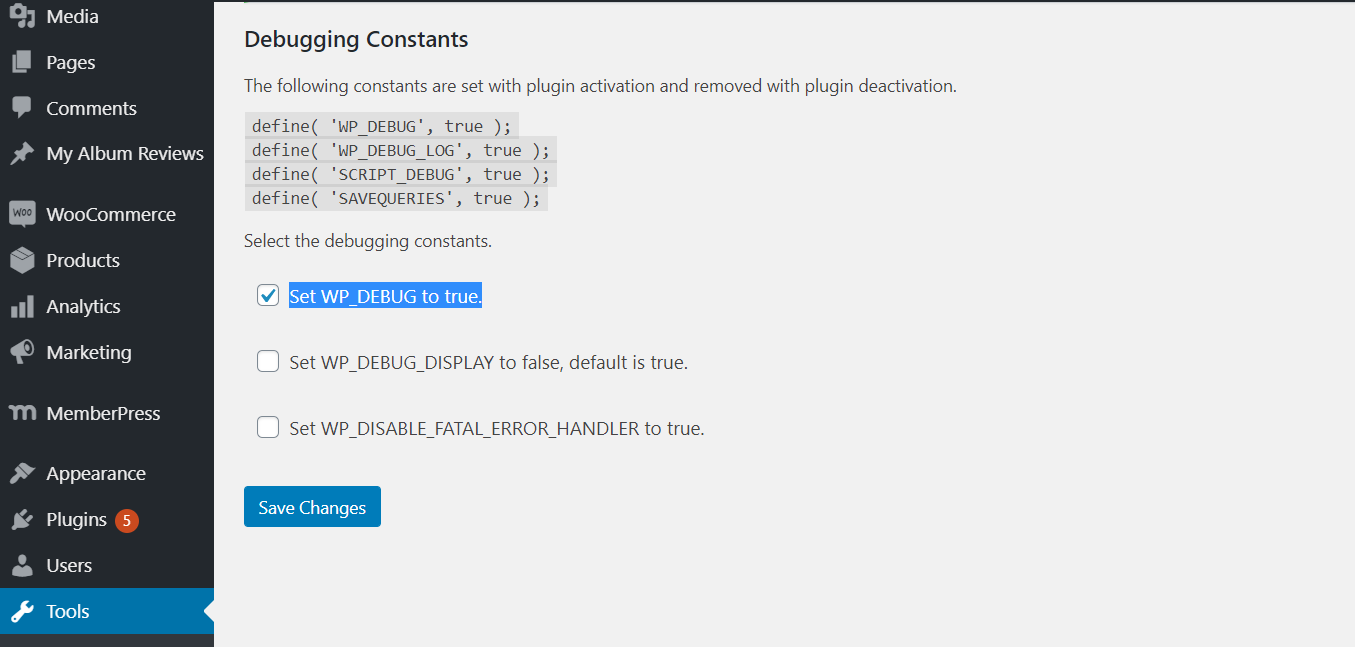
You can even apply some additional settings, such as WP_DISABLE_FATAL_ERROR_HANDLER. This option can be found in Tools – WP Debugging – Debugging Constants. From there, you can also disable WP_DEBUG and WP_DEBUG_DISPLAY.

Method 2: Enabling Debug mode manually
If you have confidence in your coding skills, you can use the manual method. For you to do this, you need to make changes to the WP – config.php file. It can be accessed from the hosting Control Panel or your FTP client.
After locating the file, change the debug mode values too “true” by using the following code above the line which says /That‘s all, stop editing! Happy blogging./:
define('WP_DEBUG', true);
After you do this, WordPress will display for you all PHP errors and vulnerabilities on the back and front ends of your website. Make sure you don‘t do this with live websites. It can be, however, quite helpful if other troubleshooting methods fail. You can save this information by enabling the debug log functionality with the following codе:
define('WP_DEBUG_LOG', true);
WordPress will now create a debug.log file which can be accessed from the wp – content directory. Once this is done, you can disable the debug mode by changing the value to "false":
define('WP_DEBUG', false);
Another thing you can do is deleting the debug mode code entirely. However, if you simply change the status this will help you activate the feature quickly in the future.
Conclusion
Learning how to activate debug mode is a very important skill. It’s very useful with some common WordPress errors and identifying the causes for such problems. Fortunately for you, it’s an easy process, and there is no need to mess with your website’s code if you don’t have the confidence.
Do you have any questions about the debug mode? Drop a comment below!
Should I leave WordPress debug mode on?
No. You should switch off debug mode once you have finished debugging your issue. If debug mode is fully on it will be showing errors on your site if there are any. If you set it to just log errors (and not display them) then it could be filling up your debug_log file.
Debug mode does not work for me.
Some security plugins for WordPress suppress debug mode. Try disabling these to see if debug messages show.
At Fixed we fix and maintain WordPress websites all day, every day. See our WordPress help information for more details.


