Introduction
Whether you are new to the world of eCommerce or probably have been there for some time, chances are you've had an encounter with the Jetpack plugin.
But have you tried using this plugin with WooCommerce?
When it comes to managing WooCommerce, nothing beats Jetpack. With over 5 million installs, Jetpack provides the most powerful features to provide a smooth running WooCommerce website. The plugin comes with the right tools to enhance your website's security, marketing campaigns and optimize your store's performance.
Consequently, if you're looking for the perfect tool to help increase your conversions, you need to search no further.
For more information about Jetpack, I recommend you read this guide. We'll start by having a quick overview of the plugin, key features, and its integration with WooCommerce.
Ready to learn?
Jetpack Overview
Despite most WooCommerce users having come across Jetpack, a significant percentage are yet to use the plugin. Jetpack is a free WordPress plugin designed to make WordPress sites safer, faster and help you increase your conversions.
Jetpack is developed by Automattic, the team behind WooCommerce and WordPress.com.
The plugin targets users launching their first self-hosted WordPress website or migrating from WordPress.com.
Jetpack for WooCommerce allows you to automate most processes for your store, including content management, customer service product management, and security
Additional features entail editor-type tools, content delivery network services, and website metrics. Let's dive in detail into some of the best features Jetpack offers.
Jetpack Features for WooCommerce
1. Security
Jetpack provides robust security features to enhance the safety of your WordPress site. With Jetpack protect, you can shield your store from malicious attacks, malware, and virus attacks.
Besides, Jetpack offers automated scans for spam protection throughout your entire site. Upon detection of a threat, an email is sent to the admin for maintenance using Jetpack's 1-click fix feature. Additionally, Jetpack offers protection against brute force attacks using two-factor authentication, single sign-on and blocking multiple login attempts.
2. Real-time backups
Regardless of what happens to your site, you don't have to worry about your sales. Jetpack's real-time backup plugin helps you automatically restore your site, create backups, and even assist when migrating your site.
On top of that, you can back up your files and databases to prevent data loss in case of a security breach. The best part is that you can still download back your data in case of a disaster. To prevent loading the server, all backups are stored in the cloud. To restore your backups, visit the activity log and pick among the saved versions of your site's data.
3. Performance optimization
Jetpack enables you to analyze the performance of your store's marketing campaigns for effective marketing strategies.
With Jetpack, you can access valuable stats and insights on the performance of your business straight at your WooCommerce dashboard. These include metrics about your site's visits, popular blog posts, and most searched products. Despite the limited information in these reports, they can critically help you devise future strategies for the growth of your business.
4. Automate social sharing
Statistics show that 52% of active social media users have at one time purchased a product courtesy of a social platform. Social media plays a significant role in marketing your WooCommerce products.
Jetpack's Publicize feature allows you to automatically share new content on social platforms such as Facebook and Twitter to reach a wider audience. To add to that, it adds social share buttons on your product pages to encourage customers to share their purchases with others.
How to Connect WooCommerce to Jetpack
Step 1: Installation
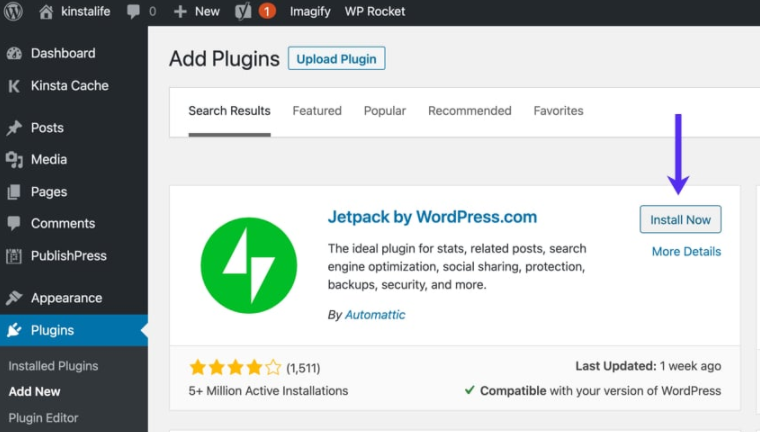
To install Jetpack, go to WooCommerce > Plugins > Add new. Type 'Jetpack' as your keyword on the search box and hit the search button. Once you've identified the plugin, click 'Install' and then activate your plugin.
Step 2: Set-up
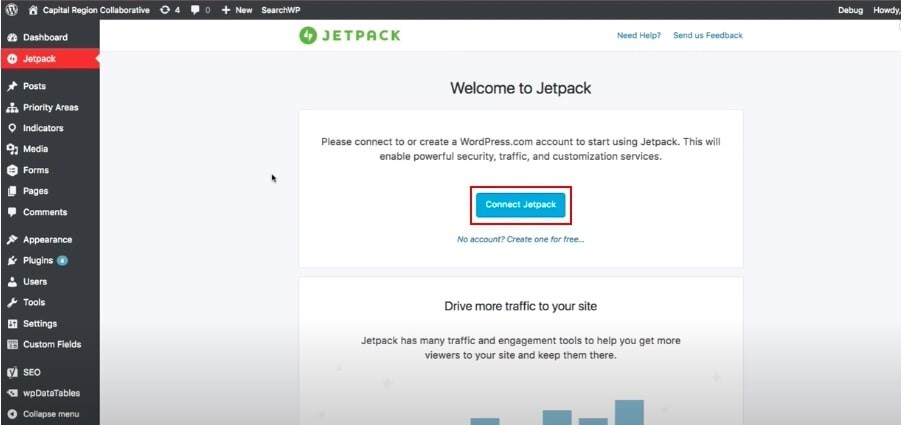
Once you've installed the plugin, you'll be redirected to a welcome page where you'll need to set up the plugin. Click on the 'Connect Jetpack' button to proceed.
Next, you'll need to sign up with your Google account or WordPress.com account. Once logged in, click on 'Approve' to proceed.
A prompt will appear requesting you to choose a pricing plan. You can consider going for the free plan if you're starting.
Step 3: Configuring Jetpack's settings
To configure Jetpack, go to WooCommerce > Jetpack > Settings. There are 6 primary settings in Jetpack that you should configure: security, performance, sharing, writing, discussion, and traffic. Let's briefly look at each.
1. Security
The first thing you'll notice with Jetpack security settings is the toggle on/off sliders that allows you to enable/ disable certain features in Jetpack. The 'Backups and security scanning feature' (available for paid plans) helps you backup your WooCommerce data to prevent any loss.
Additionally, downtime monitoring helps alert you when your site goes offline and comes back online. At the same time, brute force attack protection adds an extra security layer against malicious attacks. Furthermore, you can auto-update plugins to stay up-to-date with their latest versions. Have security issues with WooCommerce? Here's a solution for you.
2. Performance
Jetpack performance settings enable customers to find products faster and efficiently from your site. Some of the essential performance features offered by Jetpack include search optimization, video hosting, and image optimization. Enabling 'lazy loading for images' will improve your site's speed, while compressing and formatting images will reduce media file load times. For search-heavy sites, Jetpack search can assist with speeding up your site's functionality.
3. Writing
Bloggers and content creators can also benefit from Jetpack's features, such as full-screen carousel slideshows, Markdown/Latex support, and many more. You can add the full-screen carousel slideshow functionality to your WordPress gallery and select whether you want to use a dark or light theme for your carousel. This can enhance the experience for visitors coming to your site.
Lastly, with Jetpack, you can publish new posts via email, customize widgets, and add custom content types such as testimonials and portfolio items to your site.
4. Sharing
Jetpack has plenty of social sharing features to enable you to connect better with your audience. These include social sharing buttons and like buttons.
The Jetpacks' Publicize Connections' feature enables you to link WordPress to several social media platforms such as Facebook, Twitter, and LinkedIn. As a result, when you publish a post, it'll be shared across all the platforms.
Additionally, the 'sharing' buttons assist you in adding social sharing buttons to your posts and pages. The 'like buttons' feature, on the other hand, will enable you to add a like button at the end of your WordPress blog posts or product pages.
5. Discussion
Since WordPress's default commenting system has some limitations in its engagement features and login methods, you can use the Jetpacks 'Discussion' feature to enhance the comment functionality. If your blog generates many comments, enabling Jetpack's comment tools can provide a better experience for your audience.
In addition, with Jetpack's 'Subscriptions' feature, you can easily add site and comments subscriptions to your site.
Click here to view the best WordPress comment plugins.
6. Traffic
Jetpack's 'Traffic' feature enables you to configure various settings in your WooCommerce store, including display ads, shortlinks, sitemaps, optimize SEO, and enable Google Analytics.
The Jetpack premium plan will help you enable display ads on your site to help your reach a wider audience. Besides, the 'Related Posts' feature is essential to help you add a related header and thumbnail image for each of your posts.
Other features include site verification and sitemaps that help generate XML sitemaps for your WordPress site.
And that's all for now about Jetpack's features that you can enable/disable to your store.
In Conclusion
If you are looking for the perfect plugin to increase the usability of your WooCommerce site, Jetpack is the right choice for you.
Jetpack is an all-rounded plugin that can offer advanced functionality to your WooCommerce site. Integrating the plugin with WooCommerce is easy. All you have to do is install the plugin and configure its settings.
Moreover, Jetpack is packed with plenty of features good for your store's growth. Right from security, performance, writing, sharing, discussion, and traffic features.
After reading this guide, we hope you're now ready to integrate Jetpack into your WooCommerce store. We recommend you to enable all the features covered in this aide.
Anything you think we missed out on? We'd love to hear from you. Leave us a comment below!
To remind you, we fix, host & maintain WordPress websites. Here are our pricing plans.
How can I integrate Jetpack for a multisite installation?
Ensure to connect Jetpack separately on WordPress.com on sites where a Jetpack connection is needed when using WordPress Multisite.
What do I need to run Jetpack on my site?
To run Jetpack in your WordPress site, you will need a web host that meets the WordPress hosts requirements, the latest version of WordPress, a WordPress.com account, and a publicly accessible WordPress site that is XML-RPC enabled.
What is the WooCommerce shipping & tax Jetpack connection?
WooCommerce Shipping and Tax simplifies basic eCommerce services like shipping by taking care of everything needed. The plugin uses your Jetpack connection to speed up the selling process in your WooCommerce store by aiding in processing payments, calculating tax, and printing labels.
Can I use Jetpack for a local site install or a private site?
Yes. You can still access Jetpack's features provided you enable Jetpack's development mode.

