Introduction
Clover POS is a perfect option for modern business. It's an integrated, comprehensive system that provides much more than just a point of sale.
Clover POS has various features to help your business run smoothly, including inventory tracking, integrated customer management, product customization, and more. There's also a built-in five-axis machining center and CNC, which means you can easily manage your inventory and production requests.
The Clover POS for WooCommerce is the ideal solution to expand your business. It's cloud-based, enabling you to store data in the cloud and is accessible from anywhere.
Integrating Clover POS with WooCommerce is simple. This article will teach you how to integrate Clover POS with WooCommerce to help manage your store effectively. Let's dive in!
4 Reasons to Integrate Clover POS with WooCommerce
Integrating WooCommerce with Clover POS is a crucial way to grow your business. Before discussing how to do this, let's first look at the benefits of integrating WooCommerce with this POS system.
Inventory management
Integrating WooCommerce with Clover POS will allow you to manage your inventory effectively. This is possible because the latest version of the POS system allows for automatic updates as soon as you update your inventory on WooCommerce. Besides, it ensures that the available stock is accurate and up-to-date at any given time.
Automate processes
One of the most significant benefits of integrating WooCommerce with Clover POS is automation. For instance, integrating your inventory with WooCommerce will allow your sales reps to process sales orders quickly. In turn, this frees up their time to focus on other aspects of the business. Alternatively, if your inventory is managed elsewhere, integrating WooCommerce with Clover POS will automate the process of updating your inventory. This ensures that all relevant data is accurate and up-to-date, allowing you to manage your inventory more efficiently.
Streamline business
With WooCommerce Clover integration, you can run your business more effectively and efficiently. For instance, it's easy to track your sales and inventory remotely. This is because the latest version of the POS system comes with a mobile application that allows you to monitor and manage your business on the go. Additionally, this version of the POS system features enhanced security features that will help you protect your sensitive information.
Improve customer experience
Integrating WooCommerce with Clover POS gives your customers quick access to customer support and ensures that their orders are processed quickly. Moreover, this integration will help you significantly improve the customer experience by offering a seamless checkout process. Now that you know what integrating WooCommerce with Clover POS offers, let's see how you can do it.
But before that, do check out how you can customize WooCommerce checkout fields for a better shopping experience.
How to integrate WooCommerce with Clover POS
Many businesses use POS systems to increase productivity and streamline business processes. Integrating WooCommerce with Clover POS allows you to sell your products efficiently. This section will show you how to integrate WooCommerce with Clover POS.
1. Sign up for an account with Kosmos Central
To start with, you need to create an account with Kosmos Central. If you already have one login to your dashboard to proceed.
You'll find two menus on your dashboard menu, Tasks, and Actions. Select 'Actions' to assist you in choosing the data you want to sync between Clover and WooCommerce.
If you're doing it for the first time, you'll have an option to create a new action. Click the 'Create Action' button to proceed.
On the next screen, you'll get several icons showing different applications. Select the icon that represents Clover to start your connection. In addition, you'll find a list of other options in a drop-down menu slightly below the Clover icon. Pick the 'Add a different account' option and hit the continue button.
2. Authorize eSync to access your Clover account
After hitting the 'Continue' button, you'll see a form with a 'Grant access' request on the next screen. Now, give your Clover account a name in eSync. Add your preferred name in the given fields and add the Clover URL. Click 'Next' to continue.
On the next screen, you'll be prompted to log in to your Clover account.
If you are using a different account, click on 'Add a different account' and then 'Continue'. Also, if eSync is not yet installed, click on Connect > Accept and choose the 'Open App' option.
3. Select a merchant
Here, you need to add a merchant to allow developers to access your merchant's data via Clover's OAuth. As mentioned previously, you need to ensure that your application is installed. Otherwise, you'll need to head over to Clover's app market.
Check out How to Add Your WooCommerce Shop to Google Merchant Center
4. Create an action for WooCommerce
In this stage, you need to choose a second action similar to what you did while choosing the first action. This page will display your previously selected merchant. Since you're interested in connecting WooCommerce to Clover, select your second connection as 'WooCommerce' by clicking the icon that represents it. Tap the 'Grant Access' button to continue.
5. Give access to WooCommerce
At this point, you need to add several details in the grant access form to enable eSync access to your WooCommerce account. These include giving your WooCommerce account a name in eSync, adding your WooCommerce website URL, consumer key, and consumer secret. To receive your consumer key and consumer secret IDs, return to WooCommerce Settings > Advanced > REST API. On the grant access form where you're to add these details, you'll find links to guide you in generating these details.
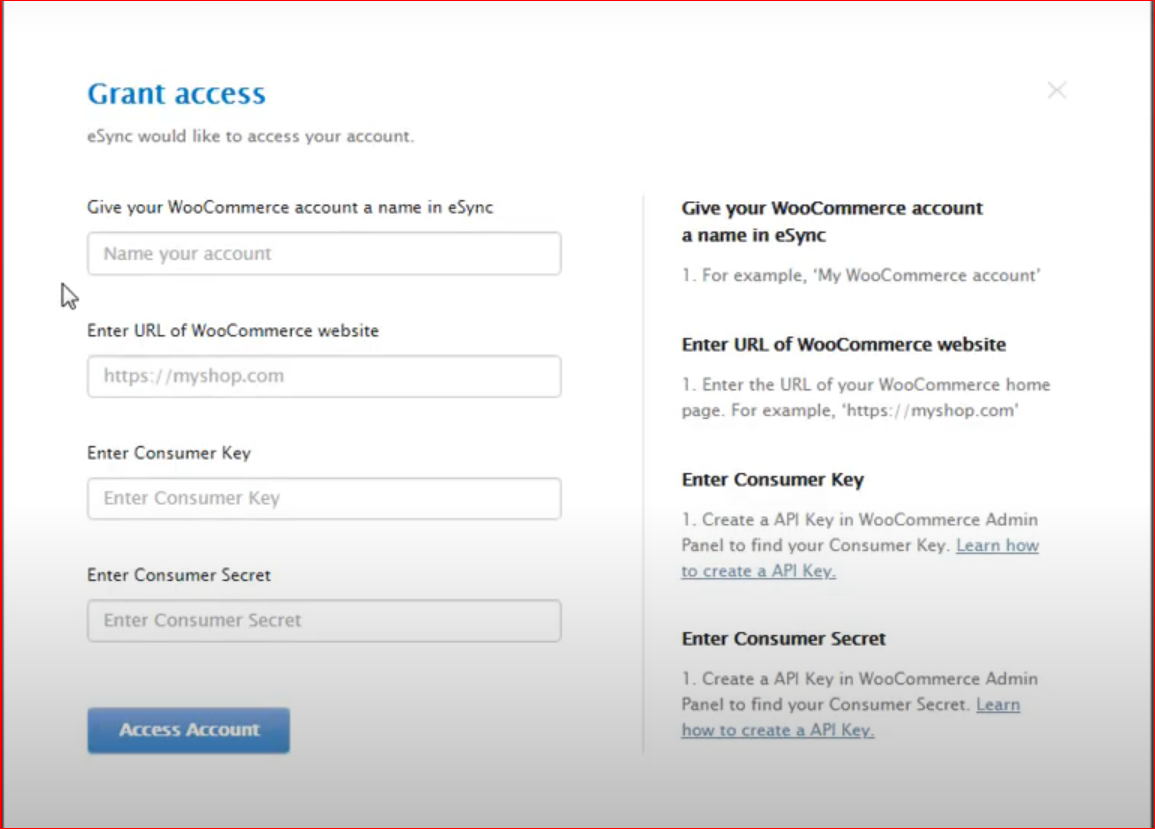
Copy these details and paste them into the relevant fields. Now you can proceed to click the 'Access' account button.
The next screen will display both of your connections; Clover and WooCommerce. Hit the 'Continue' button to proceed.
In the next section, you'll need to pick actions such as whether you would like Clover to send standard items to WooCommerce, Clover to send inventory levels for standard items, and whether Clover should send inventory for standard items to a multi-stock location in WooCommerce. Pick the 'Clover send standard items to WooCommerce' option and click on 'Continue'.
Click the 'Save action' screen and add your action name and save the changes on the next screen. In addition, under the 'Modified action' section, click on 'Configure' to configure your chosen action.
6. Configure your chosen action
Go to the action configuration settings and pick a date. This will allow you to send updated data in Clover based on your selected date. Click the 'Save Clover Settings' button to save your changes. Next, scroll down, and you'll find a 'Back to Dashboard' option. Select the option to return to the dashboard. Click the 'Action' tab, and then 'Configure'. Click the 'View/Edit' section under 'Clover Setting' to customize your details.
7. Create tasks
On your dashboard, select the 'Tasks' tab and click on 'Create task' to proceed. Select the 'Add Action' option and continue until you encounter a 'Success' button. Next, scroll down the page to the 'Task Name' field. Enter your task's name in this field and save your changes.
In the next screen, pick a schedule in which you would like your task to occur. Click on 'Run', enter the preferred time you wish to run your task, and click 'Apply'.
Now, click the 'Activity' button and choose 'Download Log File'. After completing the download, click on 'Action', select 'Clover', and pick a merchant. Similarly, choose 'WooCommerce' for the second connection and continue adding other actions until one at a time to the last one.
At this point, the WooCommerce Clover integration is successful. You can now track your sales transactions in WooCommerce when you're in the POS.
Conclusion
Integrating WooCommerce with Clover POS is essential in today's business landscape. With the integration of both platforms, you can easily manage customer data and create a robust system to streamline your business operations.
The Kosmos eSync platform is an excellent example of integrating WooCommerce with Clover POS. You can use it for inventory management and data synchronization. As a result, you can combine POS and WooCommerce inventories into one central database that both platforms can access.
With this integration, you can create a powerful CRM system that tracks everything from customer data to product history. This will ensure all data is up to date and accurate while also building a solid online presence.
How much is Clover per month?
This answer depends on the type of plan you are interested in. However, subscription fees start at $9.95 monthly. Advanced plans start at $39.95 per month but offer more features and benefits.
How does tracking inventory work with WooCommerce?
Clover integrates with the REST API to allow you to manage your product data and stock levels through your accounting and POS systems.
Is the integration secure?
Yes, the WooCommerce-Clover integration uses industry-standard SSL/TLS technology to keep your data safe.
How can I save money on this integration?
If you have a WooCommerce website but do not require a checkout, it is possible to set up the integration without connecting to Clover's checkout platform.