Introduction
Adding Apple Pay to WooCommerce can be a great way to improve the checkout process for your customers and increase your sales. Why? Because 48% of mobile users say that even if they like a business and their website is not optimized for mobile phones, they will turn to a competitor.
So, if you want your business to succeed in the mobile age, you need to ensure that you've optimized your website for smartphones and tablets.
Apple Pay can help you to achieve this goal. With Apple Pay, customers can check out quickly and easily with just a few taps on their iPhone or iPad. In addition, because Apple Pay uses Touch ID, it's more secure than traditional credit card transactions. With Apple Pay integration for WooCommerce, you can take advantage of these benefits and more.
This tutorial will show you how to set up Apple Pay in your store. We'll also discuss some of the benefits of using Apple Pay and how it can help you boost your sales. Let's get started!
What is Apple Pay, and how does it work?
Apple Pay is a mobile payment system developed by Apple Inc. It allows users to make payments using an iPhone, iPad, or Apple Watch.
You can use Apple Pay for eCommerce payments on the web or mobile apps. It is compatible with: iOS 11, macOS Sierra, and watchOS. The user must first add their credit or debit card to the Wallet app on their iOS device or to the Apple Watch to make a payment.
When making a payment, the user holds their iOS device or Apple Watch near the contactless reader on the merchant's checkout terminal. The user must authenticate their identity using Touch ID (for iPhones) or double click the side button of the Apple Watch.
This unlocks the funds sent from the credit or debit card to a virtual account. The user receives a notification of the outcome upon completing the transaction.
Apple Pay is a more secure way to make payments as it doesn't use your actual card number. Instead, the payment is completed using a unique transaction code that can't be used again. Apple Pay also doesn't store your card details on your device, meaning they are inaccessible once your device is lost or stolen. This makes it a more secure alternative to using your physical card.
Benefits of Using Apple Pay WooCommerce Payments
Millions of customers worldwide are using Apple Pay to make their purchases. With Apple's market share continuing to grow, it's a critical payment method to accept if you want to grow your business. Below are some of the reasons why you should consider adding Apple Pay to your WooCommerce store:
1. iOS' market share is growing
In the United States, for example, iOS now has a market share of almost 50%. This means that if you want to reach the most customers, you need to accept Apple Pay.
2. It increases conversions
Apple Pay is a very convenient payment method for customers, and it has been shown to increase conversions by up to 300%.
3. It's simple to use
Apple Pay is straightforward for customers to use, and it doesn't require them to enter any payment information. This helps to reduce the chances of them abandoning their purchase.
4. It's secure
Apple Pay is one of the most secure payment methods available. It uses a chip card system virtually impossible for fraudsters to hack into. This makes it much harder for them to steal customer information or credit card details. It also makes it easier for you to comply with PCI DSS requirements and keep your customer's data safe.
5. It prevents fraud and chargebacks
Apple Pay offers enhanced security with its chip card system, making it harder for fraudsters to steal information. In addition, because the server doesn't store the customer's payment information, it reduces the chances of chargebacks occurring. This means you don't have to worry about them as much.
6. It's available via Stripe for WooCommerce
If you're using Stripe for your WooCommerce store, you can easily add Apple Pay as a payment method. This makes it quick and easy to accept payments from customers who want to use Apple Pay.
7. It's future proof your business
As more and more people start using mobile payments, it's essential to have a payment system that supports this. By adding Apple Pay, you're future-proofing your business and ensuring it can grow with the latest payment technologies. So, if you're looking for a secure, convenient, and future-proof way to accept payments from your customers, consider adding Apple Pay to your WooCommerce store.
Adding Apple Pay to Your WooCommerce Store
Step 1: Download and install Stripe For WooCommerce
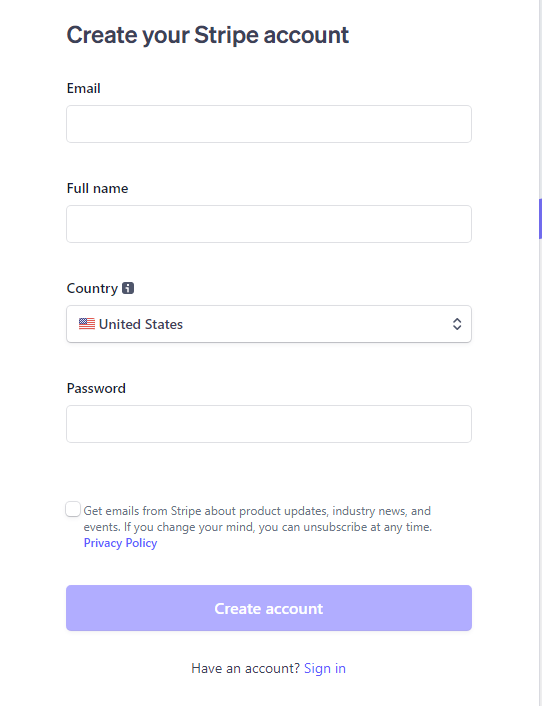
First and foremost, you'll need to sign up for a Stripe account. Add the required information, including your business details and bank information.
In the next step, you need to install the Stripe payment gateway plugin in your WooCommerce store.
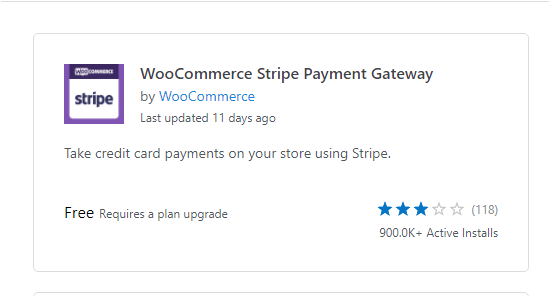
Navigate to your WordPress dashboard and go to Plugins > Add New. On the search box, search for 'Stripe for WooCommerce' and once you find it, install and then activate the plugin.
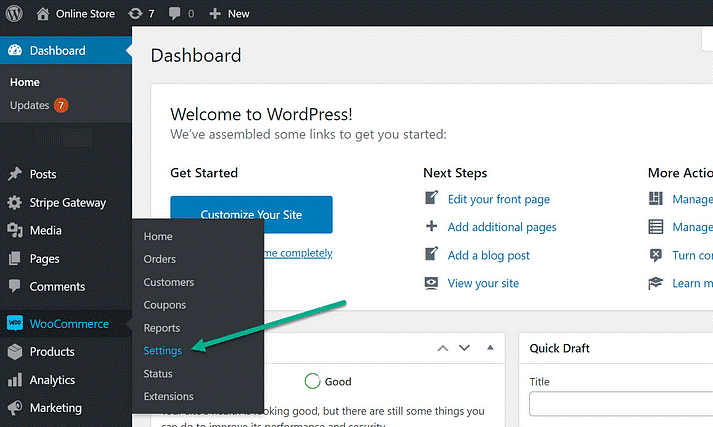
Step 2: Configuration
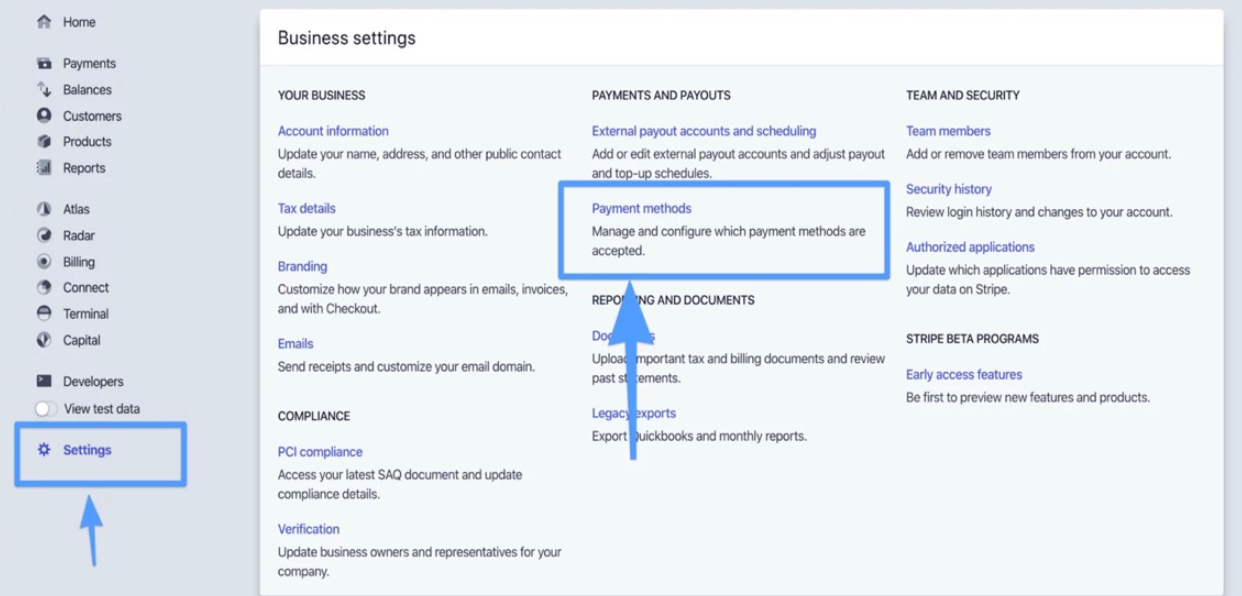
This step will involve linking Stripe to your WooCommerce store. Hover to WooCommerce > Settings > Payments tab.
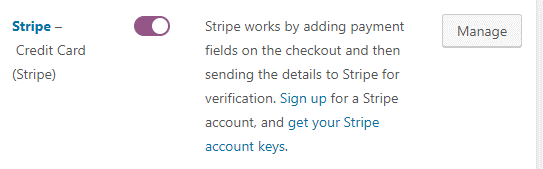
Here, you'll find several payment methods. Ensure to enable the 'Stripe Credit Cards' option. Then, click on 'Manage' to configure the plugin further.
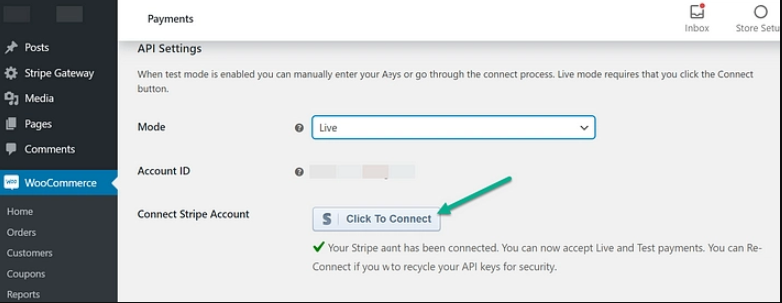
On the next screen, click on the 'API Settings' tab and then 'Click to Connect' to integrate your Stripe account. A new page will open where you can add the Stripe account you want to connect. After a successful connection, a test publishable key and a test secret id will be generated. Don't forget to save these changes.
Step 3: Add an Apple Pay button
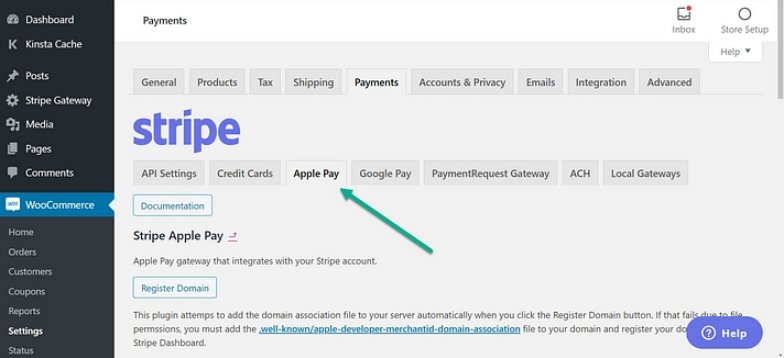
On your WP Admin dashboard, go to WooCommerce > Settings > Payments. Click on the 'Apple Pay' option under the 'Payments' section to register your domain. Next, click on the 'Register Domain' button under Apple Pay to complete the setup.
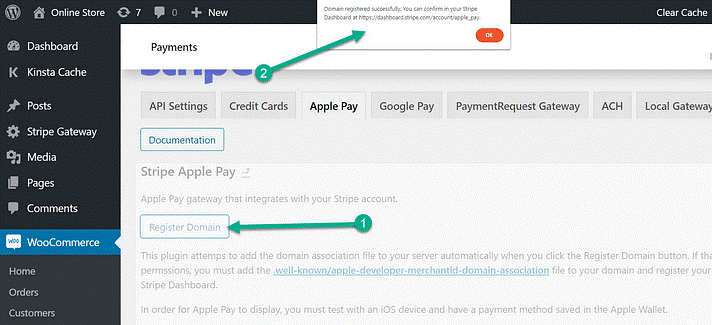
A pop-up notification will alert you that the domain has successfully been registered. Alternatively, you can go to WooCommerce Apple Pay settings to submit your verification document manually. Upon completing this process, your WooCommerce Apple Pay button will be added to your checkout page.
Step 4: Add your domain to Apple Pay in Stripe
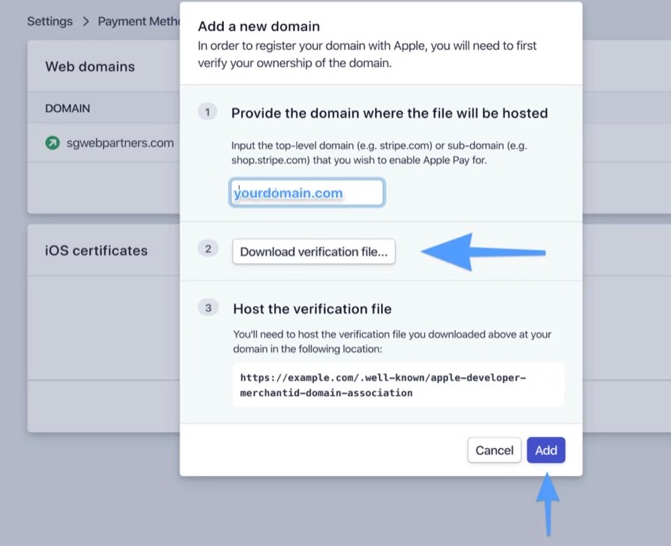
Head back to your Stripe dashboard and log in. Next, click on Settings > Payment Methods > Apple Pay.
At this point, click on 'add domain' and key in your domain name. Click the 'Download verification file' button to save the verification file to your computer.
Step 5: Upload verification file
In this stage, you need to connect your server through SFTP or SSH using a program such as FileZilla. To proceed, upload the 'apple-developer-merchantid-domain-association' file to the '.well-known' folder in your document root. On completing this process, a string of random numbers will appear. This will assure you that you're on point with the entire process. However, note that you may have to create a new file directory that will enable you to create the '.well-known' folder.

Step 6: Test whether Apple Pay is working
Now, it's time to check whether our Apple Pay button is functional. To do this, open the Safari browser on your phone or computer. Go to your website add a product to the cart. Next, try making your payment via Apple Pay on the checkout page.

If not working, check if:
You're using an Apple product
You're on the Safari browser
You've cleared your caches
You have installed an SSL certificate to your site
Apple Pay set up was successful on your Apple device.
And there you go! Your Apple Pay payment gateway should easily integrate with your WooCommerce store if you carefully follow the entire process.
Final Thoughts
Apple Pay is one of the safest and most convenient ways to pay for your online purchases. And with Stripe for WooCommerce, you can easily add Apple Pay to your WooCommerce store.
Adding Apple Pay to your store is a great way to increase conversion rates and improve the customer experience. Apple Pay is fast, easy to use, and secure, so your customers will appreciate the convenience it provides.
And thanks to Stripe for WooCommerce, adding Apple Pay to your store is a breeze. The Stripe for WooCommerce plugin makes it easy to set up Apple Pay and accept payments. So why wait? Add Apple Pay to your WooCommerce store today!
And that's it for this post. Thanks for reading!
Where is Apple Pay available?
Apple Pay is available in over 50 countries. They include the United States, the United Kingdom, Canada, Australia, Japan, China, the UAE, France, Russia, and Europe. Check out the complete list here.
Which devices work with Apple Pay?
Apple Pay is compatible with Apple iPhone 6, iPhone 6 Plus, and newer versions. Also, Apple iPad Pro, iPad Air 2, iPad mini 3, and later versions.
Is there a limit for Apple Pay?
No, there is no limit for Apple Pay. This means you can make or accept payments for any amount.
What if you lose your iPhone or Watch?
If you lose your iPhone or Watch, use Find My [device] to suspend Apple Pay so that no one else can make payments. Also, if you lose your device, go to "Find My iPhone-findmyiphone" or use the Find My app on another Apple device.