Thanks to the evolvement of technology, you can now sell your products to customers from any part of the world. With numerous eCommerce tools that allow sellers to explore markets in other regions other than their locations, selling has never been easier. One of the popular eCommerce tools that are available in the market is WooCommerce.
It is a tool in WordPress that allows people to sell both physical and digital goods to customers across the world. With over 92% market share, it is undoubtedly one of the most popular plugins used by businesses online. Thankfully, it is easily accessible.
When it comes to setting up a WooCommerce store, paying close attention to the numerous technical and business-related details is crucial to making the buying and selling experience on your site seamless. If you sell physical goods at an online store, one of the most crucial issues that you must provide solutions to is how to get your products across to your customers.
Shipping plays a critical role in your customers’ experience and how they perceive your brand. Generally, the shipping experience of your customers is determined by the efficiency, speed, and cost they have to pay to get their products shipped to their location.
The great news is that the platform offers numerous built-in shipping options and features that you can explore to give your customers a variety of methods to choose from. It also ensures that you give more precise shipping rates.
With the built-in features in the WooCommerce eCommerce tool, you can set up shipping discounts, such as offering customers free shipping when they order a specific volume. In this post, we will provide detailed information on how you can configure shipping options in WooCommerce.
Steps to Configure Shipping Options in WooCommerce
After installing and activating the WooCommerce plugin on your site, you will need to fill out some pages of details to set up your account. One of the pages is your Shipping page. There is so much you can do with your shipping page and you can even add extensions to make it more robust.
However, if you are just getting started, you can start with the basics, and with time, you can explore more features to give your customers a seamless shipping experience. The first setup you must complete when you want to set up shipping in WooCommerce is shipping zones.
Next, you have to add specific shipping options to the zones and then include the shipping rates for each method. You have the freedom to create many zones and include multiple options and rates for each zone. We will look at these setup stages to get your WooCommerce shipping up and running.
How to Add Shipping Zones
Shipping zones are the geographical areas where you would want to ship your products. How you set this up will depend on how specific you want to get. You can make it more general or be very specific to the point of adding zip codes and regions. It all depends on what you want.
Your customers will only see the shipping options available for their address and the corresponding zone. Each customer address will match only one zone. For instance, you can create different zones for local, domestic, and international customers.
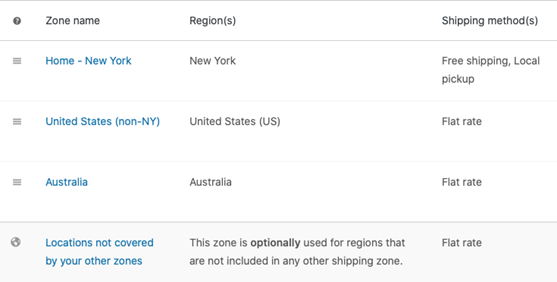
You can go further to break the international zones into continents or countries. For each zone, you should include the region and the shipping options available for each of them.
Steps to Add and Manage Shipping Zones
Follow the steps below to set up shipping zones on your WooCommerce platform: • Navigate to WooCommerce and then “Settings”
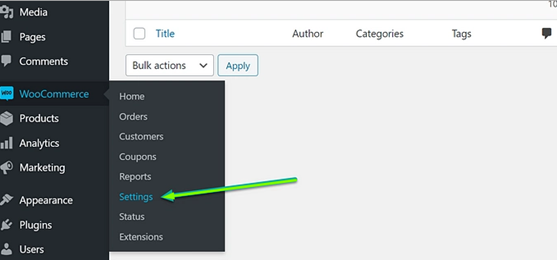
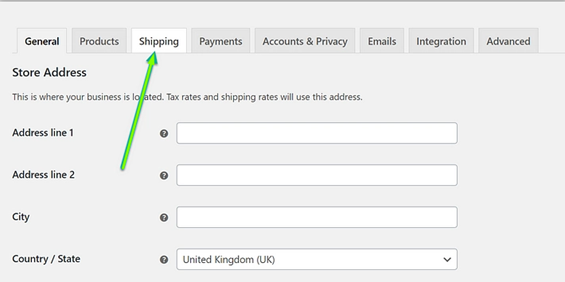
• Next, click on “Shipping” If you cannot see the option of “Shipping” you should return to “WooCommerce” and then click on “General”. Preview the settings on the Shipping Locations to see how you can enable “Shipping” settings.
• If you are visiting the “Shipping” section of WooCommerce for the first time, you will be prompted to include a new and default zone. • From the “Shipping” section, click on “Shipping Zones.”
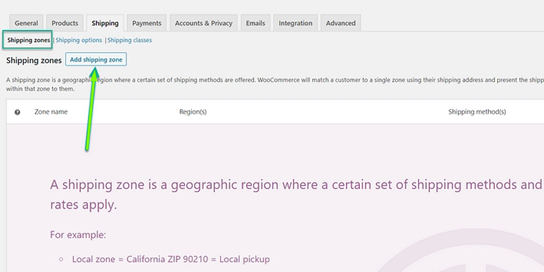
• From the top bar, select “Add Shipping Zone” and provide a descriptive Zone Name in the available space. Next, select “Zone Regions” that apply to the zone name you have chosen. The regions can contain Continents, Countries, and States. • To narrow the customers that match a specific zone, choose “Limit to Specific Zip/Postcodes where applicable. • Select the specific “Shipping Options” that are available for the zone and save the changes.
How to Sort and Reorder Shipping Zones
Shipping zones should match the customers’ addresses from top to bottom. Usually, the first zone that matches a customer’s address will be used. If none of the custom zones matches the customer’s address, “Locations not covered by your other zones” will apply. Here is how to sort and reorder zones in WooCommerce.
• Navigate to WooCommerce and click on “Settings” and then “Shipping.” Next, click on “Shipping zones.” • Hover your mouse on the far-left side and click on any space. You will see a four-point icon on the screen. Simply drag and drop.
How to Edit the Shipping Zones
If you notice any error after going through the zones you have included, you can edit and correct it. To edit a shipping zone, follow the steps below:
• Navigate to WooCommerce and then “Settings” and “Shipping.” Click the “Shipping Zones” menu. • Hover your mouse on “Zone Name,” and two options, “Edit” and “Delete,” will appear. • Select “Edit,” and a pop-up window will appear. Make all the changes you want. You can change the name, shipping options, and regions. • When you are done, click “Save Changes.” It should be noted that you cannot move, delete, or rename the “Locations not covered by your other zones” because it functions as a default when there is no other zone that applies. • Just as you click on “Edit” when you want to make changes, you can click on “Delete” if you want to delete a shipping zone.
How to Configure Shipping Options to Zones
So far, we have looked at how to configure zones, add and edit zones. In this part, we will look at how you can configure a shipping option to an existing shipping zone.
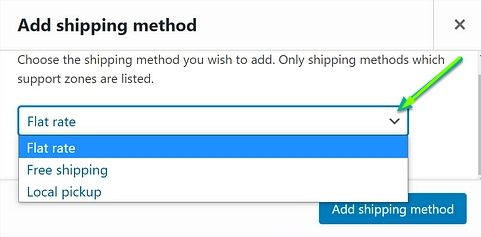
• Navigate to WooCommerce and click on “Settings.” Next, click on “Shipping” and then “Shipping Zones.” • Hover your mouse on the “Shipping Zone” that you want to configure its shipping options and click on “Edit.” • A new window will pop up. Scroll down to “Shipping Methods” on the window. • Select “Add Shipping Method” to add a new shipping option and click “Save Changes.”
It should be noted that only the shipping options that support the Shipping Zones are included. If you want to add another method that does not support the Shipping Zone, it will show in the navigation menu and function independently of Shipping Zones. You can also remove shipping options from zones. To do this, follow the steps below:
• Navigate to WooCommerce and click on “Settings.” Next, click on “Shipping” and then “Shipping Zones.” • Hover your mouse on the zone you want to change and click on “Edit.” • A new window will appear. Scroll down the window and click on “Shipping Methods.” • Hover your mouse on the method you want to remove and click on “Delete.” • Click on “Save Changes.”
What are the Shipping Rate Options Available in WooCommerce?
There are numerous features available in WooCommerce and they are all designed to help users build an effective online store. These built-in features are simple to use, but you can explore third-party plugins and extensions if you want something complex. The primary and default shipping rate on the platform comes with a shipping calculator.
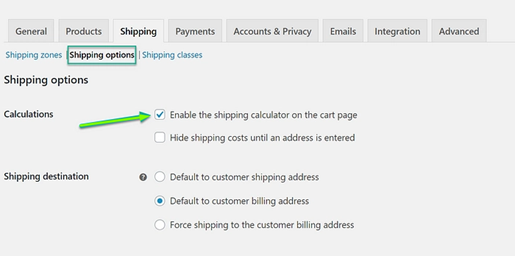
You can find this on the cart. When a customer selects a specific shipping location, the shipping option linked to that location will determine the rate. The shipping rate options that are available in your newly installed WooCommerce are as follow:
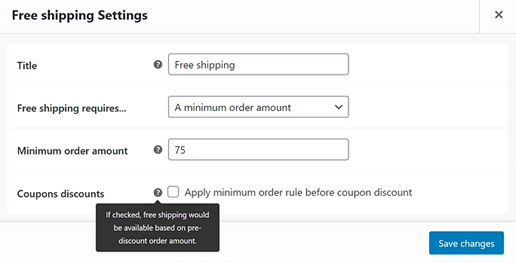
Free Shipping: If you use this shipping rate option, customers will not pay anything to have the product delivered to them. You can use this as a sale mechanism to offer free shipping when customers spend a minimum amount on your online store. You can also use it as a coupon to increase sales in your store.
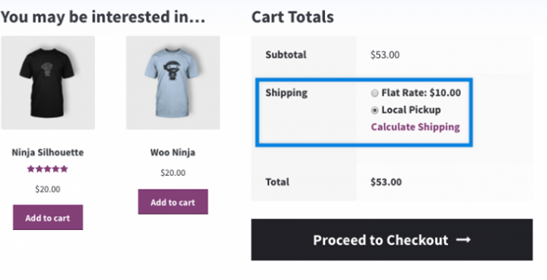
Local Pickup: This option means you do not have to deliver to your customer’s doorsteps. Instead, they will pick up their order from a designated location. Local pickup often does not have any fee attached to it and when there is a shipping fee, it is often minimal.
To use this method, your business must have a physical location where you store and handle products and hand them over to customers.
Flat Rate: This is a simple and predictable shipping cost for you and your customers. It is a standard rate for all shipments that leave your store. The downside to using this shipping rate method is that some customers may pay too high for shipping while some may pay too little.
These are the only shipping rate options that are available on WooCommerce. As mentioned above, WooCommerce allows users to add extensions and plugins to their online stores.
That means that if you want more sophisticated shipping rate options, you can explore third-party plugins and extensions. Some features you can get from shipping rate plugins and extensions are as follow:
Real-time Carrier Rates: this links your shipping page to carrier systems, such as DHL, FedEx, USPS, and UPS, to enable you to get real-time accurate rates for specific locations. This ensures that you give customers 100% accurate shipping values. The downside to this is that your customers have to get to the checkout point before they can see the shipping rate.
Table Rate Shipping: This offers more specific rates based on certain conditions, such as volume, type of product, length of shipping, and date range. Table rate shipping enables fair rates because customers can pay for shipping based on their purchase volume and other conditions.
Local Delivery: Here, you give customers the option to deliver the product directly to them. This is often used by retail stores with a delivery van or truck.
What Plugin and Extensions Can you Explore?
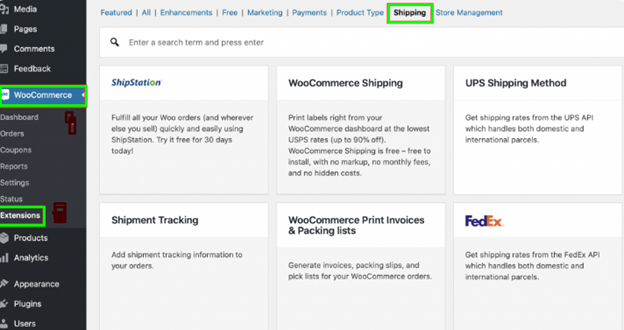
If you want to set up more sophisticated WooCommerce shipping rates, you will need to get a plugin. Many options are available to you including but not limited to:
• WooCommerce Advanced Shipping • WooCommerce Cart Based Shipping • Flexible Shipping • WooCommerce Shipping Tracking • ShipStation Integration • FedEx Shipping method • USPS Shipping Method
Final Thoughts
When configuring WooCommerce shipping settings, make sure you understand the different built-in methods. It would be best if you also take the time to understand what different zones mean for your online store. If you are just getting started with an online store, you can test-run your shipping options with settings like free shipping and flat rates. However, you should consider more advanced extensions and plugins to improve customers’ shipping experience on your site.
How can I create a new shipping option in WooCommerce?
Navigate to “WooCommerce” and click on “Settings” and then “Shipping Zones.” Hover your mouse over the zone you want to change and click “Edit. Click on “Shipping Methods” on the pop-up window and then click “Add Shipping Method.”
What are the default shipping options available on WooCommerce?
There are three default shipping methods on the platform: local pickup, free shipping, and flat rate shipping.
Does WooCommerce allow third-party Shipping Plugins and Extensions?
Yes, WooCommerce allows users to install and activate third-party shipping plugins and extensions on its platform. It is compatible with shipping carriers, such as FedEx, DHL, USPS, among others.
Can I Offer free Shipping with WooCommerce?
Yes, WooCommerce allows its users to offer free shipping to their customers. Free shipping is one of the three default options that are available on the platform.